Learn AutoCAD with our Free Tutorials
Welcome to CADTutor
CADTutor provides the best free tutorials and articles for AutoCAD, 3ds Max and associated applications along with a friendly community forum. If you need to learn AutoCAD, or you want to be more productive, you're in the right place. See our tip of the day to start learning right now!
Free Tutorials and More…
The Tutorials section provides over 100 original tutorials for AutoCAD, 3ds Max and other design applications. Michael’s Corner is an archive of productivity articles that brings you the best AutoCAD tips and tricks. Our Forum is a lively community where AutoCAD users can ask questions and get answers. The Downloads area provides free AutoCAD blocks, free AutoLISP routines and free images.
Tutorials of the Moment
Recently viewed tutorials
-
AutoLISP Quick Start

This tutorial is designed to help AutoCAD users get to grips with AutoLISP quickly. It demonstartes how to create AutoLISP routines from a standing start. Format: Text/Image
Last visited: less than one minute ago
-
Landscape Materials

Efficient landscape modelling demands the ability to create realistic looking surfaces, edges and objects quickly and precisely. This tutorial discusses the issues. Format: Text/Image
Last visited: 3 minutes ago
-
Dimensioning

This tutorial describes the options and commands available for dimensioning drawings and how to use them. The correct use of AutoCADs dimension tools is the key to producing clear and concise measured drawings. Format: Text/Image
Last visited: 9 minutes ago
-
Edges

Edges exist where one surface meets another. Usually an edge is a surface edge detail such as pavers, a retaining wall or stepped features such as steps or terracing. This tutorial explores ways of working with them to create 3D elements. Format: Text/Image
Last visited: 10 minutes ago
-
Object Snap

A tutorial giving an overview of all the AutoCAD object snaps (osnaps) with some worked examples. The tutorial also covers the use of temporary tracking points and object snap tracking. Format: Text/Image
Last visited: 10 minutes ago
-
Object Properties

This tutorial describes how to control the display of objects (colour, linetype etc.) using layers. It also explains what layers are and how they should be used. Format: Text/Image
Last visited: 13 minutes ago
CADTutor Tutorials
Our tutorials are comprehensive but straightforward introductions to AutoCAD and related software. They are designed to help beginners get to grips with design workflows as quickly as possible. There are over 100 to choose from, some text/image based and others in video format. Whatever stage you are at in your learning, you should find a tutorial to help.
Forum Latest
Currently Active Topics
Free Multi Plot Lisp – Fast Batch Printing for AutoCAD, BricsCAD & ZWCAD | Model/Layout, Zone Plotting & PDF Merge
by CamDuy
9 replies
Last post: 1 hour ago
Yet another block manager for BricsCAD
by Danielm103
4 replies
Last post: 1 hour ago
Beyond APPLOAD: A local script manager for those of us with too many LISPs
by VicoWang
13 replies
Last post: 6 hours ago
Insert a copy of the block at the specified point. CopyRenameBlockV1-5.lsp /Lee Mac/
by Nikon
19 replies
Last post: 10 hours ago
Name my Roads
by CivilTechSource
6 replies
Last post: 25 hours ago
Changing the precision of fields
by Nikon
21 replies
Last post: 25 hours ago
This Week's Hot Topics
Beyond APPLOAD: A local script manager for those of us with too many LISPs
by VicoWang
13 replies
Viewed: 907 times
Free Multi Plot Lisp – Fast Batch Printing for AutoCAD, BricsCAD & ZWCAD | Model/Layout, Zone Plotting & PDF Merge
by CamDuy
9 replies
Viewed: 609 times
Name my Roads
by CivilTechSource
6 replies
Viewed: 463 times
North direction in AutoCAD drawing does not match my real-world compass direction
by CHICHA
4 replies
Viewed: 451 times
Yet another block manager for BricsCAD
by Danielm103
4 replies
Viewed: 94 times
Python BRep sample
by Danielm103
1 reply
Viewed: 252 times
CADTutor Forums
Our forum is a vibrant community of experts and beginners. The main focus is helping beginners get to grips with AutoCAD and to help more advanced users become more productive. The AutoLISP forum is one of the busiest out there, providing expert advice for busy professionals.
AutoCAD Productivity
Text Frame on Mtext
From: AutoCAD Productivity Articles #148
Originally published: October 2016
Yes, you can Enclose Text in Objects from Express Tools — See Michael's Corner, June 2004 — but when using the Text Frame property on Mtext, the frame adjusts when you size the Mtext or change the text content!
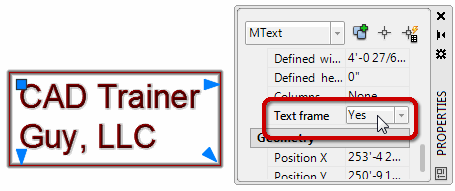
Just select your Mtext, open Properties [Ctrl 1], then set Text Frame to <Yes>.
To test it, change the size of your Mtext or edit the content and the frame automatically adjusts!
See all the articles published in October 2016
Michael's Corner
Between 2003 and 2016, Michael Beall (and one or two guests) wrote almost 600 articles for CADTutor. The focus of these articles is AutoCAD productivity, and although some of them are now more than a few years old, most remain relevant to current versions of AutoCAD. The article above is just one example. Check out Michael's Corner for a full listing.
Image of the Week
-
27th July to 2nd August 2026

This week's image is by Lazarus
Software used: AutoCAD 2009
-
Last Week's Image

Last week's image is by BenGoble
Software used: 3ds Max
-
Two Weeks Ago

This image is by boofredlay
Software used: SketchUp and V-Ray
-
Three Weeks Ago

This image is by Red333
Software used: AutoCAD 2009
Gallery of Work
Over the years, our forum members have contributed hundreds of images, showcasing their amazing work. The images above are just a small selection that demonstrate the wide range of project types our community is involved with. Take a look at our gallery to see all the images published in the last 12 months.
Tip of the Day
Do you want to turn it into one? <Y>
When using PEDIT and selecting an object which is not a polyline you will get a message asking if you want to turn it into a polyline. This can be quite annoying if you're having to create closed polylines from a bunch of lines. To stop getting this message, type PEDITACCEPT and press Enter. Then type 1 and press Enter. This will automatically answer "yes" to the question in future.
Missed a Tip?
Did you miss yesterday's tip? Maybe you forgot to drop by or maybe you don't visit over the weekend. If so, you can now see all the tips published during the past week. Also, if you have a tip you'd like to share with us, you can post it on our forum and if we like it, we'll publish it here.