Leaderboard


Popular Content
Showing content with the highest reputation on 12/17/2025 in Posts
-
Note that you can use my Layer Director to preset & reset a layer (including layer creation) for both standard and custom commands: https://lee-mac.com/layerdirector.html2 points
-
You can just use the following entry in the layer list to achieve the result you require: ("CENTERLINE" "CENTERLINE" "" 7 "Continuous" -3 1 nil )1 point
-
The " . " is the only thing stopping your lisp from running the first 25 lines of your code in an infinite loop. If you gave that lisp to someone them typing centerline in the command prompt would run your code not the default centerline command. as it is "overwritten" I'll post some examples tonight. but off the top of my head I created shortcuts to commands like ;;----------------------------------------------------------------------------;; ;; Create Cricle from picking 3 Points (defun C:C3P () (command "._CIRCLE" "_3P"))1 point
-
mhupp, Your suggestion and generous code submission are both very well received: Thank you! I will rework the "robot" program code to include your superior code lines. Questions Outside of the important warning applied to LISP programming and variables, Can you or others give an example(s) of instances of how a programmer/customizer can modify default commands? Would this action be limited to creating macro code lines to assign to custom buttons? Future After stalling out, I am now at a DWG-based design environment and will resume my LISP programming studies. I was recently encouraged by understanding how to use the built-in IDE. P.S.: My thanks go out to the excellent developer and programmed systems just developed from a longtime fellow member of other forums and entrepreneur running https://cadprograms.ca/ Thanks, Clint1 point
-
Try PSLTSCALE.1 point
-
Yes. I know. I already mentioned that this problem could arise on some long segments during turns. I didn't want to delay posting again to fix this. But I already have an idea of how to solve it. I'll post the solution as soon as I can.1 point
-
When you are trying tricks like these AutoCAD is very fussy that you do things correctly, in your block there are no actions that match up with you linear parameters, there also needs to be an object selected for those actions, watch that second video you linked too at about the 5.30 minute position your parameters also need to be set as a list of defined measurements. This is a tricky subject to get the hang of, but well worth the effort. And a tip it is much easier to keep your linear parameters horizontal and stacked above each other as in that video it just makes it easier to see what is what and keep your actions organised as well.1 point
-
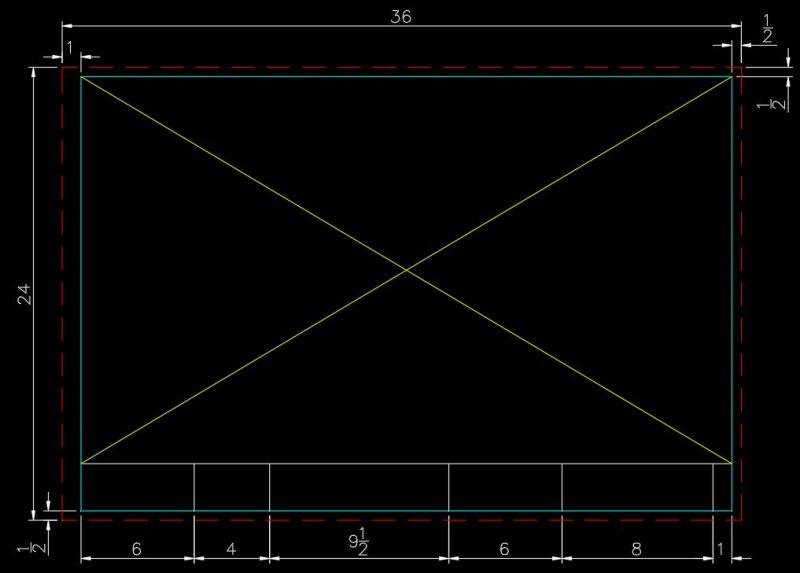
I recently had a student message me regarding the title block and border asking for help drawing it. Of everything the student is asked to draw for this project the title block and border should be the easiest task to accomplish. The full instructions are on page 16 under the heading "Preparing the plat map for plotting." The student is given the overall size of the drawing (24x36), the minimum offset from the cutting edge to the border (1/2") and the offsets for the title block area at the bottom of the sheet. Note that I elected to increase the left hand offset from 1/2" to 1". I've reproduced them here for your benefit. Note: the colors I used are for display purposes only and may not be those called for in the instructions. Keep in mind that when you are finished the title block and border are going to be the size of a postage stamp compared to the subdivision or plat map. It has to be scaled up. A scale factor of 50 will do quite nicely. Once the title block and border has been saved as a block insert the block and specify the scale I just gave you then move the block into position around your plat map. Oleson Village and the surrounding streets should fit quite nicely in the area where you see the yellow "X" in the image above. The red dashed line is considered the cut line. The cyan colored lines are the border. Got it? Good. Now go do it. Warning: do NOT ask me to give my title block and border block. Ain't going to happen. No how...no way.
 1 point