

Advanced Selection
See also, Object Selection
Introduction
The selection tools described in the Object Selection tutorial are fine if you only need to pick a few objects at a time or if you can easily see the objects you want to select. Sometimes though, your selection requirements may not be quite so simple. AutoCAD enables you to create selection sets by building database style queries that can make complex selections really quick and accurate. This tutorial describes the use of AutoCAD's advanced selection tools and how the selection options can be configured for better selection efficiency.
Quick Select
| Toolbar | not available |
| Pull-down | Tools |
| Keyboard | QSELECT |
Quick Select made it's debut in AutoCAD 2000 and is designed to help users make complex selections quickly. It is also designed to be a simplified version of the Filter command, detailed below. Quick Select allows you to make selections based upon object properties. Say, for example, that you needed to select all circles on a layer called Water. Quick Select can help you do this. If you look at the dialogue box below, you will see that there are a number of parameters to set. To select all circles on the Water layer, you would make the settings shown in the dialogue box.
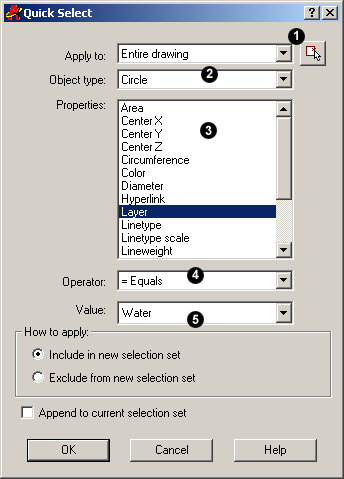 Let's have a closer look at the selection parameters in the Quick Select dialogue box. As with all dialogue boxes, it is important to move methodically through the various parameters. It is even more important in this case because the choices you make at the beginning of the process will affect the options available to you later. Start at the top of the dialogue with "Apply to" and work your way down.
- The "Apply to" parameter can be used to cause the selection to be made from the entire drawing or from a selected part of the drawing. Use the Select objects button to create a selection set from which your more detailed selection will be made.
- The "Object type" parameter allows you to select objects such as circles, lines etc. The drop-down list contains an inventory of all the different object types in the current drawing. If your selection is to be made from more that one object type, select "Multiple". Note that this parameter only allows you to select one object type or all objects. This is one limitation of Quick Select, although you can append selections to create compound selection sets, see below. However, if you want to make complex selections based upon multiple selection criteria, you may be better of using the more advanced features of the Filter command described below.
- The "Properties" parameter allows you to specify which paricular property of an object type to apply to the selection. For example, circle properties include radius, diameter and circumference in addition to the standard object properties like layer and colour. So you could select all circles with with a particular radius or all circles on a particular layer.
- The "Operator" parameter determines how the value is applied to the selection. For example, using the equals option with a circle radius and a value set to 24 would mean all circles with a radius of 24 are selected. However, other options available for the operator parameter allow you to select all circles of radius less that 24 or greater than 24 or even all circles except those with a radius of 24. Pretty amazing huh?
- The "Value" parameter is used to specify the value of the property you have already chosen. For example, if you had specified Circle and Radius as your object type and property, you might enter "24" as a value. All circles with a radius of 24 would be selected. Or if you had specified Circle and Layer as your object type and property, you could select a layer name such as "Water". In this case, all circles on the layer called Water would be selected.
Finally, using the "How to apply" box, you have the option to have the selected objects either included or excluded from the new selection set. In addition, you can also have this selection appended to the current selection set. The "Append to current selection set" option is particularly useful because it means that you can use Quick Select repeatedly to build up compound selections. For example, you could use Quick Select to select all blue circles and then use it again to select all blue lines. Appending the blue lines selection to the blue circles selection would mean that you end up with a selection of all blue lines and circles.
As you can see, this is a very powerful tool and takes a little time to get used to. However, it is well worth making the effort as it can drastically improve your drawing efficiency. For your convenience, Quick Select is also available from the right-click context menu.
Object Selection Filters
It may sometimes happen that you need to create a selection set of objects based upon one or more of their properties. For example, you may want to select all objects on a particular layer or more particularly, you may even want to select all circles on that layer. This type of selection is relatively easy with the Quick Select command discussed above. However, what if you wanted to select all green circles and lines on a particular layer? As good as Quick Select is, it cannot create selections from so many parameters. Fortunately AutoCAD provides a method to filter objects based upon a wide range of selection criteria.
| Toolbar | not available |
| Pull-down | not available |
| Keyboard | FILTER or FI |
 An AutoCAD drawing is simply a database of objects and their properties. Using the Filter command you can define a query just like you would in a database. If you look at the Object Selection Filters dialogue box, shown above, you will see that a filter has been defined that will select all circles on the "Construct" layer.
To create a filter, click the arrow on the drop-down list in the Select Filter area and select the object type or property you would like to add to the filter list. Click on the "Add to List" button. You can add as many object types or properties to the list as you like. Having defined a filter list you can either use it as a one-off or you can save it as a named filter by typing a name in the Save As edit box and then clicking the "Save As" button. Your named filter will then be added to the Named Filters drop-down list and you can use it again at any time.
Although you can create filters using the Filter command from the command prompt, you will mostly want to use it during the course of a selection operation. Fortunately, the Filter command can be used transparently. This means that it can be used whilst another command is still running. To get an idea how this might work, follow the example below.
Create a Drawing
- Start a new drawing, click on
 and select "Start from Scratch" from the Create New Drawing dialogue box.
 - Use the Layer command,
 from the toolbar or Format
 Layer… from the pull-down menu to create two new layers called "Construct" and "Boundary". Set the Construct layer colour to Green and the Boundary layer colour to Red. Set the current layer to "Construct".
Note: If you need more information about layers, see the "Object Properties" tutorial.
- Draw a selection of objects, lines, polylines, ellipses etc. including several circles.
- Set the current layer to "Boundary" using the Object Properties toolbar.
- Draw some more circles.
- Now you are going to erase just the circles on the Construct layer, so start the ERASE command,
 from the Modify toolbar or ModifyErase from the pull-down menu.
Compile the Filter
- At the "Select objects" prompt enter 'filter. The apostrophe is very important, it tells AutoCAD that you want to use a command transparently.
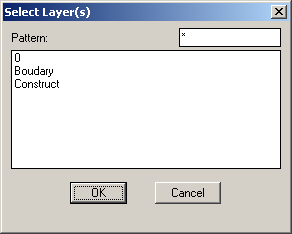
- When the Object Selection Filter dialogue box appears, select "Layer" from the drop-down list. The list is arranged alphabetically so you will need to scroll down the list to find it. When you have selected "Layer", click on the "Select…" button. The Select Layer(s) dialogue box appears, select "Construct" from the list and click the "OK" button. You are now returned to the Object Selection Filter dialogue box, click the "Add to List" button, your layer selection is added to the list which now displays "Layer = Construct".
- Next, select Circle from the drop-down list and click the "Add to List" button. "Object = Circle" is added to the list below the Layer entry. You have now completed the filter list.
Apply the Filter
- Click on the Apply button. The dialogue box disappears and you are returned to the "Select objects" prompt. The principle behind the filter list you have just compiled is that when applied to a selection, all objects which do not match the listed criteria will be filtered out. The simplest way to apply this filter to the whole drawing is to use the All selection option. Enter all at the prompt. All objects are selected but the filter ensures that all objects except the circles on the Construct layer are filtered out.All the circles on the Construct layer are highlighted to indicate that they are selected. and you are returned to the "Select objects" prompt.
- Enter
 at the prompt, AutoCAD responds:
Exiting filtered selection.
You now see the "Select objects" prompt again because you can add objects to the selection set without them being filtered. Enter again to complete the command. The green circles are erased, leaving all other objects unaltered.
This whole process may seem very long-winded but when you have to make this type of selection on a complex drawing you will thank your lucky stars that the Filter command exists. However, if your selection requirements are more reasonable, try the Quick Select command as an alternative to using Filter.
Object Selection Modes
| Toolbar | not available |
| Pull-down | Tools |
| Keyboard | DDSELECT |
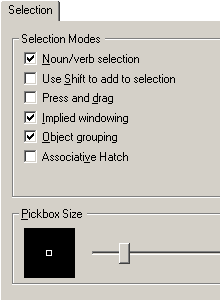
The Selection tab of the Options dialogue box (extract shown on the right) can be used to control many of the settings that have been discussed above and some that have not. In general it is advisable not to change any of the default settings unless you have good reason to do so.
Noun/Verb Selection allows you to select objects either before or after starting a command when it is checked.
Use Shift to Add, does just that when checked. The default is to remove objects when shift picking, as described above.
Press and Drag enables selection windows to be defined by picking and then dragging the mouse when checked. The default method for defining a selection window is to use two pick points.
Implied Windowing enables this type of selection when checked. See "Implied Windowing" above for details.
Object Grouping enables a group of objects to be selected by picking only one of the objects in the group when it is checked.
Associative Hatch causes a hatch boundary to be selected along with the hatch when it is checked.
Pickbox Size
You can also use the Selection tab of the Options dialogue box to change the pickbox size. Use the slider bar to increase or decrease the size. The larger the size of the pickbox the wider the area in which AutoCAD looks for objects. Generally the pickbox is better set to a smaller size to make picking more accurate. The default setting works very well and it is unlikely that you will need to change it.
Object Sorting Methods
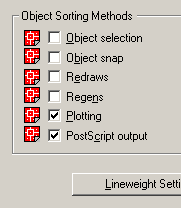 Object sorting methods are controlled from the User Preferences tab on the Options dialogue box, Tools
![]() Options… from the pull-down menu. The object Sorting Methods section of the dialogue is shown on the right. These options enable you to optimise the way objects are selected with respect to different operations. Objects will be added to selection sets in the order in which they appear in the drawing database for each method that is checked. Although the "Plotting" and "PostScript Output" methods are the only ones set by default, it is often advantageous also to check the "Object Selection" method so that more recent objects are selected before older ones for general drafting. Since processing time is increased for each additional method selected, it would also be advantageous to uncheck the "PostScript Output" method unless you intend to use PostScript output, of course.
Options… from the pull-down menu. The object Sorting Methods section of the dialogue is shown on the right. These options enable you to optimise the way objects are selected with respect to different operations. Objects will be added to selection sets in the order in which they appear in the drawing database for each method that is checked. Although the "Plotting" and "PostScript Output" methods are the only ones set by default, it is often advantageous also to check the "Object Selection" method so that more recent objects are selected before older ones for general drafting. Since processing time is increased for each additional method selected, it would also be advantageous to uncheck the "PostScript Output" method unless you intend to use PostScript output, of course.
Donate to CADTutor
If you found this tutorial useful, you might like to consider making a donation. All content on this site is provided free of charge and we hope to keep it that way. However, running a site like CADTutor does cost money and you can help to improve the service and to guarantee its future by donating a small amount. We guess that you probably wouldn't miss $5.00 but it would make all the difference to us.
Local Navigation
Sponsored Links
The Basics
- Dual Dimensions in a Dim…
- UCSICON Options
- "Best of" Basics: Irreg…
- Tool Palette Basics
- Original Dimension Value
- Possible Solutions to th…
- Avoid Using 'Standard' i…
- Shorten the Plot Scales…
- Update the Source File B…
- User Increment Angles fo…
- Drawing Information
- 'Sign Language'
- Rotate with the Copy Opt…
- Use the INSERT Osnap on…
- To or From the Current L…


