

User Co-ordinate Systems
Introduction
This tutorial describes what UCSs are, why we need them and how to use them. The correct use of UCSs with AutoCAD is the key to producing good 3D models and they can also help with 2D work. If you just want to quickly find a description of the UCS options, click on the appropriate button on the QuickFind toolbar below.
What is a UCS and why do I need one?
AutoCAD started life as a two-dimensional drafting program. It was not designed for 3D. Almost all the AutoCAD drawing and edit commands can only work in 2D (the exceptions being commands like 3DPOLY and 3DFACE). When Autodesk, the makers of AutoCAD incorporated 3D into the program they needed some method for doing so without completely rewriting the software. The method they decided upon has become known as UCS, User Co-ordinate Systems.

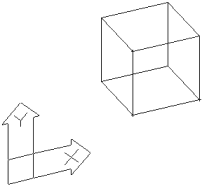
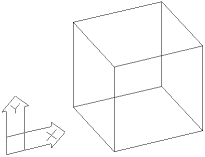
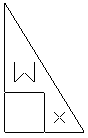
When you first start up AutoCAD you are presented with a plan view of the drawing area. In the bottom left hand corner of the drawing area is an icon, known as the UCS icon. The icon looks like the illustration on the right and shows 3 specific bits of information. First, the icon contains a figure X and an arrow which points from left to right along the bottom of the screen. Second, the icon contains a figure Y and an arrow head which points from bottom to top along the left hand side of the screen. These first two parts of the icon indicate the position and direction of the X and Y axes. As your cursor moves over the screen area you can see the change in X and Y co-ordinates by watching the co-ordinate status
area at the bottom left of the screen (X,Y,Z). X and Y co-ordinates increase in the direction indicated by the UCS icon. ![]() By implication the Z axis points straight out of the screen towards us. If you have just opened a new drawing the Z co-ordinate
will appear as "0.0000" in the status bar and will not change as you move the cursor because you are only moving in the XY Plane. The third piece of information contained in the UCS icon is the letter W. The W stands for "World" and indicates that you are using the World Co-ordinate System.
By implication the Z axis points straight out of the screen towards us. If you have just opened a new drawing the Z co-ordinate
will appear as "0.0000" in the status bar and will not change as you move the cursor because you are only moving in the XY Plane. The third piece of information contained in the UCS icon is the letter W. The W stands for "World" and indicates that you are using the World Co-ordinate System.
You can think of the World Co-ordinate System as representing the real world. The 2D drawing plane that you see in plan when you first start AutoCAD can be thought of as the ground under your feet. This plane is known as the XY plane.
As mentioned above, almost all drawing with AutoCAD happens in 2D. For example to draw an open ended box you would simply draw a rectangle in plan and then use Change Properties to give it a thickness. Notice that to produce this 3D box you have only worked in 2D. To produce a 3D effect all you have to do is to change one of the 2D rectangles parameters i.e. its thickness. No actual drawing was done in 3D.
This method works very well for simple 3D objects, but say you wanted to draw a circle on one of the vertical faces of the box you have just drawn. Using only the World Co-ordinate System this would be impossible because circles (like many other AutoCAD entities) can only be drawn in the XY plane.
AutoCAD gets round this problem by allowing you to move the XY plane into a different position. For example, to draw a circle on the vertical face of a box you would need to move the XY plane in such a way that it lay coplanar (in the same plane) with the vertical face of the box.
By moving the XY plane you are by definition changing the co-ordinate system. In fact AutoCAD takes this analogy and turns it around. To move the XY plane the user (i.e. you) must create a new co-ordinate system, in other words, you must define a User Co-ordinate System.
 |
 |
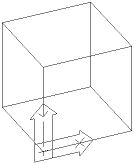
| Orientation of the UCS icon in an oblique view with the World Co-ordinate System. |
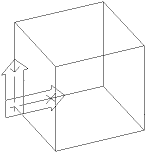
Orientation of the UCS icon in an oblique view with a User Co-ordinate System which is coplanar with the front vertical face of the box. |
As you can see from the two illustrations above, the UCS icon shifts its position to indicate the orientation of the current User Co-ordinate System. Also, when you are working in a UCS the W disappears from the icon to indicate that you are no longer in the World Co-ordinate System.
How do I define a UCS?
AutoCAD provides a number of ways to define a User Co-ordinate System. All of these options are available to you when you use the UCS command.
The UCS Command
| Toolbar | |
| Pull-down | Tools |
| Keyboard | UCS |
When you start the UCS command from the keyboard or from the toolbar you are presented with lots of options on the command line:
Origin/ZAxis/3point/OBject/View/X/Y/Z/Prev/Restore/Save/Del/?/<World>:
These options will be described later.
Note that the pull-down menu allows direct access to all of these options. You can also gain direct access to the options from the fly-out UCS buttons on the standard toolbar or from the UCS toolbar.
First let's have a look at a practical example of defining a UCS using the 3point option.
The 3 Point Option
| Toolbar | |
| Pull-down | Tools |
| Keyboard | UCS |
The 3point option prompts you to pick 3 points in space which it uses to define the position of the new XY plane. The three points represent three positions in the new XY plane. The first point will become the origin of the new co-ordinate system. The second point can be any point on the positive portion of the X axis. The third point can be any point on the positive portion of the Y axis. The illustration below shows the three points you could pick to define a UCS with an XY plane which is coplanar with the front face of the box.
This is a very common sequence which you may need to use in order to draw windows and doors on a building elevation.
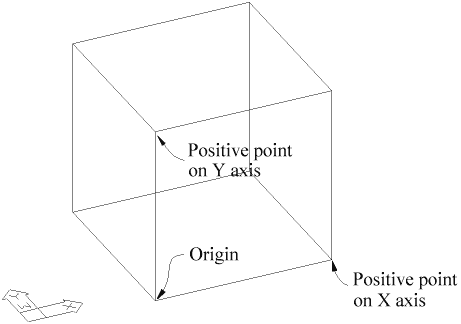
Make sure you use the Endpoint Osnap to pick the corners of the box.
An Example
Let's go through the sequence of defining a UCS and then using it to draw on the vertical face of a box.
1. Draw the box
Start AutoCAD and draw a square with sides of 50 drawing units using the Rectangle command.
Select Rectangle from the Draw toolbar. ![]()
At the Chamfer/Elevation/Fillet/Thickness/Width/<First point>: prompt, pick a point near the middle of the drawing area.
At the Other corner: prompt, enter @50,50 at the keyboard (the @ indicates a relative co-ordinate). The square is now drawn at the required size.
Using Properties give the square a thickness of 50 drawing units.
Select Properties from the Object Properties toolbar. ![]()
Select the rectangle at the Select objects: prompt and enter 50 in the Thickness edit box.
Next, change the view using the DDVPOINT command, setting the
angle from the X Axis to 245 degrees and the angle from the XY Plane to 30 degrees. You can find this command on the view pull-down (View![]() 3D Viewpoint
3D Viewpoint![]() Select…)
Select…)
Your box should now look similar to the one in the illustration above.
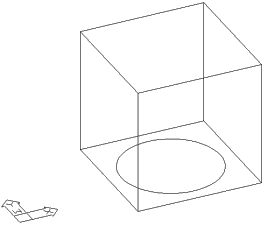
2. Try to draw a circle
Try to draw a circle on the front vertical face of the box. Start the Circle command (select ![]() from the Draw toolbar), pick a centre point near the middle of the front vertical face of the box and enter a radius of 20. Notice that the circle ends up flat in the World XY plane.
from the Draw toolbar), pick a centre point near the middle of the front vertical face of the box and enter a radius of 20. Notice that the circle ends up flat in the World XY plane.
3. Start the UCS Command
Start the UCS command by typing "UCS" at the keyboard or by selecting ![]() from the UCS toolbar.
from the UCS toolbar.
Origin/ZAxis/3point/OBject/View/X/Y/Z/Prev/Restore/Save/Del/?/<World>:
Type "3" to select the 3point option at the prompt.
Origin point <0,0,0>:
The default (0,0,0) refers to the origin of the current UCS. Using the Endpoint Osnap select the lower front left hand corner of the box (refer to the illustration above).
Point on positive portion of the X-axis <23.00,16.00,0.00>:
Using Endpoint again, select the lower front right hand corner of the box.
Point on positive-Y portion of the UCS XY plane <22.00,17.00,0.00>:
Pick the upper front left hand corner of the box (don't forget Endpoint!).
Note: The default co-ordinate values shown in triangular brackets at your command prompt will probably be different from the ones shown here, this will make no difference to the final result.
Notice that two things have happened to the UCS icon. The icon has changed position to reflect the orientation of the current UCS and the W has disappeared to tell you that you are no longer in the World Co-ordinate System.
4. Now try drawing that circle again
Now that you have successfully defined a UCS you should be able to draw that circle on the front face of the box. Draw a circle of 20 units radius with its centre near the centre point of the front vertical face. Notice that this time the circle is drawn exactly where you wanted it.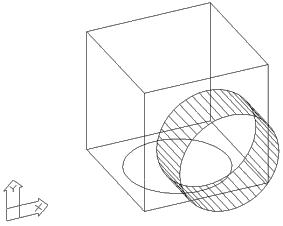
5. Give it a thickness
Once you have defined a UCS all AutoCAD commands will work relative to the new co-ordinate system. In other words AutoCAD treats the UCS just as if it were the WCS (World Co-ordinate System). For example if you give an object a thickness, you know that the object will be extruded in a direction which is perpendicular to the XY plane. Since our XY plane is now in a vertical position relative to the WCS any thickness applied to an entity will cause an extrusion in a horizontal direction relative to the WCS.
Use Properties ![]() to give the new circle a thickness of 20 drawing units.
to give the new circle a thickness of 20 drawing units.
6. Define another UCS
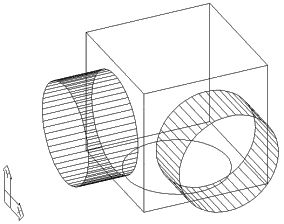 Try the UCS 3point option again, start the command by selecting
 ![]() from the UCS toolbar to pre-select the 3 point option and this time define a UCS on the left hand face of the box. Draw another circle and give it a thickness of 20 units.
from the UCS toolbar to pre-select the 3 point option and this time define a UCS on the left hand face of the box. Draw another circle and give it a thickness of 20 units.
Your finished drawing should look something like the one on the right.
7. Experiment with the Plan command
The Draw and Modify family of commands are not the only ones which work with respect to the UCS. View commands like Plan also change to take the new co-ordinate system into account. You can create a plan view of the current UCS by typing PLAN and ![]() at the command prompt (current UCS is the default option) or you can select it from the pull-down menu at View
at the command prompt (current UCS is the default option) or you can select it from the pull-down menu at View![]() 3D Viewpoint
3D Viewpoint![]() Plan View
Plan View![]() Current UCS.
Current UCS.
Try using the Plan command with different UCS orientations. With a UCS defined as coplanar with the vertical face of a box the UCS plan view will correspond to the WCS elevation of the same face.
Remember, you can return to the World UCS at any time by selecting ![]() from the UCS toolbar or by typing UCS
from the UCS toolbar or by typing UCS ![]() 3 at the keyboard.
3 at the keyboard.
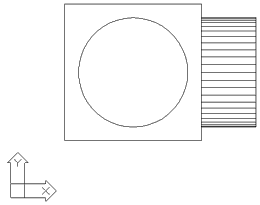
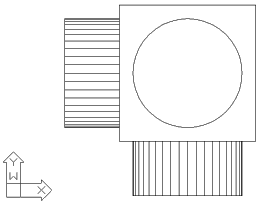
The two illustrations below show this situation. The one on the left shows the result of a plan view with a UCS defined coplanar with the left hand vertical face of the box which you drew in the above exercise. As you can see the result is an elevational view of that face relative to the WCS. The one on the right shows the result of a plan view of the same box with the UCS set to World. In other words this is the true plan view.
 |
 |
Before we go on to have a look at the other UCS command options let's have a look at another command which can help to make life easier when working with UCSs.
The UCSICON Command
The UCSICON command is used to control how the UCS icon is displayed. In the examples above you have been working with the UCS icon in its default position, however there are a couple of options which the UCSICON command provides which can help to prevent certain visual ambiguities. Consider the example below: These two illustrations show a cube. The cube on the left has a UCS set to its front face and the cube on the right has a UCS set to its back face. Notice the problem; you cannot tell by looking at the UCS icon which is which.
 |
|
You can overcome this problem by using the ORigin option of the UCSICON command.
Draw a simple cube like the one above and set the UCS to the front face. Then start the UCSICON command by typing "UCSICON" at the keyboard.
ON/OFF/All/Noorigin/ORigin <OFF>:
The command options are simple:
OFF, the default, turns the UCS icon off. This can be useful if you are working with a complicated drawing and the icon is getting in the way. It is also useful if you are creating an AutoCAD slide file or a bitmap using SAVEIMG and you do not want the icon to show on the image.
ON, turns the UCS icon back on if it has been turned off.
All, applies any change to the UCS icon status to all viewports, not just the current viewport.
Noorigin, displays the UCS icon in the bottom left hand corner of the viewport, irrespective of where the UCS origin is.
ORigin, displays the UCS icon at the UCS origin position.
 You can also toggle the ON/OFF and the ORigin/Noorigin options from the View pull-down menu (View/Display/UCS Icon/options). The UCS icon is set to ON and will display at the Origin when these options are shown as checked with a tick in the menu.
Type OR to select the ORigin option and hit the RETURN key.
Notice that the UCS icon jumps to the bottom left hand corner of the front face of the cube. Now define a UCS on the back face of the cube and watch what happens.
 |
 |
As you can see, by using the ORigin option of the UCSICON command you can be sure that any UCS you define is in the correct position. There is no ambiguity as there was in the previous example.
Notice that the icon shows a small cross at the origin position when this option is activated.
Tips
The UCS icon will only display at the origin position if the origin is in the current viewport. If it is not, the icon will display in its default position. You can test this by using the PAN command to move the UCS origin off screen.
Remember, when you want to put the UCS icon back to its default position just use the Noorigin option of the UCSICON command.
UCS Command Options
Let's now go back and have a look at the UCS command options.
Origin/ZAxis/3point/OBject/View/X/Y/Z/Prev/Restore/Save/Del/?/<World>:
Origin, ![]() defines a new UCS by moving the origin of the current UCS. The orientation of the XY plane remains unchanged. For example, you could have used this option to change the UCS from the front face of the cube to the back face of the cube in the above example.
defines a new UCS by moving the origin of the current UCS. The orientation of the XY plane remains unchanged. For example, you could have used this option to change the UCS from the front face of the cube to the back face of the cube in the above example.
Auto CAD prompts:
Origin point <0,0,0>:
Using an appropriate object snap, pick the new position for the UCS origin.
ZAxis, ![]() defines a UCS with a particular extrusion direction (positive Z axis).AutoCAD determines the position of the XY plane based on the new Z axis.
defines a UCS with a particular extrusion direction (positive Z axis).AutoCAD determines the position of the XY plane based on the new Z axis.
AutoCAD prompts:
Origin point <0,0,0>:
Point on positive portion of the Z axis <default>:
In each case pick the new position using an Osnap.
3point, ![]() You should already be expert with this option, if not see the main UCS command section above.
You should already be expert with this option, if not see the main UCS command section above.
OBject, ![]() lets you define a new UCS by pointing to any object except a 3D Polyline, polygon mesh, or Viewport entity. The new UCS will have the same extrusion direction as the selected entity. The origin of the new UCS and the orientation of its X axis are found according to the rules given in the table above. For objects other than 3D Faces, the XY plane of the new UCS will be parallel to the XY plane in effect when the object was created. For 3D Faces, the XY plane of the new UCS will be coplanar with the face. This can be very useful if you want to draw on a 3D Face.
lets you define a new UCS by pointing to any object except a 3D Polyline, polygon mesh, or Viewport entity. The new UCS will have the same extrusion direction as the selected entity. The origin of the new UCS and the orientation of its X axis are found according to the rules given in the table above. For objects other than 3D Faces, the XY plane of the new UCS will be parallel to the XY plane in effect when the object was created. For 3D Faces, the XY plane of the new UCS will be coplanar with the face. This can be very useful if you want to draw on a 3D Face.
| Object | Method of UCS determination |
|---|---|
| Arc | The centre of the arc becomes the new UCS origin. The X axis passes through the endpoint of the arc, which is closest to the pick point. |
| Circle | The Circle's centre becomes the new UCS origin, with the X axis passing through the pick point. |
| Line | The endpoint nearest the pick point becomes the new UCS origin. The new X axis is chosen so that the line lies in the XY plane of the new UCS. |
| 2D Polyline | The Polyline's or Polyline arc's start point is the new UCS origin, with the X axis extending from the start point to the next vertex. |
| 3D Face | The new UCS origin is taken from the first point, the X axis from the first two points, and the Y positive side from the first and fourth points. |
| Text, Block, Attribute | The new UCS origin is the insertion point of the entity. The new X axis is defined in such a way that the entity will have a rotation angle of 0 in the new UCS. |
View, ![]() establishes a new UCS whose XY plane is perpendicular to your viewing direction (i.e., parallel to the screen). The UCS origin remains unchanged.
establishes a new UCS whose XY plane is perpendicular to your viewing direction (i.e., parallel to the screen). The UCS origin remains unchanged.
 |
 |
One useful application of the View option is to set the UCS for text annotation from the current view position. If you are creating an AutoCAD slide file you may want to annotate a 3D object in an oblique view. The illustration on the left shows the result of adding text in the World Co-ordinate System. The one on the right shows the same text added after using the UCS View option.
X/Y/Z, ![]()
![]()
![]() rotates the current User Co-ordinate System around a specified axis.
rotates the current User Co-ordinate System around a specified axis.
AutoCAD prompts:
Rotation about n axis <0.0>:
where n is X, Y, or Z. You can indicate the desired angle either by picking two points, or by entering the rotation angle at the keyboard. The new angle is specified relative to the X axis of the current UCS. You can enter either a positive or a negative rotation angle.
Previous, ![]() restores the previous UCS. AutoCAD stores the last 10 co-ordinate systems, so you can step back through them by repeating the UCS Previous option.
restores the previous UCS. AutoCAD stores the last 10 co-ordinate systems, so you can step back through them by repeating the UCS Previous option.
Restore, restores a saved UCS so that it becomes the current UCS.
When you enter "R", AutoCAD prompts:
?/Name of UCS to restore:
You must enter the name of a UCS which you have previously saved. If you cannot remember the name, enter "?" and then RETURN at the next prompt to see a list.
Save, names and saves the current UCS. The name can be up to 31 characters long and can contain any of the usual valid DOS characters.(i.e. spaces are not allowed).
When you enter "S", AutoCAD prompts:
?/Desired UCS name:
Enter a valid name or use the question mark option to see a list of current names.
Delete, removes the specified UCS from the list of saved co-ordinate systems.
When you enter "D", AutoCAD prompts:
UCS name(s) to delete <none>:
If you enter the name of an existing UCS, AutoCAD deletes it. You can delete more than one UCS by using wild-card characters or by entering a list of UCS names separated by commas.
?, Lists the UCS you specify, providing the name, origin, and the XYZ axes for each saved co-ordinate system, relative to the current UCS. If the current UCS is unnamed, it is listed as *WORLD* or *NO NAME*, depending on whether or not it is in the World position.
When you enter "?", AutoCAD prompts:
UCS name(s) to list <*>
Either type the name of the UCS you want listed or hit the RETURN key to see a listing for all User Co-ordinate Systems.
World, ![]() sets the current UCS to be the same as the World Co-ordinate System.
sets the current UCS to be the same as the World Co-ordinate System.
The UCS Control Dialogue Box
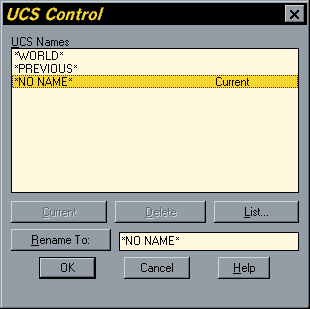 As you have seen the Save, Restore and Delete options allow you more control over the User Co-ordinate Systems you define. However, they are often difficult to use if you can't remember all the names.
The DDUCS command displays a dialogue box which lists all the co-ordinate systems and allows you to do many of the things the UCS command allows you to do in a more intuitive manner.
| Toolbar | |
| Pull-down | Tools |
| Keyboard | DDUCS |
The UCS Control dialogue box displays a list of the co-ordinate systems you have defined. The *WORLD* Co-ordinate System is always the first entry in the list. If other co-ordinate systems have been defined during the current drawing session, a *PREVIOUS* entry appears next. If you haven't named the current co-ordinate system, *NO NAME* appears as the third entry in the list.
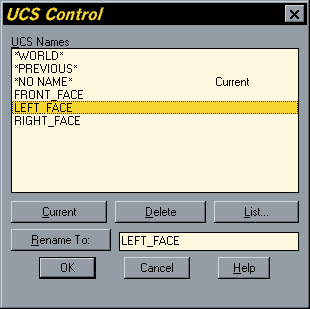 AutoCAD indicates that a co-ordinate system is currently in effect by displaying "Current" next to its name in the list box. To make a different co-ordinate system current, pick its name and select the Current button.
To rename a co-ordinate system, select its name, enter the new name in the Rename To: edit box, and then pick Rename To:. Once a UCS has been renamed, it is saved and can be restored at a later time. The dialogue box on the right has three named User Co-ordinate Systems. To delete a co-ordinate system, select its name and pick the Delete button. You can't rename or delete the *WORLD* or *PREVIOUS* co-ordinate systems.
To save any changes you have made, pick the OK button.
The UCS Follow system variable
Keyboard UCSFOLLOW
Changing from one UCS to another does not change the view of the drawing unless the UCSFOLLOW system variable is turned on (set to 1), in which case a plan view of the new UCS is displayed.
At the command prompt enter "UCSFOLLOW", AutoCAD prompts:
New value for UCSFOLLOW <0>:
Entering "1" turns UCSFOLLOW on and "0" turns UCSFOLLOW off.
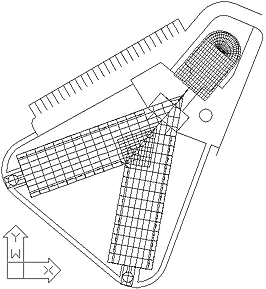
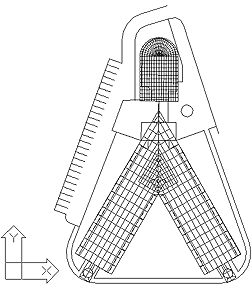
UCSFOLLOW can be particularly useful if you are working in plan on a scheme which is orientated in such a way that it is awkward to work with. Rather than using the Rotate command to rotate the whole drawing you could set UCSFOLLOW to 1 and create a UCS which is in your preferred working orientation. UCSFOLLOW will then simply rotate your view (see the illustration below).
 |
 |
| A plan view of a site in the World co-ordinate system. |
A plan view of the same site with ucsfollow set to 1 and a UCS which is rotated about the Z axis. |
Other UCS Icons
 There are three other common UCS icons which you may come across from time to time.
The "broken pencil" UCS icon (shown right) appears if your view direction is edge-on to the current UCS (or within one degree of edge-on). The icon indicates that you cannot draw in the current view.
 The cube icon indicates that you are in perspective viewing mode. You can produce a perspective view of ant AutoCAD drawing using the DVIEW command. When you are in perspective viewing mode you cannot select objects or use any of the draw commands. These limitations are the same as those in shaded or rendered view.
 The triangular icon illustrated on the right indicates that you are in Paper Space and that Tilemode is set to 0. Note that if you have defined more than one viewport (using the MVIEW command) with Tilemode set to 0 and you are in Model Space, each viewport has its own UCS icon (see
below). However, you cannot define different UCS settings to different viewports. If you set a new UCS in one viewport, the new settings will be applied to all viewports irrespective of which viewport is in current use (see the illustration below).
The triangular icon illustrated on the right indicates that you are in Paper Space and that Tilemode is set to 0. Note that if you have defined more than one viewport (using the MVIEW command) with Tilemode set to 0 and you are in Model Space, each viewport has its own UCS icon (see
below). However, you cannot define different UCS settings to different viewports. If you set a new UCS in one viewport, the new settings will be applied to all viewports irrespective of which viewport is in current use (see the illustration below).
Tips & Tricks
- If you ever get lost in 3D space or you're not sure which orientation your UCS is in, just return to the World Co-ordinate system and use the Plan command.
- Always look at the UCS icon to check whether you are in a UCS or in WCS.
- Remember, the commands you use will always operate relative to the current UCS.
- Always save a UCS if you need to return to it in the future.
- Always be clear in your mind about which are your X, Y and Z axes.
- Use the UCSICON command with the ORigin option to force the icon to appear at the UCS origin point. This can be very useful when the drawing gets complicated because it may be difficult to see where your UCS plane is.
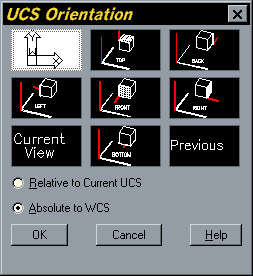 If you want to quickly set the UCS to an elevation (relative to WCS) just use one of the presets available from the DDUCSP command.
The UCS Orientation dialogue box is illustrated on the right. Notice that you can also use this dialogue box to set the UCS to View, Previous and World.
| Toolbar | |
| Pull-down | Tools |
| Keyboard | DDUCSP |
- When you are setting a new UCS it is often easier to do it when looking at your drawing in an axonometric view. Use the DDVPOINT
command (View
 3D ViewpointSelect… from the Pull-down menu) to get a clear view of your drawing.
 - Use the SHADE command (ViewShadeoptions from the Pull-down menu) to see 3D objects more clearly. 3D objects in wireline can look ambiguous.
- Always end your drawing session with the UCS set to World. This avoids confusion next time the drawing is opened.
- When using commands like DDVPOINT and DDUCSP, make sure that the option "Absolute to WCS" is checked otherwise the results can be very confusing.
- If you find working in 3D confusing you can always construct a simple 3D box around your work as a visual reference. It is also a good idea to use a box as a constructional guide for complex shapes.
Donate to CADTutor
If you found this tutorial useful, you might like to consider making a donation. All content on this site is provided free of charge and we hope to keep it that way. However, running a site like CADTutor does cost money and you can help to improve the service and to guarantee its future by donating a small amount. We guess that you probably wouldn't miss $5.00 but it would make all the difference to us.
Local Navigation
Sponsored Links
The Basics
- Dual Dimensions in a Dim…
- UCSICON Options
- "Best of" Basics: Irreg…
- Tool Palette Basics
- Original Dimension Value
- Possible Solutions to th…
- Avoid Using 'Standard' i…
- Shorten the Plot Scales…
- Update the Source File B…
- User Increment Angles fo…
- Drawing Information
- 'Sign Language'
- Rotate with the Copy Opt…
- Use the INSERT Osnap on…
- To or From the Current L…


