Tutorials
CADTutor tutorials are all original and specifically designed to get you working with AutoCAD and other applications as knowledgeably as possible. We don't believe in providing only quick step-by-step tutorials like other sites. Our tutorials are comprehensive and aim to give you a deeper understanding and a better learning experience. See the AutoCAD tutorials page for more information.
If you can't see what you're looking for on this page, take a look at the list of all tutorials and don't forget that there's lots more content in the Michael's Corner section of the site.
We're always on the lookout for good content. If you have a tutorial or an article that you'd like to see published on CADTutor, get in touch using the contact form.
Tutorials of the Moment
The most recently viewed tutorials
Keyframe Animation
|
Units and Scales
|
|
Last visited: less than one minute ago |
Last visited: 1 minute ago |
|
Object Snap
|
Dimensioning
|
|
Last visited: 4 minutes ago |
Last visited: 4 minutes ago |
Featured Tutorials
Tutorials we think you'll like
AutoCAD 2010: Starting a Command
|
AutoCAD 2010: Ribbon Basics
|
|
Last visited: 2 hours ago |
Last visited: 2 hours ago |
|
AutoCAD 2010: The User Interface - Part 1
|
AutoCAD 2010: Getting Ready for 3D
|
|
Last visited: 5 hours ago |
Last visited: 14 minutes ago |
Tip of the Day
AutoCAD's Spell Checker
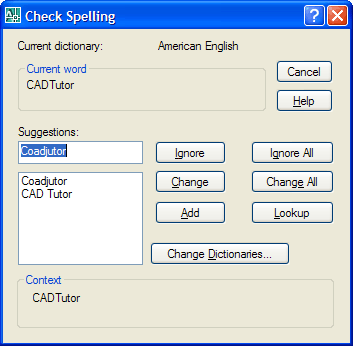
 You can spell check one or more blocks of text using AutoCAD's in-built spell checker. Select from the pull-down menu or just type SPELL at the command line. When prompted, select as many blocks of text as you like and then hit
 ![]() (Enter). What you get is the Check Spelling dialogue box, which works in exactly the same way as the spell checker in Microsoft Word.
(Enter). What you get is the Check Spelling dialogue box, which works in exactly the same way as the spell checker in Microsoft Word.
Missed a Tip?
Did you miss yesterday's tip? Maybe you forgot to drop by or maybe you don't visit over the weekend. If so, you can now see all the tips published during the past week. Also, if you have a tip you'd like to share with us, you can post it on our forum and if we like it, we'll publish it here.
Local Navigation
Featured Tutorial
This tutorial introduces the ViewCube and describes how it can be used for effectively navigating your 3D drawings. Running time: 6min 13sec
Sponsored Links
The Basics
- Dual Dimensions in a Dim…
- UCSICON Options
- "Best of" Basics: Irreg…
- Tool Palette Basics
- Original Dimension Value
- Possible Solutions to th…
- Avoid Using 'Standard' i…
- Shorten the Plot Scales…
- Update the Source File B…
- User Increment Angles fo…
- Drawing Information
- 'Sign Language'
- Rotate with the Copy Opt…
- Use the INSERT Osnap on…
- To or From the Current L…


