

Importing AutoCAD Meshes to Bryce
This tutorial describes how to create a triangular ground model using Key Terra-Firma and AutoCAD and how to import this ground model into Bryce. The import technique described will work with any mesh or complex of 3D faces created with AutoCAD. If you do not have access to Key Terra-Firma, see the Alternative Method section below. This describes how 3D Studio VIZ can be used to create the terrain model.
Although you can create very realistic terrain objects in Bryce, it is often difficult to get them to look just like a real place. However, you can use Key Terra-Firma with AutoCAD to create an accurate terrain model from contour or other height data and then import this into Bryce. There are some limitations. An imported terrain model cannot be edited using the Terrain Editor. However, the imported terrain can be moved, scaled and rotated just like any other object in Bryce. The terrain or mesh can also be smoothed to give a better appearance and you can even apply Bryce terrain materials.
Step 1
 Draw, trace or acquire the contours for the terrain you are interested in. Remember that your contours must be drawn using 2D polylines. Each contour should have an elevation corresponding to its height value. If you are using Terra-Firma, you can give specific elevations to your contours using the "Move Vertically to" command. You will find this on the pull-down menu at KeyT-F
![]() 3D utilities
3D utilities![]() Move Vertically to. See the Contours section of the Ground Modelling tutorial for more tips on drawing contours.
Move Vertically to. See the Contours section of the Ground Modelling tutorial for more tips on drawing contours.
Step 2
Create a ground model (KGM file) using your contours. From the pull-down menu, KeyT-F![]() Ground Modelling
Ground Modelling![]() Create Ground Model…. See The Create Ground Model Command section of the Ground Modelling tutorial for details.
Create Ground Model…. See The Create Ground Model Command section of the Ground Modelling tutorial for details.
Step 3
Once you have created the Ground Model file, you can use it to create a triangular mesh. The triangular mesh is the most accurate representation of the surface which was represented by your contours. You can create a triangular mesh using the Key Terra-Firma Draw Triangles command. You will find this command at KeyT-F![]() Ground Modelling
Ground Modelling![]() Draw Triangles…
Draw Triangles…
First, select the ground model you just created by clicking the button and navigating your way to the file. In some cases your KGM file will already be selected, in which case you can skip this operation.
Now, specify a layer name. Terra-Firma will automatically create a layer if it does not exist. It is a good idea to give your layer a useful name because when the mesh is imported into Bryce, the layer name will be used as the name of the imported object.
Also, choose a suitable colour for the mesh. The colour you choose will be the colour that your mesh appears when it is imported into Bryce.
Finally, set the "Draw as" option to "3D faces" and click on the Start button.
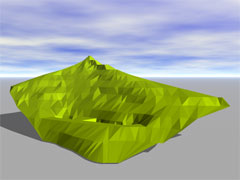
You should now have a triangular mesh, something like the one in the illustration on the left. This is a 3D representation of your contour data.
See The Draw Triangles Command section of the Ground Modelling tutorial for more details on the use of this command.
Step 4
 You must now export your triangles to a 3DS file. Bryce cannot import native AutoCAD (DWG) files and so you must convert your drawing objects to a format that Bryce understands. Bryce can also import DXF files but you will find that the 3DS file format gives much better results.
To export AutoCAD objects to a 3DS file, go to File![]() Export… on the pull-down menu. When the Export Data file dialogue box appears, set the export format to "3D Studio" using the "Save as type" drop-down list at the bottom of the dialogue box. Then, select a location for the file, give the file a name and click the Save button. AutoCAD then prompts, "Select objects:". Select the objects you want to export (in this case, just the triangular mesh) and then press the
Export… on the pull-down menu. When the Export Data file dialogue box appears, set the export format to "3D Studio" using the "Save as type" drop-down list at the bottom of the dialogue box. Then, select a location for the file, give the file a name and click the Save button. AutoCAD then prompts, "Select objects:". Select the objects you want to export (in this case, just the triangular mesh) and then press the ![]() key to complete the selection.
key to complete the selection.
The next thing you will see is the 3D Studio File Export Options dialogue box. You can use this dialogue box to control how the 3D Studio objects are derived from the AutoCAD objects you have just selected. In most cases, as in this one, the default settings are good and nothing need be changed. New objects will be derived by layer. Since the triangular grid is on a single layer, this will result in a single object when the 3DS file is imported into Bryce.
Step 5
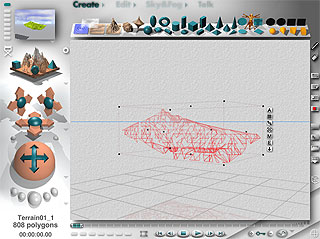 Now that you have created a 3DS file, you can close AutoCAD/Key Terra-Firma and open Bryce. Once in Bryce, you must import the 3DS file into the current Bryce scene. You can import a 3DS file into a new Bryce document or you can import it into a scene that you have already started building. From the Bryce pull-down menu, select File
![]() Import Object…. When the file Open dialogue box appears, select your 3DS file and click on the Open button. As soon as you do this, the triangular mesh appears in the centre of the scene.
Import Object…. When the file Open dialogue box appears, select your 3DS file and click on the Open button. As soon as you do this, the triangular mesh appears in the centre of the scene.
Step 6
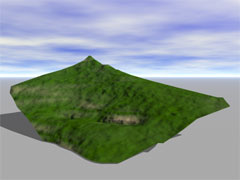
 If you now render the scene, you will see that the imported terrain appears in the colour you selected as the layer colour in AutoCAD. You will also notice that the triangular mesh looks highly faceted, giving a crude overall appearance. Fortunately, you can improve upon this.
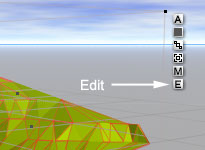 When the mesh is selected (highlighted in red), you will see a set of icons displayed in a column next to it. These are the Object Control icons. One of the icons says "E". This is the Edit icon. What happens when you click on the Edit icon depends upon what type of object is selected. With mesh objects, as in this case, the Edit icon takes you to a small dialogue box which allows you to smooth the mesh.
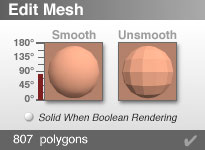 Simply click on the image of the smooth sphere and click on the
 ![]() icon at the bottom right of the dialogue box. When you return to the drawing, you may notice that the mesh object is visually unchanged. However, render the scene again and you should now see that the rendered mesh is much smoother than it was previously. The rendered mesh will always appear smooth but if you want to change it back, use the Edit Mesh dialogue box again and this time click on the faceted sphere image to unsmooth the mesh.
icon at the bottom right of the dialogue box. When you return to the drawing, you may notice that the mesh object is visually unchanged. However, render the scene again and you should now see that the rendered mesh is much smoother than it was previously. The rendered mesh will always appear smooth but if you want to change it back, use the Edit Mesh dialogue box again and this time click on the faceted sphere image to unsmooth the mesh.
 |
 |
Step 7
Finally, you will probably want to apply a material to your mesh. Fortunately, you can do this in just the same way as you would for a Bryce terrain object and you will find that the results are just as pleasing.
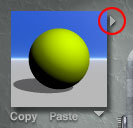 To assign a material, select the mesh (if it is not already selected) and then click on the "M" (Materials Lab) icon. You are taken to the Materials Lab. When you arrive, click on the little arrow at the top right of the preview image. This will take you to the Material Library.
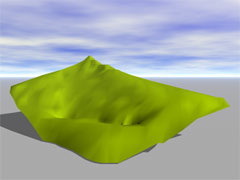
When you arrive, select "Planes & Terrains" from the list and select a suitable material type from those shown. Click on the ![]() icon to return to the Material Library. Then click the
icon to return to the Material Library. Then click the ![]() icon again to return to the drawing. Render the scene again to see your terrain in all its glory. The material used for the terrain in the illustration above is Mossy Rock.
icon again to return to the drawing. Render the scene again to see your terrain in all its glory. The material used for the terrain in the illustration above is Mossy Rock.
An Alternative Method
If you do not have access to Key Terra-Firma, you could create a terrain model from contours using 3D Studio VIZ R2 or later. Save your AutoCAD contour drawing as a Release 14 drawing and then import the drawing into 3D Studio. See the Creating Contour Data and Importing the .DWG File sections of the Creating Terrain Objects tutorial to find out how to do this.
 Once you have imported your contours, create a terrain object in VIZ, see Creating the Terrain Object for details. Now, all you need to do is to export the VIZ terrain to a 3DS file, File
![]() Export… from the pull-down menu. Choose a folder, give the file a name and set the format to 3D Studio (*.3DS) using the "Save as type" list.
Export… from the pull-down menu. Choose a folder, give the file a name and set the format to 3D Studio (*.3DS) using the "Save as type" list.
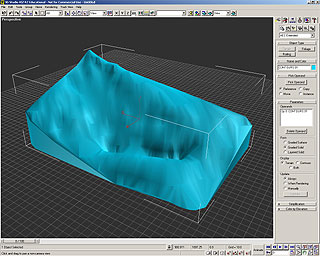
As you can see from the illustration on the right, one of the advantages of using VIZ to create your terrain is that you can elect to give your terrain vertical walls (known as a skirt) around the edges. This is done by setting the Form option to "Graded Solid" and can help to improve the look of the terrain when imported into Bryce. From here on, the process is exactly the same as it is for importing an AutoCAD mesh created with Key Terra-Firma. Go to Step 5 above to continue. One important point is that although the terrain looks smoothed in VIZ, it will appear faceted when it is imported into Bryce, so you will still need to smooth it.
Donate to CADTutor
If you found this tutorial useful, you might like to consider making a donation. All content on this site is provided free of charge and we hope to keep it that way. However, running a site like CADTutor does cost money and you can help to improve the service and to guarantee its future by donating a small amount. We guess that you probably wouldn't miss $5.00 but it would make all the difference to us.
Local Navigation
Sponsored Links
The Basics
- Dual Dimensions in a Dim…
- UCSICON Options
- "Best of" Basics: Irreg…
- Tool Palette Basics
- Original Dimension Value
- Possible Solutions to th…
- Avoid Using 'Standard' i…
- Shorten the Plot Scales…
- Update the Source File B…
- User Increment Angles fo…
- Drawing Information
- 'Sign Language'
- Rotate with the Copy Opt…
- Use the INSERT Osnap on…
- To or From the Current L…


