

Keyframe Animation
See also, Animating Materials: Water
Introduction
This tutorial gives a basic introduction to keyframe animation in Bryce. The tutorial is compatible with Bryce 4 and 5 but may work with earlier versions although I haven't tested this.
If you are new to animation or if you are a Bryce novice, I suggest you work through the tutorial from start to finish. Use the examples given in order to gain a good understanding of the concepts before embarking on your own project. If you are a more experienced user, you may just want to look at the FastTrack section below and then have a go on your own. You can always refer to specific steps in the main tutorial if you get stuck. The tutorial should be easy to follow but it is quite long and you should give yourself enough time to get through it at your own pace. Don't rush it.
What is Keyframe Animation?
OK, so what is keyframe animation? Well, keyframe animation is a technique that works a little like storyboarding (a comic strip series of images illustrating a sequence of events). It enables us to choreograph and build an animation by arranging objects and taking snapshots of them at key moments during a sequence of movement or change. These key moments or keyframes become the fixed points in time through which the animation passes. Animation between these keyframes is calculated by the application, in this case by Bryce.
 |
 |
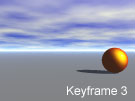 |
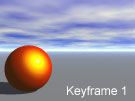
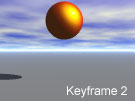
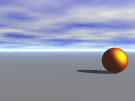
Above are three pictures of the same scene. The only difference is that the ball is shown in a different location in each scene. If we decide to make each ball position a keyframe within an animation of the scene and allow 1 second of time between keyframes, the resulting animation might look something like the one shown below.

Although we have only specified the position of the ball in the 3 keyframes, Bryce has calculated the ball position in all of the intermediate frames. As a result, the whole animation is generated from a relatively small amount of information and (more importantly) with relatively little effort.

This all sounds pretty impressive but there is more. Not only does Bryce calculate the position of the ball in all the intermediate frames, but it does so on the basis of a splined trajectory. In other words, the ball does not simply move in a straight line from one keyframe position to the next. Bryce calculates a smooth curved trajectory which results in smooth and natural looking movement during the animation. The illustration on the right shows this. The three ball positions are shown and through those points is drawn the curved path or trajectory. (Actually, the word "path" is used to describe something specific in Bryce so we'll use the word "trajectory" to describe the keyframed motion of an object in Bryce space.) In fact, Bryce even allows us to control how trajectories are fitted through the keyframe points and the points themselves (known as Trajectory Handles) can be moved to fine tune the movement. We'll cover all of this later in the tutorial.
Keyframe animation is a very powerful tool. It enables us to create complex animations with ease. Also, since Bryce allows us to animate almost anything, keyframing can be used to show changes in object geometry and changes in colour as well as movement. The animation above shows a ball moving in a curved trajectory, being stretched and changing from gold to green. All this is achieved by specifying just three keyframes.
It's worth mentioning here that although we will be exploring keyframe animation using Bryce, the basic concepts and processes are common to almost all 3D applications capable of animation. So, having mastered keyframe techniques with Bryce, you will subsequently find it easier getting to grips with even more complex applications such as VIZ, MAX or Maya.
General Sequence of Events
Before we start on the nitty gritty detail of which buttons to press, it's worth just taking a step or two back to consider why you might want to create an animation and how you might go about planning it.
There are usually two reasons why you might want an animation. Either you are involved with the latest blockbuster movie at Pixar or you are a designer trying to convey some point of information. I will assume that you are the latter. Design is all about communication and animation enables us to communicate quite a lot of information about our design intentions in a very succinct way. Always try to communicate your design ideas in a clear and concise way. Animation could be just the right thing but always consider other alternatives before committing yourself. After all, some alternatives are a lot simpler.

Once you have decided that animation is the way to go, there are a number of processes you must go through in order to complete the project. Broadly speaking there are 7 processes involved. Only 3 of which are covered in detail in this tutorial. The 7 processes are:
Inspiration and Visualization
The initial idea for the animation and picturing it in your minds eye.
Storyboarding
Creating a sort of comic strip description of what will happen during the animation. This is a good way to get your initial ideas down on paper and can be used as a reference during the animation process. The simple 3 image storyboard shown above describes the animation we are about to create.
Constructing the Scene
Creating and modifying the objects that make up the scene. Create all the objects you need for the whole animation and position them at their start locations in the scene.
Animating the Scene
Covered in steps 1 to 8 of this tutorial. Setting time, modifying objects and adding keyframes.
Previewing and Modifying the Animation
Covered in steps 9 and 10 of this tutorial. Consider movement and timing and make any modifications required.
Rendering the Animation
Covered in steps 11 and 12 of this tutorial. Rendering the animation to a movie file format so that it can be viewed on any computer.
Post Production
Adding titles and sound to the movie or changing size and format using software such as Adobe Premiere.
Creating successful animations takes a lot of careful planning. It's not really a good idea to start doodling in Bryce until something interesting happens. Think about your animation, what will happen and how long it will take. Make a quick storyboard sketch and then set to work with Bryce.
FastTrack to Keyframe Animation
OK, let's assume you've had your inspiration, you've sketched your storyboard and you've constructed the scene. Exactly how do you go about creating a short and simple animation in Bryce using Keyframing? Well, the whole process can be completed in 12 simple steps. Follow the sequence starting in the next section to find out how it's done. Those of you familiar with animation in Bryce might just want to look at this FastTrack section as a quick reminder. For those of you unfamiliar with Bryce, this section gives a good overview of the whole process.
Step 1 Go to File![]() Animation Setup… and set values for the Duration and FPS.
Animation Setup… and set values for the Duration and FPS.
Step 2 Scale the timeline so that you can easily see the whole duration (Time Working Area).
Step 3 Turn off Auto-Key.
Step 4 Add a keyframe at the start time of the animation for all objects that will be animated.
Step 5 Move the time scrubber to the next keyframe position.
Step 6 Modify the object or objects.
Step 7 Add a keyframe for each object modified.
Step 8 Repeat steps 5, 6 & 7 until all the keyframes are defined.
Step 9 Preview the animation.
Step 10 Make modifications to trajectory and time as required.
Step 11 Go to File![]() Document Setup… and specify render resolution (output size).
Document Setup… and specify render resolution (output size).
Step 12 Go to File![]() Render Animation… and render your animation to a file.
Render Animation… and render your animation to a file.
Keyframe Animation - 12 Steps to Heaven
During this tutorial, we will create a short animation similar to the one at the top of this page. We will use a single sphere and animate it using just 3 keyframes over a period of 2 seconds. Keep it simple to start with so that you can easily understand what is going on. Once you have completed this tutorial, you can experiment with more complex scenarios.
Getting Ready
![]() Start a new document in Bryce and change to Camera View using the Perspective Toggle button (click the directors chair icon at the top left of the screen so that it changes to a camera).
Start a new document in Bryce and change to Camera View using the Perspective Toggle button (click the directors chair icon at the top left of the screen so that it changes to a camera).
![]() Check that you can see the Time Palette at the bottom of the screen. You should be able to see a small Key icon with a plus sign to the left and a minus sign to the right. If you do not see this, you are looking at the Selection Palette. Toggle to the Time Palette by clicking the Time/Selection Palette Toggle button in the bottom right hand corner of the screen.
Check that you can see the Time Palette at the bottom of the screen. You should be able to see a small Key icon with a plus sign to the left and a minus sign to the right. If you do not see this, you are looking at the Selection Palette. Toggle to the Time Palette by clicking the Time/Selection Palette Toggle button in the bottom right hand corner of the screen.
Creating the Scene
 Create a sphere and move it using the Reposition Tool on the Edit Toolbar so that it is located to the left of the field of view. Use the illustration on the right as a guide. You can make things a bit more interesting by adding a material to the sphere. The material used here can be found in the "Simple&Fast" library and is called "Warm Gold". You may also want to scale the sphere to make it a bit bigger. You can do this using the Resize Tool on the Edit Toolbar. When your scene looks similar to the one on the right, we are ready to proceed.
 Animation Setup
 This involves setting values for the number of frames per second and the duration of the animation. Select File
![]() Animation Setup… from the pull-down menu. If you don't see a pull-down menu, move your cursor to the top of the screen and hover until the menu appears. You will now see the Animation Setup dialogue box shown above. There are two settings that we must make before we start moving things about.
Animation Setup… from the pull-down menu. If you don't see a pull-down menu, move your cursor to the top of the screen and hover until the menu appears. You will now see the Animation Setup dialogue box shown above. There are two settings that we must make before we start moving things about.
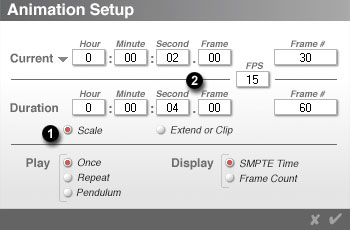
The first setting is displayed in a box labelled FPS. This stands for Frames Per Second. Bryce needs to know how many frames will be used to describe each second of animation. The default value is 15. So, what value should be used? The frame rate you choose will depend upon how the animation will be viewed. For example, if you are creating a hight quality animation that will be played on video tape, you will want to use an FPS value of 30. Video tapes play at 30 frames per second. However, if you want to view the animation on a computer, you can get away with a much lower frame rate. A value of 15 will give a good smooth animation on a computer. Bear in mind that the higher the frame rate, the larger the resulting animation file will be. Since animation files can be very big, you might even want to drop the frame rate lower than 15 if file size is a problem. You can probably go as low as 10 frames per second before the quality of the animation becomes unacceptable. In most cases, though and in this case in particular, the default value of 15 frames per second will be just fine, so that's what we'll use.
The second setting we need to make is the duration of the animation. Although this value can easily be changed later, it's a good idea to get it about right from the start. You need to think about all the changes that will take place in your animation and work out how long it should all take. One good way of doing this is to use a stopwatch to record the time as you run through the animation in your head. In this particular case, we are creating a very simple animation and so our duration is going to be set to just 2 seconds. Notice that by default, animation times are expressed in Hours, Minutes, Seconds and Frames. This scheme is called SMPTE (pronounced "simptee"). A time of 2 seconds in SMPTE time is expressed as "00:00:02.00".
Set values for Frames Per Second and Duration in the Animation Setup dialogue box as indicated. When you have done this, the Frame# box should display a value of 30. This is the total number of frames in the animation. 15 frames per second for 2 seconds equals a total of 30 frames. Now click the ![]() to complete step 1.
to complete step 1.
 Scale the Timeline
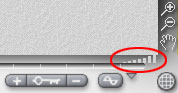 This involves scaling the timeline so that you can see the whole duration of the animation at one glance. When you set a time duration for your animation, the time is shown on the timeline at the bottom of the screen and is know as the Time Working Area. However, since some durations will be short and others long, the timeline may need to be scaled so that you can easily see the whole of the time working area. This will make working with the timeline much easier later. To scale the timeline, click and drag the Scale Timeline tool, located in the lower right corner of the screen and illustrated on the right. Dragging to the left increases the size of each frame on the timeline, dragging to the right decreases the size. Scale the timeline so that all 30 of the frames in our animation can be clearly seen. Your timeline should look something like the one illustrated below.

 Turning off Auto-Key
Auto-Key is a very useful tool when creating complex animations with Bryce. Basically, Auto-Key can be used to automatically record keyframes as objects are moved and time is advanced. The downside of Auto-Key is that you have to know exactly what you're doing otherwise you get into a real mess, creating Keyframes all over the place. For the beginner, it's best to turn Auto-Key off and make your keyframes manually. That way you can control exactly when your keyframes occur and the changes that are taking place. As you become more confident, Auto-Key can be used to speed up the process of keyframe animation but for now we'll turn it off.

Click the small down arrow just below the Scale Timeline tool at the bottom right of the screen (see illustration). You will see a pop-up menu. The Auto-Key option is at the top. If it is turned on, you will see a small tick. Click the menu item to remove the tick and turn Auto-Key off. If no tick is displayed, Auto-Key is already off.
 Adding a Start Keyframe
Let's assume that the current position of our sphere is its start position for the animation. In order to mark this as a point in time we must add a keyframe for the sphere. We will add a start keyframe at time = zero because that's where we want our animation to begin. But it doesn't have to be at zero. For example, if you were creating a movie where everything was stationary for one second, we could make our first keyframe at time = 1 second. However, even in this latter scenario, it is a good idea to start with a keyframe at time = zero because it keeps everything neat and tidy.
Make sure that the time is set to zero. You can do this by moving your cursor over the Time Scrubber. The current time or "Scrub Time" is displayed in the status area. You should see "00:00:00.00". If you see anything else, click and drag the time scrubber to the left until the displayed time shows zero. Let's add the first keyframe.
Adding a Keyframe
Now, click the Add Keyframe button. You will see a pop-up menu that shows the three permanent parts of the Bryce word, the Camera, the Sky and the Sun. Below these is a list of all the objects in the current scene. Since we have only a single object in our scene, a sphere, you should see a menu item called "Sphere 1". Click this item to display another pop-up menu. This menu allows us to set keyframes for various parameters of movement and geometry. Since we want a keyframe that represents all changes to our sphere, click the "All Timelines" option. You have now set the first keyframe.
 Move Time Scrubber to next Keyframe position
We're going to keep our animation simple. We will use just 3 keyframes, one of which we have already set. Since our animation duration is set to two seconds, we'll add a second keyframe at one second (the middle of our animation) and a final keyframe at two seconds. So, click and drag the Time Scrubber to the right until the time "00:00:01.00" is displayed. Your timeline should now look like the one shown below.

 Modify the Object
 Use the Reposition Tool on the Edit Toolbar to move the sphere to the position it will reach at 1 second into the animation. Let's make the sphere fly on a curved trajectory. To do this, move the sphere off the ground (moving in the Y direction) and away from the camera (the Z direction). As the sphere is moved, you will see a grey line appear which joins the start position of the sphere to the new position. At each end of the line is a small blue square. These blue squares are known as Trajectory Handles and the grey line is the Trajectory. Position the sphere so that it is in a similar position to the one shown on the right and move on to the next step.
 Set a Keyframe to Record the Changes
Repeat Step 4. In order to record the changes we have made to the sphere and assign them to the current time, we must add a keyframe to "All Timelines" for the sphere (Sphere 1).
 Move Time Scrubber, Modify Object, Set Keyframe
 Step 8 is really a repetition of Steps 5, 6 and 7. The only difference is that this time we will move the Time
  Scrubber to the two second position on the timeline and we'll move the sphere down to the ground and further away from the camera. Remember that you can place the sphere on the ground simply by clicking the Land Objects Down tool located next to the selected object.
Click and drag the Time Scrubber and position it so that the time reads "00:00:02.00". Now, move the sphere so that it appears in a similar position to that shown in the image on the right. Finally, add a keyframe to "All Timelines" for "Sphere 1". You have now completed the keyframing part of the animation process and your Bryce scene should look something like the one illustrated below.
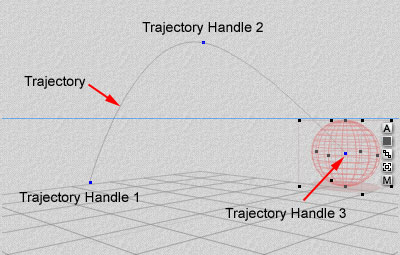
Now that all three keyframes have been set, you should see three trajectory handles. Each one indicates the position of the centre of the sphere when the keyframe was set. You should also see the curved trajectory passing through each of the handles.
 Preview the Animation
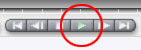 It's now time to have a look at your handiwork. To preview the animation you have created, simply click the Play button on the Time Palette below the timeline. You should see the sphere travel along the trajectory in a smooth curve as shown in the animation below. Obviously, the preview is only a wireframe but it does give a good impression of what the final animation will look like, particularly as we are most concerned with movement and speed at this stage. If you are entirely happy with the preview, you can skip to Step 11 but do have a look at Step 10 because the stuff covered there may be useful to you in the future.

 Modifying the Trajectory and Time
At this point in the process, you may be thinking, "the sphere is moving at the wrong speed", it might be too fast or too slow. Or, you may be thinking, "the trajectory isn't quite right". These are both very common situations. It is unusual to get a keyframe animation right first time.
OK, we want to tweak the trajectory so that the movement of the sphere is slightly different. How can this be done? Well, actually it's really easy. If you move your cursor over one of the Trajectory Handles, you will see it turn into a 4 headed arrow. Simply click and drag to move the position of the handle. The trajectory will change as the handle is moved. The "Tension" of the curve can also be modified. If you hold down the "T" key on the keyboard as you hover the cursor over a Trajectory Handle, the cursor will turn into a 2 headed arrow. If you click and drag now, you can modify the curve so that it becomes either sharper or fuller depending upon which direction you drag. Drag right for a sharper curve and left for fuller curve. You may also modify the "Continuity" and the "Bias" of the trajectory by holding down the "C" and "B" keys respectively. Continuity is used to control whether a curve is continuous or broken. A broken curve might have a curved segment to the left of a Trajectory Handle followed by a segment with a fuller or flatter curve to the right. Using this method, it is possible to make dramatic changes in direction at Trajectory Handle points rather than smooth transitions. The Bias controls the emphasis of the curve to either one side or the other of the Trajectory Handle. As is usual in such cases, you can best understand how these things work by experimenting with them.
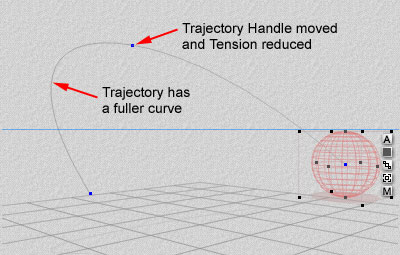
In the illustration above, the trajectory has been modified by moving the second Trajectory Handle and then changing the Tension of the curve to increase the radius, giving a fuller curve.
 So, what if we now want to change the speed of the sphere? Well, time in Bryce can be scaled. You can do this using the Animation Setup dialogue box. From the pull-down menu, select File
![]() Animation Setup…. If you look at the Duration section of the dialogue box, you will see two radio buttons, one labelled "Scale" and the other "Extend or Clip". Say we wanted our animation to last 4 seconds; we have two options. If we set the Duration to 4 seconds and choose to Extend or Clip (the default), our 2 second keyframed animation will be unaffected but we will gain an extra 2 seconds on the timeline. This is useful if we want more time to continue our animation of the sphere. However, if we choose the Scale option, our keyframed animation will be stretched out over 4 seconds. The keyframe we previously set at 1 second will now appear at 2 seconds on the timeline and our 2 second keyframe will appear at 4 seconds. Effectively, we will have doubled the length of the animation. The result is that the sphere moves along the same trajectory but takes twice as long to do it. In other words, the sphere will move at half the speed it did previously. Using the same logic, we can also speed up the sphere by reducing the time. If we choose the Scale option and set the Duration to just 1 second, the sphere will travel at twice the original speed.
Animation Setup…. If you look at the Duration section of the dialogue box, you will see two radio buttons, one labelled "Scale" and the other "Extend or Clip". Say we wanted our animation to last 4 seconds; we have two options. If we set the Duration to 4 seconds and choose to Extend or Clip (the default), our 2 second keyframed animation will be unaffected but we will gain an extra 2 seconds on the timeline. This is useful if we want more time to continue our animation of the sphere. However, if we choose the Scale option, our keyframed animation will be stretched out over 4 seconds. The keyframe we previously set at 1 second will now appear at 2 seconds on the timeline and our 2 second keyframe will appear at 4 seconds. Effectively, we will have doubled the length of the animation. The result is that the sphere moves along the same trajectory but takes twice as long to do it. In other words, the sphere will move at half the speed it did previously. Using the same logic, we can also speed up the sphere by reducing the time. If we choose the Scale option and set the Duration to just 1 second, the sphere will travel at twice the original speed.
 Specify Render Output Frame Size
Before rendering the animation, we must decide on the size of the animation frame. The size is important because it dramatically affects the finished movie file size.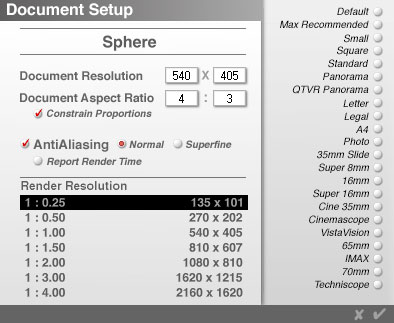 Also, we must consider how the movie will be viewed and how complex the scene is. More complex scenes will need a larger frame size. You will only really be able to make these kind of decisions with some experience but my general rule of thumb is that it doesn't need to be as big as you think it does. For example, the animation right at the top of this page is just 135 pixels wide and 101 pixels high. Obviously it's a very simple scene, but it is perfectly clear and the file size is relatively small.
To set the render frame size, select File![]() Document Setup… from the pull-down menu. You will see the Document Setup dialogue box shown above. Bryce refers to the render frame size as "Render Resolution", which is a little misleading but don't let that confuse you. All dimensions are expressed in pixels as you might expect but the available sizes are all in multiples of the "Document Resolution", that's the working area to you and me. This is actually quite logical. Simply select an output size from the list under Render Resolution and click
Document Setup… from the pull-down menu. You will see the Document Setup dialogue box shown above. Bryce refers to the render frame size as "Render Resolution", which is a little misleading but don't let that confuse you. All dimensions are expressed in pixels as you might expect but the available sizes are all in multiples of the "Document Resolution", that's the working area to you and me. This is actually quite logical. Simply select an output size from the list under Render Resolution and click ![]() to save the new settings. If you want a particular output size, you'll need to change the Document Resolution first and then the Render Resolution.
to save the new settings. If you want a particular output size, you'll need to change the Document Resolution first and then the Render Resolution.
 Render the Animation to a File
 Once you are happy with the Trajectory and the Speed of your animation and you have selected an appropriate frame size, it's time to render the animation to a file.
On the pull-down menu, select File![]() Render Animation… You will now see the Render Animation dialogue box, shown on the right.
Render Animation… You will now see the Render Animation dialogue box, shown on the right.
There are 3 things we must check to ensure we get what we want out of our render. We need to determine what we are rendering, what format the animation will be written in and where the file or files will be located.
First, check that the "Entire Duration" radio button is highlighted. This ensures that the whole animation is rendered.
 Second, choose an output file format. There are 3 options, AVI Movie (the default), BMP Sequence, and Quicktime Movie. AVI movies will play on most Windows computers, the BMP Sequence option renders each frame to a separate BMP file and Quicktime Movies require the Quicktime Player to be installed on the computer where you want to play the animation. In most cases you will want to render to an AVI file. If you want to select one of the other formats, click on the small down arrow in the Output Module section of the dialogue box and select the required format from the pop-up menu.
Third, click the Set button and choose a suitable file location using the Save As dialogue box.
Finally click ![]() to start the render. This may take a few minutes depending upon the speed of your computer.
to start the render. This may take a few minutes depending upon the speed of your computer.

When the render process is complete, you can review the rendered animation you have created. If you've been following this tutorial, it should look something like the one above. If not, you can always make modifications to your objects and trajectories and render again. It is difficult at first to know what you're going to get but with a little experience you'll soon be able to predict with greater certainty how things will turn out.
Conclusion
If you have got this far without any tears, congratulations! Creating keyframe animations is quite a complex process but the end result is usually worth the effort. They say a picture is worth a thousand words so a moving picture must be worth quite a lot more. Animations can dramatically improve the communication of design ideas but it is important to keep things simple. It is tempting to throw all the techniques you know into a project but it's always worth asking yourself whether what you are doing is appropriate.
This has been a rather lengthy tutorial and we have covered a lot of ground. However, don't go running away with the idea that you now know all about animation with Bryce. We have hardly scratched the surface. Bryce has an amazing range of tools for creating and controlling animations that we haven't even mentioned. The Advanced Motion Lab for example allows us to do many things such as vary the speed of objects between trajectory handles. If you would like to learn more about animation in Bryce, I suggest you buy a copy of the best book on the topic, Real World Bryce by Susan Kitchens and Victor Gavender.
Tips & Tricks
Finding Keyframes
Once your animations go beyond the simple 3 keyframe variety, it can be quite difficult to keep track of all the keyframes in an animation. Bryce provides a couple of simple tools that make finding your keyframes a lot easier. First of all, the small Key icon on the Time palette is highlighted when the Time Scrubber is positioned over a keyframe, like this ![]() . This is quite handy because you can locate a particular keyframe by dragging the Time Scrubber up or down the timeline, watching for the Key icon to highlight. When the Scrubber is not over a keyframe, it is displayed in its normal grey like this
. This is quite handy because you can locate a particular keyframe by dragging the Time Scrubber up or down the timeline, watching for the Key icon to highlight. When the Scrubber is not over a keyframe, it is displayed in its normal grey like this ![]() .
.
 Bryce also enables you to jump from the current time position to either the next or the previous keyframe on the timeline. The two buttons are part of the Animation Playback Controls and are illustrated on the right. Simply click on a button to jump to either the next or previous keyframe. The two buttons outside of those indicated can be used to jump to the first and last keyframes.
Removing Keyframes
 You may find, as you build your animations that there are times when you need to remove a keyframe, either because it is redundant or because it was added in error. This is often the case if you have been working with Auto-Key turned on. Fortunately, removing keyframes is just as easy as adding them. Simply click on the minus sign to the right of the Key icon and select an option from the pop-up menu.
Donate to CADTutor
If you found this tutorial useful, you might like to consider making a donation. All content on this site is provided free of charge and we hope to keep it that way. However, running a site like CADTutor does cost money and you can help to improve the service and to guarantee its future by donating a small amount. We guess that you probably wouldn't miss $5.00 but it would make all the difference to us.
Local Navigation
Sponsored Links
The Basics
- Dual Dimensions in a Dim…
- UCSICON Options
- "Best of" Basics: Irreg…
- Tool Palette Basics
- Original Dimension Value
- Possible Solutions to th…
- Avoid Using 'Standard' i…
- Shorten the Plot Scales…
- Update the Source File B…
- User Increment Angles fo…
- Drawing Information
- 'Sign Language'
- Rotate with the Copy Opt…
- Use the INSERT Osnap on…
- To or From the Current L…


