Tutorials
CADTutor tutorials are all original and specifically designed to get you working with AutoCAD and other applications as knowledgeably as possible. We don't believe in providing only quick step-by-step tutorials like other sites. Our tutorials are comprehensive and aim to give you a deeper understanding and a better learning experience. See the AutoCAD tutorials page for more information.
If you can't see what you're looking for on this page, take a look at the list of all tutorials and don't forget that there's lots more content in the Michael's Corner section of the site.
We're always on the lookout for good content. If you have a tutorial or an article that you'd like to see published on CADTutor, get in touch using the contact form.
Tutorials of the Moment
The most recently viewed tutorials
Modifying Objects
|
Drawing Objects
|
|
Last visited: less than one minute ago |
Last visited: 1 minute ago |
|
AutoCAD 2010: Getting Ready for 3D
|
Uploading Files with WS_FTP
|
|
Last visited: 1 minute ago |
Last visited: 1 minute ago |
Featured Tutorials
Tutorials we think you'll like
AutoCAD 2010: Starting a Command
|
AutoCAD 2010: Ribbon Basics
|
|
Last visited: 2 hours ago |
Last visited: 39 minutes ago |
|
AutoCAD 2010: The User Interface - Part 1
|
AutoCAD 2010: Getting Ready for 3D
|
|
Last visited: 1 hour ago |
Last visited: 1 minute ago |
Tip of the Day
Moving vertically in 3D

Moving objects vertically always used to be a bit of a chore with AutoCAD, usually involving some relative coordinate entry for the Z direction or maybe the .XY filter. Fortunately, AutoCAD 2007 introduced a new command that makes moving objects vertically a snap.
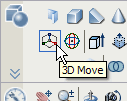
 You'll find the 3D Move button on the Dashboard or from the pull-down menu.
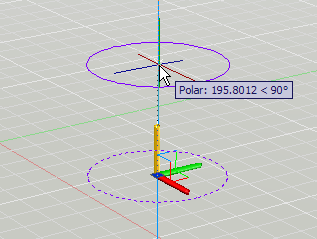
As with the normal Move command, you're first prompted to select objects. Once a selection is made, the cursor changes to the move grip tool. Now, pick any point on the base plane to fix the move grip tool at that elevation. Next, hover your cursor over the blue axis handle (Z axis) until it changes to a gold colour and left-click. This has the effect of constraining movement in the z direction. All you need do now is enter the distance you want the object to be moved or use the mouse to pick a distance.
Missed a Tip?
Did you miss yesterday's tip? Maybe you forgot to drop by or maybe you don't visit over the weekend. If so, you can now see all the tips published during the past week. Also, if you have a tip you'd like to share with us, you can post it on our forum and if we like it, we'll publish it here.
Local Navigation
Sponsored Links
The Basics
- Dual Dimensions in a Dim…
- UCSICON Options
- "Best of" Basics: Irreg…
- Tool Palette Basics
- Original Dimension Value
- Possible Solutions to th…
- Avoid Using 'Standard' i…
- Shorten the Plot Scales…
- Update the Source File B…
- User Increment Angles fo…
- Drawing Information
- 'Sign Language'
- Rotate with the Copy Opt…
- Use the INSERT Osnap on…
- To or From the Current L…


