

Creating Selections from Image Masks
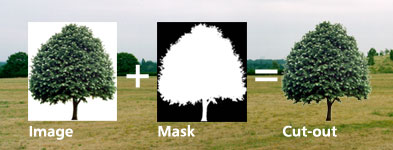
Creating a "cut-out" or "floating image" of any of the image objects supplied in the CADTutor Image Bank is a simple 7 step process. The image below gives an overview of the process. The screen shots shown here were taken using Photoshop 6 but you can do the same thing in Photoshop 5 and 5.5.
Step 1
Download a pair of images from one of the CADTutor Image Bank pages. Right-click one image at a time, and choose "Save Target As…" from the context menu. See the Download Main Page for more details. Save the two images to a convenient folder on your computer.
Step 2
Open both images in Photoshop and make the mask image (the black and white one) the current image.
Step 3
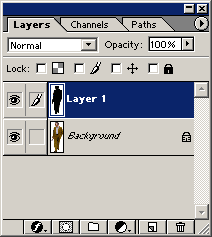
In the Layers palette, shift-click and drag the mask "Background" layer and drop it onto the colour image window. Holding the Shift key down ensures that the layers are perfectly aligned, one on top of the other. Your Layers palette should now look something like the one illustrated on the right. You should have two layers, "Layer 1", the mask and "Background", the colour image.
Step 4
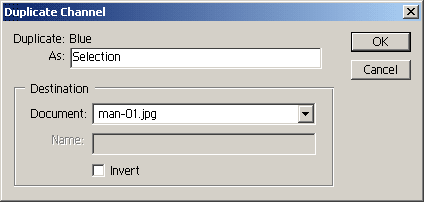
Click on the Channels tab to display the channels palette. Right-click the Blue channel and select "Duplicate Channel…" from the context menu. Now, using the Duplicate Channel dialogue box, give the new channel a name by typing in the "As" edit box. Now click the OK button.
In fact you could duplicate either the Red, Green or Blue channels and get the same effect. Since the mask image is black-and-white, the three colour channels are identical. Your Channels palette should now look something like the one shown on the right.

The channel you have just created contains the selection information for this particular image. This type channel is often known as an "Alpha Channel".
Step 5
Click the "Load channel as selection" button ![]() at the bottom left of the Channels palette. You have now used your new channel to create a selection and you should see it displayed in the main image window.
at the bottom left of the Channels palette. You have now used your new channel to create a selection and you should see it displayed in the main image window.
Step 6
Click the Layers tab to display the Layers palette. Click "Layer 1", the mask layer, to make it the current layer. Delete this layer by clicking the "Delete layer" button ![]() at the bottom right of the Layers palette. Since you now have a selection saved as a channel, you no longer need the mask layer.
at the bottom right of the Layers palette. Since you now have a selection saved as a channel, you no longer need the mask layer.
Step 7
You now have a couple of options. If you would like to save this image with a selection (alpha channel) for future use, you should use the "Save As" option from the File pull-down and save the image as either a TIFF or a PSD file. These are the only two file formats that can save channel information. Saving alpha channel information as an integral part of a file is very useful because it means you never have to bother making that selection again. It also means that you can use these files when creating Bryce image objects to load both colour and alpha channel information simultaneously. See the Bryce Image Objects tutorial for details.
Alternatively, if you have no future use for the selection, you can simply copy and paste the selection into another image so that the selected object forms a separate layer. The original image file can then be closed without saving.
Donate to CADTutor
If you found this tutorial useful, you might like to consider making a donation. All content on this site is provided free of charge and we hope to keep it that way. However, running a site like CADTutor does cost money and you can help to improve the service and to guarantee its future by donating a small amount. We guess that you probably wouldn't miss $5.00 but it would make all the difference to us.
Local Navigation
Sponsored Links
The Basics
- Dual Dimensions in a Dim…
- UCSICON Options
- "Best of" Basics: Irreg…
- Tool Palette Basics
- Original Dimension Value
- Possible Solutions to th…
- Avoid Using 'Standard' i…
- Shorten the Plot Scales…
- Update the Source File B…
- User Increment Angles fo…
- Drawing Information
- 'Sign Language'
- Rotate with the Copy Opt…
- Use the INSERT Osnap on…
- To or From the Current L…


