

 From: AutoCAD Productivity Articles #109
Originally published: January 2012
This Year, Resolve to Use…
My visits to Guam are always rewarding because I meet such nice folks. Last month I had the privilege to train four more people from the government NAVFAC group.
During our training, a couple of the following questions came up, so I thought I'd pass these along, as well as a few others that have been stacking up in my "Basics" list.
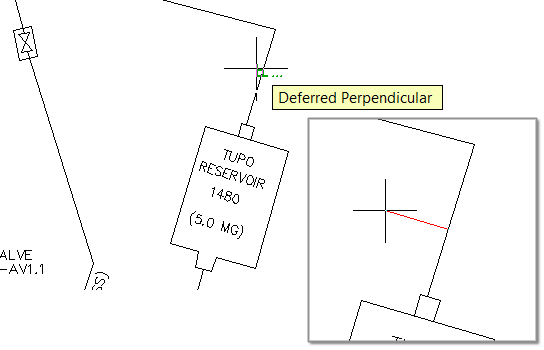
Snap Perpendicular From an Object
Many of us are familiar with snapping Perpendicular To an object, but if you launch the Line or Polyline command, then invoke Snap to Perpendicular (use Shift + Right click if needed), you can then slide along your geometry (including circles) then specify a point to begin the line. It essentially acts as Ortho for drawing new geometry from non-orthogonal lines.
Select Similar: The Settings Option
 Introduced in AutoCAD 2010, the Select Similar feature is amazing. (See the Basics in Michael's Corner, May 2011 when guest author and CADTutor captain, David Watson, provided a nifty video tutorial on this very topic). But what object properties determine if something is ‘similar’.
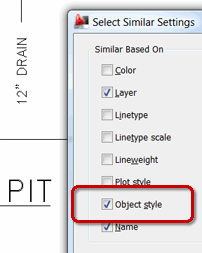
Curiously, you will need to launch the SELECTSIMILAR command to get the option for SEttings… since it's not available from the right-click menu which is the most common method of invoking this feature.
By default, Layer and Name (object name/type) are on. But if you want to select the text that is on the same layer and also uses the same Text Style?
Solution: Check the box for Object Style!
OFFSET: The Layer and Erase Options
Have you ever taken the time to consider the options available for the Offset command?
Command:  OFFSET

Current settings: Erase source=No  Layer=Source  OFFSETGAPTYPE=0
Specify offset distance or [Through/Erase/Layer] <1.0000>:
The Offsetgaptype option was covered way back in the June 2003 Basics of Michael's Corner, but back then the Erase and Layer options were not available, so here's how they work:
Erase: [Yes / No] Default: No
Set to Yes, after completing the offset, the source object will be erased.
Layer: [Source / Current] Default: Source
By default, the offset geometry is placed on the same layer as the source object. Set the Layer option to Current to place the offset geometry onto the current layer.
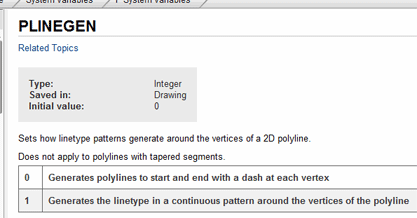
Help for Variable Values
When you're looking for the values that can be used to set a variable – for example, PLINEGEN – hit F1 for the Help window (ironically launched in Autodesk Exchange).
Alternatively, you could go to Express![]() Tools panel
Tools panel![]() System Variable Editor to open the dialog box which contains the same information. See Michael's Corner, June 2004.
System Variable Editor to open the dialog box which contains the same information. See Michael's Corner, June 2004.
Add Layers to the Quick Access Toolbar
As you navigate the Ribbon, what if you are on a tab other than Home… and you need to change your layer? Now you have to go back to the Home tab![]() Layers panel so you can change the current layer from the dropdown list.
Layers panel so you can change the current layer from the dropdown list.

Solution: Right-click in the Layer dropdown list, then click Add to Quick Access Toolbar!
See all the articles published in January 2012
See this article in the January 2012 Corner
Donate to CADTutor
If you found this article useful, you might like to consider making a donation. All content on this site is provided free of charge and we hope to keep it that way. However, running a site like CADTutor does cost money and you can help to improve the service and to guarantee its future by donating a small amount. We guess that you probably wouldn't miss $5.00 but it would make all the difference to us.
Note from Michael: I want to thank all of my customers for continuing to retain my training services (some for over three decades!) and let you know your donations do not go to me personally, but to the ongoing maintenance of the CADTutor ship as a whole and to support the yeoman efforts of my friend and CADTutor captain, David Watson, to whom I am grateful for this monthly opportunity to share a few AutoCAD insights.


