

 Michael’s Corner #83
November 2009
Very Thankful
![]() The United States celebrates Thanksgiving this month (the last Thursday of the month), so I just wanted to say thank you from myself (in Kentucky) and the CADTutor staff (in England), for your continued interest and encouragement to us; we do appreciate your patronage. Autodesk University will be upon us in no time (and may be going on when this column sees the light of day), and I'm getting pretty excited.
The United States celebrates Thanksgiving this month (the last Thursday of the month), so I just wanted to say thank you from myself (in Kentucky) and the CADTutor staff (in England), for your continued interest and encouragement to us; we do appreciate your patronage. Autodesk University will be upon us in no time (and may be going on when this column sees the light of day), and I'm getting pretty excited.
This month I'm sharing with you a couple topics that will be in my AU Lab regarding the AutoCAD 2010 Quick Access Toolbar and Workspaces. I'm also adding a couple editing tips such as suppressing that giant Mtext Editor when you edit Mtext and the fundamentals of changing dimensions with the grips.
…and I would love to hear from you if you're cooking your Thanksgiving turkey by some method other than an oven!
If you would like to contact me directly, you can do that also.
Blessings to one and all,
Michael
Assigning a Quick Access Toolbar to a Workspace [A2010]
In AutoCAD 2010, each workspace can be assigned a unique Quick Access Toolbar. After populating your Quick Access Toolbar with the tools you like (see Michael's Corner, December 2008), here's how to assign it to a workspace.
Instructions to Assign a Quick Access Toolbar to a Workspace
If you have yet to do so and you want to just experiment with this, create a new Workspace (Workspace Switching
 Save Current As) such as MC_Nov09.
Enter CUI to open the Customize User Interface, then click your workspace name in the Workspaces list.
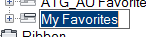 Right-click the Quick Access Toolbar node, then click New Quick Access Toolbar and enter a name such as My Favorites. Click the plus sign (+) to display the default tools in your new QA Toolbar.
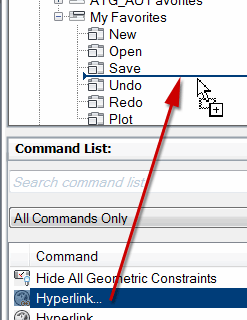 To quickly customize this Quick Access Toolbar - so it looks different than the default - from the Command List, drag one of your favorite commands up from the list, and release it somewhere in your My Favorites Quick Access Toolbar list of commands. In the figure, you will see that I'm dragging up the Hyperlink command.
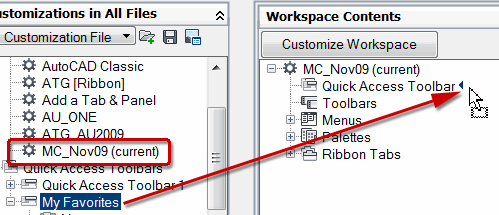
Now, click on your Workspace name (up in the list of workspaces) to display Workspace Contents on the right.
Drag your "My Favorites" Quick Access Toolbar over and release it next to the Quick Access Toolbar which then applies your Quick Access Toolbar name.
Click OK to save your edits and close the CUI. You should now see your additional tool(s) on the Quick Access Toolbar.
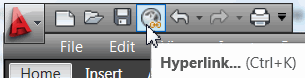
To prove that the tool collection shown is unique to that workspace, change you workspace and see what happens!
Power Tool
Adding Layer Combo to the Quick Access Toolbar
 Since we're on the subject of the Quick Access Toolbar, here's another one.
In an effort to be more Ribbon-friendly/compliant, I discovered in AutoCAD 2010 (as well as LT), that I can put the "Layer Combo Control" tool on my Quick Access Toolbar! This means I can get to the current layer without going to the Home tab![]() Layers Panel… and it's so easy!
Layers Panel… and it's so easy!
Instructions to Add Layer Combo Control to the Quick Access Toolbar
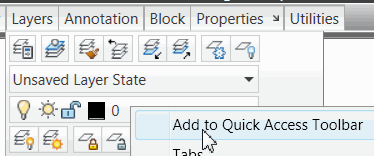
On the Home tab of the Ribbon, the Layers panel, right-click in the area of the layer dropdown list, then click Add to Quick Access Toolbar.
Um, there is no second step. You're done!
![]() I discovered the name of this thing when I went to the CUI and looked at the list of stuff that was on my Quick Access Toolbar and saw "Layer Combo Control". Works for me!
I discovered the name of this thing when I went to the CUI and looked at the list of stuff that was on my Quick Access Toolbar and saw "Layer Combo Control". Works for me!
For more coverage on the Quick Access Toolbar, see Michael's Corner, December 2008.
The Odd Spot
Giant Mtext Editor Solution
 Since about AutoCAD 2008, have you ever double-clicked on an Mtext object… and have the Editor would jump up and nearly fill the screen? That's all very nice for AutoCAD to help me see the text better, but since we can zoom into the Editor now with our wheel mouse (or whatever method you prefer), what's the point?
To disable that giant leap into your face, set the variable MTEXTFIXED to <0> or <1>.
The Basics
Dimension Grips
Have you ever noticed the dots at the bottom of the extension lines of a dimension? Those are the definition points - Defpoints - of the dimension. And as you may have intuited, those dots live on the Defpoints layer (and a collective "Ah-ha!" went up across the land).
The simple feature I want to present here is how easy it is to modify a dimension, simply by moving the position of the Defpoints.
Instructions to Modify the Dimension with Grips
Add a dimension to your drawing.
Click on one of the "defpoint" grips at the bottom of an extension line.
Now snap that point to a new location using any object snap method.
You can move the position of the dimension line using one of the arrowhead grips.

Left Field
Breakneck Speed: When glass breaks, the cracks move faster than 3,000 miles per hour. To photograph the event, a camera must shoot at a speed of a millionth of a second.
Donate to CADTutor
If you found this article useful, you might like to consider making a donation. All content on this site is provided free of charge and we hope to keep it that way. However, running a site like CADTutor does cost money and you can help to improve the service and to guarantee its future by donating a small amount. We guess that you probably wouldn't miss $5.00 but it would make all the difference to us.
Note from Michael: I want to thank all of my customers for continuing to retain my training services (some for over three decades!) and let you know your donations do not go to me personally, but to the ongoing maintenance of the CADTutor ship as a whole and to support the yeoman efforts of my friend and CADTutor captain, David Watson, to whom I am grateful for this monthly opportunity to share a few AutoCAD insights.
Share this page:


The Basics
- Dual Dimensions in a Dim…
- UCSICON Options
- "Best of" Basics: Irreg…
- Tool Palette Basics
- Original Dimension Value
- Possible Solutions to th…
- Avoid Using 'Standard' i…
- Shorten the Plot Scales…
- Update the Source File B…
- User Increment Angles fo…
- Drawing Information
- 'Sign Language'
- Rotate with the Copy Opt…
- Use the INSERT Osnap on…
- To or From the Current L…


