

 Michael’s Corner #98
February 2011
Sweetheart Solutions
I've always liked Valentine's Day. Being a friendly kinda guy, I enjoyed the whole card swapping that went on in school and now as an adult, it's always a fabulous opportunity for a date with my lovely bride of nearly 25 years. And then there's the chocolate!
Hopefully, this month you will find a feature or two you can learn to 'love' and look forward to using in your daily AutoCAD grind. The four command-truffles I have boxed up for you this month include…
…How to make use of the recently-released AutoCAD WS
…Adding batt insulation to the walls of your floorplan
…Some random AutoCAD tech tips
…How to add a hatch to selected objects
Hope you have a wonderful February!
"On Your Mark…"
The preparations for the celebration of the 100th month of Michael's Corner are beginning to take shape!
Event
A one day seminar presenting April's Michael's Corner content in realtime, some things I am planning for my next AU seminar, along with a few hours worth of tips I have collected and have yet to write about!
Proposed Date
Monday, April 11, 9:00 - 15:00. The time can be tweaked if necessary, and the specific day that week will be determined based on venue availability.
Venue
A location in London's West End, easily accessed by Tube. David has a place in mind, but we have yet to secure the hall; we will definitely know by next month. The hall we are considering holds 70, classroom style. Unfortunately, we cannot provide the logistics for you to hook up your laptop, but you can bring it if you want.
Deliverables
- A workbook similar in layout to Michael's Corner and The AutoCAD Workbench covering the day's topics.
- Door prizes:
3 Copies of The AutoCAD Workbench
2 Flash drives containing the PDF version of The AutoCAD Workbench
1 3G iPad (seriously!) - Lunch will also be provided
Cost
This is based on the venue and the number of you attending! We have no idea how many people to plan for, but at this point, I'm looking at between £75 & £100 per person for the day. The more folks we have, the better the price we can offer!! I would love to have so many that we need to have two days!
*** Please let me or David know if you think you can make this event ***
There will be reduced pricing for Early Registration and for Students with a valid Student ID.
Please tell your friends, co-workers, former employers (that you like), and anyone else you think would enjoy this one-time event. I'm really looking forward to this opportunity. For me, this will be more exciting than Autodesk University! Once all the logistics are in place, I will forward the information to my friends Shaan Hurley and Kate Morrical to post on their blogs.
If any of you in western Europe would be intersested in onsite AutoCAD training while I'm over there, please contact me to discuss availability.
If you would like to contact me directly, you can do that also.
Blessings to one and all,
Michael
Mechanics of AutoCAD WS
 OK, this is pretty cool, but you'll have to work with it a bit to get the hang of it.
The ability to 'share' drawings with others in the field on their iPad/iPhone is very intriguing. To see how this works, you will need someone else with which to share your drawing, and each of you will need an AutoCAD WS account. (This may be the account you created when you installed a recent version of AutoCAD; mine was.)
My investigation involved the AutoCAD WS website, AutoCAD 2011, and my iPhone 3 with the free AutoCAD WS app.
Prerequisites
Go to the AutoCAD WS download site [http://www.autocadws.com/downloads] and download and install the AutoCAD plug-in for your version, AutoCAD 2010 and 2011 (or AutoCAD LT). After installing the AutoCAD WS feature, when you launch AutoCAD, you will have an Online tab with all the requisite panels. (AutoCAD LT 2011 Ribbon shown here.)

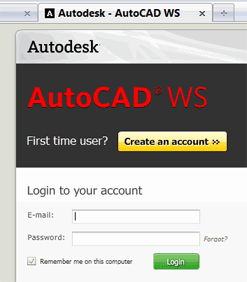
Go to http://www.autocadws.com and login or create a new account. Those with whom you want to share your drawings will need an account, too.
Note: Although the sharing of files can happen using non-mobile devices (stationary devices?), to use AutoCAD WS on an iPad, iPhone, or iPod touch, download the app from the App Store. [http://autocadws.com/mobile]
In the following process, I share a drawing with a mobile device, they edit the drawing, then upload it back to me.
Logistics for Sharing a DWG using AutoCAD WS
Create a drawing.
Click Share Drawing [Online tab
 Share panel] and the Login screen will come in to login to your AutoCAD WS account. (see prerequisite B, above)
 The Share a File dialog box opens (shown here).
Enter the email address of the account you want to share the drawing with (the mobile device in this scenario), and any pertinent message, then click Share.
On the target system (if the individual has logged in), when they launch the AutoCAD WS app, the shared drawing uploads automatically.
Using the available menu items for the mobile app, the recipient can select from a variety of features, including Add Text, Move, Scale, Rotate, and Erase.
 When finished, the recipient clicks Done which, essentially, releases the drawing to the originator of the drawing (or another collaborator in the field).
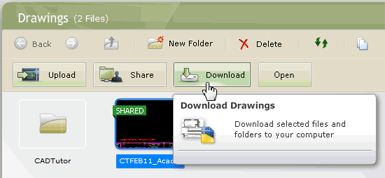
To download the drawing to your computer from the person in the field, you will need to login to the AutoCAD WS site. (see prerequisite B, above)
Once you're logged in, the Messages page lists the drawings that were recently updated.
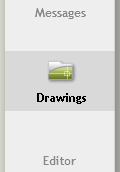
In the left panel of the AutoCAD WS screen, click the Drawings node.
To download the shared drawing, select the drawing, then click Download, then specify file type - DWG, DXF, or ZIP (for Xrefs) - then the format - A2010 to R14(!) - then the file location.
Those are the very fundamental nuts and bolts to this great tool. Although I knew about it, I really needed to find out how to make all the necessary connections. I hope that helped!
Powerful Drawing Editor within the AutoCAD WS Site
As you saw in the last figure (above), after selecting the drawing file, you also have an Open option. The Open feature enables you to open a shared drawing on any computer that doesn't have AutoCAD (but is logged in to the AutoCAD WS site).

The drawing Editor within AutoCAD WS has an amazing array of AutoCAD commands, too numerous to mention here, including the ability of editing a block! This is worth the effort in and of itself!
Power Tool
Adding Batt Insulation to Walls
One of my customers asked me the other day how to add batt insulation to the drawing, and I promised her I would have it in an upcoming article.
As it turns out, the batt insulation can be easily added as a linetype.
How to Add Batt Insulation to Walls
Create a new layer for the insulation line - CT_Insulation in this example - then, under Linetype, click 'CONTINUOUS' to open the Select Linetype dialog box.
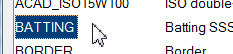 Click Load, then scroll down the list of linetypes and click 'BATTING', then OK.
In the Select Linetype dialog box, select the Batting linetype, then click OK to assign that linetype to the layer.
Be sure to set your insulation layer current, then close the Layer Properties Manager.
 Note 1: Many default settings - text size, dimension scale, and linetype scale - are just fine if you're going to be drawing something no bigger than… a laser jet printer. But for larger drawings, many of the defaults need to be increased.
I did a quick test, and as it turns out, if the LTSCALE value is 1, the batt insulation fits very nicely inside a 1″ thick wall. Read on…
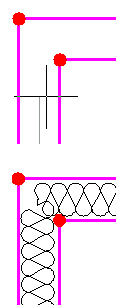 Zoom to the wall in which you want to add the insulation, then set the LTSCALE variable to the width of the wall into which it will be added. In this illustration, I'll set it to 5″.
Note 2: There is a very real possibility that the Ltscale factor (which is global, affecting all non-continuous linetypes) may need to be set to a different value. If so, you may want to take a look at the Odd Spot from August 2003 - Lyin' Type Scale.
Launch the Line or Polyline command.
To place the center of the linetype in the center of the wall, you may want to use the M2P feature, especially at the corners. When prompted for each point of the line, enter M2P, then (using Endpoint snap), accurately pick the corners of the wall, as shown by the red dots in the figure shown here. For more on M2P, take a look at the Power Tool in Michael's Corner, June 2008 (or p. 39 in your copy of The AutoCAD Workbench).
The Odd Spot
Need-To-Know Tech Tools
I'm sure you readers have more ideas on this topic, but here are a few things that I have recently encountered that will help you navigate through some technical aspects of using AutoCAD.
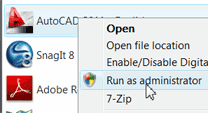
Run as Administrator
 With the advent of Vista/Windows 7, there are a lot more security-related settings that many of my customers encounter after they get AutoCAD loaded onto new computers. Unfortunately, many times their IT professional hasn't adjusted those settings to allow drawings to be saved or preferences to be applied.
If that sounds like your situation, consider this: Right-click on the AutoCAD icon on your desktop (or from the Start button), then click Run as Administrator. No promises, but some folks say this will get around those prohibitions until IT updates their settings… and you didn't hear it from me.
Copy / Paste a Path
Go to the Options dialog box, Files tab, then expand the Support File Search Path. The path at the top of the list should be very long and end in ..\Support. That path holds, among other things, the acad.pgp file (for example).
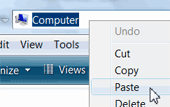 Rather than trying to remember that path, single-click on it, then single-click on it again (that's different than double-click). This will effectively highlight that path in a text field that you can Copy using the right-click menu or Ctrl+C.
Now go to Windows Explorer - what some of you know as My Computer - or hold down the Windows key and tap 'E'. Click in the path field at the top of the window, then Paste the path and press [Enter] to go to that far distant folder.
Longbow Converter to run software on a 64-bit system
Did you get a new computer that's 64-bit? Is your copy of AutoCAD the 32-bit version? Do you have a software product that has yet to be updated with a version that can run on 64-bit systems?
Although you can contact your AutoCAD reseller and order a 64-bit version, check with your IT professional and see if using the Longbow Converter would do the trick until you get the updated version, or to run your 32-bit software.
http://www.longbowsoftware.com/Home_Page.phpView 'Hidden Files and Folders'
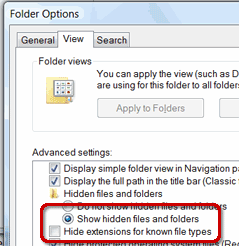 Some of the AutoCAD system files you may need to backup or view are installed in 'Hidden' folders or as 'Hidden' files. In most installations of the Windows OS, your Folder Options are configured as 'Do not show hidden files and folders'. You may also find the default is to 'Hide extensions for known file types'.
My take on this is that everyone reading this would find it very useful to see the files and the file extensions. Using the trick mentioned above (Windows key + E), click Organize![]() Folder and Search Options (or View
Folder and Search Options (or View![]() Folder Options) to open the Folder Options dialog box.
Folder Options) to open the Folder Options dialog box.
Click the View tab, then click the radio button to 'Show hidden files and folder' and clear the check box to 'Hide extensions…'.
Those are just a few of the things my customers encounter that I wanted to pass along to you.
The Basics
Hatch Selected Objects from the Hatch Tab
 When creating a hatch with AutoCAD 2011, the Quick Preview feature is pretty nice, especially if you want to hatch an area (see Michael's Corner, April 2010 for an overview on the A2011 Hatch command).
When you click the Hatch command, however, the default prompt is to pick an internal point. In this brief review, I want to steer you to the feature that enables you select an object for the hatch.
How to Hatch an Object
Set the desired layer to be current, then zoom to the object to be hatched.
Note: The object to be hatched must be entirely visible within the drawing area. If AutoCAD doesn't 'see' all of it, the preview feature won't work.
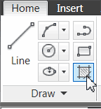
Click Hatch on the Draw panel (Home tab).
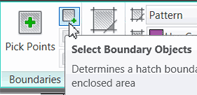 On the Boundaries panel, click Select Boundary Objects, and you are prompted to select the objects to hatch.
Immediately after selecting the object (or each object, if you have more than one to hatch), the current hatch pattern is applied in preview.
When you're finished selecting objects, press [Enter] to complete the command.
Insights
 Here are a couple other things that will enhance your use of the Hatch command.
Boundary command
The Boundary command - located on the expanded Draw panel of the Ribbon - (Michael's Corner, September 2005) enables you to pick a point within a closed area and have a polyline automatically created around the perimeter.
User-Defined hatch
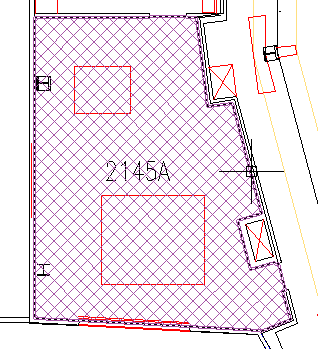
You may want to review how to configure the hatch for a User Defined pattern as shown here (12″ spacing, 45 degree rotation, Double).
Left Field
The Doldrums: I suppose this is what some of us come to expect during the month of February - at least on this side of the planet - but it's actually a seafaring term. Per the Phrase Finder (www.phrases.org.uk)…
The Doldrums is the region of calm winds, centered slightly north of the equator and between the two belts of trade winds, which meet there and neutralize each other. It is widely assumed that the phrase 'in the doldrums' is derived from the name of this region. Actually, it's the other way about. In the 19th century, 'doldrum' was a word meaning 'dullard; a dull or sluggish fellow' and this probably derived from 'dol', meaning 'dull' with its form taken from 'tantrum'. That is, as a tantrum was a fit of petulance and passion, a doldrum was a fit of sloth and dullness, or one who indulged in such.
Donate to CADTutor
If you found this article useful, you might like to consider making a donation. All content on this site is provided free of charge and we hope to keep it that way. However, running a site like CADTutor does cost money and you can help to improve the service and to guarantee its future by donating a small amount. We guess that you probably wouldn't miss $5.00 but it would make all the difference to us.
Note from Michael: I want to thank all of my customers for continuing to retain my training services (some for over three decades!) and let you know your donations do not go to me personally, but to the ongoing maintenance of the CADTutor ship as a whole and to support the yeoman efforts of my friend and CADTutor captain, David Watson, to whom I am grateful for this monthly opportunity to share a few AutoCAD insights.
Share this page:


The Basics
- Dual Dimensions in a Dim…
- UCSICON Options
- "Best of" Basics: Irreg…
- Tool Palette Basics
- Original Dimension Value
- Possible Solutions to th…
- Avoid Using 'Standard' i…
- Shorten the Plot Scales…
- Update the Source File B…
- User Increment Angles fo…
- Drawing Information
- 'Sign Language'
- Rotate with the Copy Opt…
- Use the INSERT Osnap on…
- To or From the Current L…


