

 Michael’s Corner #87
March 2010
AutoCAD® 2011 - Ready When You Are!
Dateline March 25, 2010: As many of you may have suspected, AutoCAD® 2011 was officially released today and it was a humbling experience to be seated among Autodesk management and the AutoCAD Development teams at the live webcast of the official launch.
Several of us from the social network of AutoCAD bloggers and authors were hosted by Autodesk in San Francisco in recognition of our enthusiasm for this flagship product. Please be advised: AutoCAD® and it's branded products - AutoCAD LT, AutoCAD Architecture, AutoCAD Civil 3D, AutoCAD Inventor Suites, AutoCAD Map 3D, AutoCAD Mechanical, & AutoCAD MEP - are alive and extremely well.
In the months ahead, I will have articles in Michael's Corner covering some of the wonderful new productivity features found in AutoCAD 2011 and AutoCAD 2011 LT.
"Michael's Corner, 7 Years of AutoCAD Tips & Insights": Update. I have contacted a printer and it looks like I'm still on track to have this title available by June, just in time for NeoCon! I will be working closely with the CADTutor administrator, David Watson, to coordinate the logistics of making the book available to all of you, so stay tuned!
Taking a look at what I just wrote, it looks like customizing is once again the order of the day. Ribbons, tool palettes, and workspaces are the power that drives our productivity… and I've also answered that niggling question about the difference between Off and Freeze that you've always wanted to ask.
Blessings to one and all for a glorious new season.
If you would like to contact me directly, you can do that also.
Blessings to one and all,
Michael
The Ribbon and Toolbars, too?
The Ribbon is quickly becoming my default operating mode - I know, you never thought I'd say that, but it's true. When I go back to using toolbars in A2010, it looks… old. However, I was doing a training with a customer just the other day and she was interested in putting the Object Snap toolbar over on the right side of her screen, just for those occasional single-hits you need for that random object snap like, maybe, Nearest.
Important Note: Changing of the arrangement of your Ribbon and toolbars directly relates to your Workspace. If you have not created a workspace, see Michael's Corner, May 2009.

Add a Toolbar to a Ribbon-Based Workspace
Save your current workspace.
Enter CUI (or any other method you would like) to open the Customize User Interface.
In the upper left section, click on the workspace name that is [current].
In the upper right section, under Workspace Contents, click Customize Workspace.
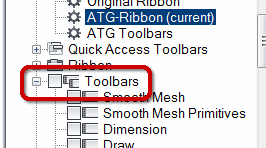 Back in the upper left section, expand the Toolbars node to display a list of available toolbars.
Check the box beside the toolbar(s) you would like to display and you will see them added to the Toolbar list on the right side, under the Workspace Contents heading.
These last steps are very important…
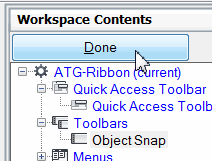 In the upper right, under Workspace Contents, click Done, then click OK to close the CUI and apply your changes.
You will now see your toolbar(s) in the drawing, so first, position them where you want them.
Finally, save your workspace by clicking Workspace Switching, then Save Current As.
In the dropdown list, select your workspace name, then Save and Replace. You are good to go!
Power Tool
Custom Button #14: Layout Tabs with Titleblocks
 Briefly, I am a proponent of having no additional layout tabs in your template. Many of my customers have a template with four or more layout tabs with their titleblocks which, in theory, sounds very wonderful. In reality, they now have layout tabs in scores of drawings they won't be using and simply clutter up the collection layouts. [And no, I don't believe you when you say you will delete the unused ones because I know you are waaaay too busy to bother with that.]
Solution: Create a button on the palette to open the Insert Layout dialog box so you can then select just the layouts you need when you need them.
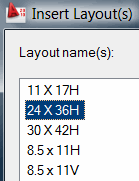
Prerequisite: A drawing (.DWG or .DWT) with the layouts configured for the desired sheet sizes with their associated titleblocks (similar to this figure).

Need -To-Know: The path and filename of this drawing (needed for step 8, below).
Add a Button to the Palette to Insert your Titleblock Layouts
Open the Tool Palette window (Ctrl + 3) and go to the tab where you want to put this new button.
Open the CUI.
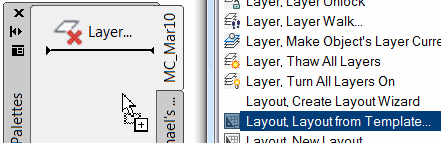 In the Command list, scroll to the command Layout, Layout from Template.
Click and drag the command Layout, Layout from Template over and drop it onto your palette.
Click OK to close the Customize User Interface; it has served its purpose.
Right-click in the Command line, then click Options to open the Options dialog box.
On the Files tab, expand the node for Support File Search Path.
If the path to the location of your .DWG or .DWT containing the layout tabs is not on the list, click Add, then Browse to add it [per the "Prerequisite" and "Need-To-Know", above]. Click OK to close Options.
On your palette, right-click on the Layout, Layout from Template button, then click Properties to open the Tool Properties dialog box.
Edit the name of your button.
In the Command String, click at the end of the existing string, and use Backspace to eliminate the space that follows the word "template".
After the word "template", add a semi-colon, then in quotes add the name of the .DWG/.DWT containing your layout tabs. What you add is shown here in red and should look similar to the following where your filename (with the proper extension) is in quotes:
^C^C^R_layout _template;"MY TITLEBLOCKS.DWG"
Click OK to save and apply your edits.
Click your new button and you should see the Insert Layouts dialog box listing your layout tabs, similar to the figure at the top of this article!
The Odd Spot
Ribbon Tab & Panel Shuffle
You may have bumped into these, but in case you haven't, here are a few additional insights into managing your Ribbon tabs and panels. For even more, take a look at Michael's Corner, July 2009.
Tab & Panel Management Ideas
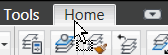 You can drag a Ribbon TAB to another location. I've moved my Home tab to the middle just so it's easier to access.
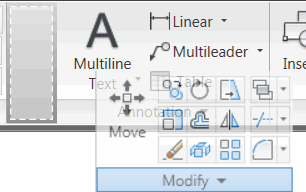 You can drag a PANEL to a new position by clicking and dragging the panel title. When you see an open ‘slot’ emphasized with dashed lines, release the panel. Don't release the panel when the open slot is ‘twitching’.
Note: If you ‘lose’ a panel as you are moving it, go to Workspace Switching and click your workspace name and the ‘missing’ panel will re-appear in its original location.
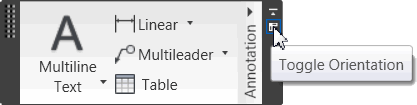 You can float a PANEL by clicking the panel title and dragging it into the drawing area. When you hover over the panel, the left and right side bars appear. There is also a small button to toggle the orientation of the panel title, too.
Use one of the side bars to drag the panel back up onto the Ribbon if you want to put it back.
The Basics
Freeze vs. Off
![]() So, what is the difference between turning a layer OFF and FREEZING it?
So, what is the difference between turning a layer OFF and FREEZING it?
![]() (This image is shown when a viewport is active in Paper space.)
(This image is shown when a viewport is active in Paper space.)
Singular Similarity
Objects on layers that are Off or Frozen cannot be seen.
OFF Conditions
Objects on layers that are turned Off are still taken into consideration when you use Zoom
 Extents.
"Global" result, i.e. a layer that is turned Off cannot be seen in Model space or in a Paper space viewport.
Turn a layer back On and a Regen of the drawing will not occur.
Turn Off the layer on which a block has been inserted and the block is still visible.
FREEZE Conditions
Objects on layers that are FROZEN are not taken into consideration upon a Zoom
Extents.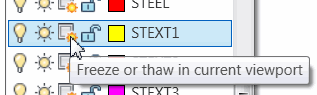 Objects in a viewport can be Frozen independently of objects in Model space using the Freeze or Thaw in Current Viewport icon.
When a layer is Thawed, a Regen of the drawing will occur.
Freeze the layer on which a block has been inserted and the block will no longer be visible.
Left Field
 Gardening Trivia:
The Saguaro Cactus (shown behind my lovely bride of 23 years while on vacation a few years ago), found in the southwestern United States doesn't grow branches until it is 75 years old.
Gardening Trivia:
The Saguaro Cactus (shown behind my lovely bride of 23 years while on vacation a few years ago), found in the southwestern United States doesn't grow branches until it is 75 years old.
The city of Mt. Vernon, WA (USA) grows more tulips than the entire country of Holland.
Two-thirds of the world's eggplant is grown in New Jersey.
"A slug is just a snail with a housing problem!"
Found at http://gardeningtips.org/trivia.shtml
Donate to CADTutor
If you found this article useful, you might like to consider making a donation. All content on this site is provided free of charge and we hope to keep it that way. However, running a site like CADTutor does cost money and you can help to improve the service and to guarantee its future by donating a small amount. We guess that you probably wouldn't miss $5.00 but it would make all the difference to us.
Note from Michael: I want to thank all of my customers for continuing to retain my training services (some for over three decades!) and let you know your donations do not go to me personally, but to the ongoing maintenance of the CADTutor ship as a whole and to support the yeoman efforts of my friend and CADTutor captain, David Watson, to whom I am grateful for this monthly opportunity to share a few AutoCAD insights.
Share this page:


The Basics
- Dual Dimensions in a Dim…
- UCSICON Options
- "Best of" Basics: Irreg…
- Tool Palette Basics
- Original Dimension Value
- Possible Solutions to th…
- Avoid Using 'Standard' i…
- Shorten the Plot Scales…
- Update the Source File B…
- User Increment Angles fo…
- Drawing Information
- 'Sign Language'
- Rotate with the Copy Opt…
- Use the INSERT Osnap on…
- To or From the Current L…


