

 Michael’s Corner #66
June 2008
NeoCon 2008 Bonus Round
This month I'm speaking at the NeoCon World's Trade Fair in Chicago for the sixth year in a row. The Merchandise Mart is swarming with folks from every facet of the contract furniture industry as well as those industries and vendors that support it… and it's great fun!
So just in case I finish going through my handout too early or I run out of things to say (…right), I can refer to this month where I begin my articles on AutoCAD 2009 and how we're just going to have to deal with it and jump right into the Help features. Of course a new button on a palette is in order and this month we automate the M2P feature, compliments of a little brainstorming with customers in Dallas. I also share the little nugget on the status bar to lock a viewport as well as a reminder about the Select option of the Dimension Continue command.
As always, if you want to be notified when Michael's Corner is posted, click the Subscribe button over on the left pane. Hopefully these insights will give you a bit more peace of mind as you make your way through your AutoCAD In-box.
See you in the Elevators! (it's a Mart-thing)
If you would like to contact me directly, you can do that also.
Blessings to one and all,
Michael
AutoCAD 2009: Dealin' With It
For those of you that have seen AutoCAD 2009 - and "seeing it" is just about all it takes to form an opinion - just keep in mind, you didn't much care for Tilemode either and now that many of you are using palettes (that interface you turned off before I started covering it in training sessions and in Michael's Corner with total abandon), now you think palettes are the greatest thing since Autodesk introduced the variable to turn off Blipmode. Bottom line, sooner or later you're going to have to deal with it.
So where do you turn to learn about this new beast? Well, if you already have the product, here are a few ideas that are right there on your C:\ drive.
AutoCAD 2009 Preview Guide & AutoCAD 2009 HELP… No, Really.
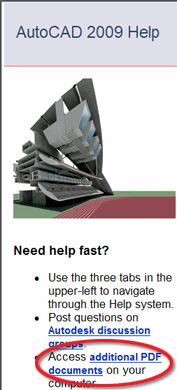
I have written about the oft-overlooked power of the Help files in AutoCAD, so this is one of the places I may go when a new version comes out. In the opening Help window under "Need Help Fast?" there's a link to "Additional PDF Documents". The files themselves are found in the ..\Help folder of your installed AutoCAD 2009, but for those of you who have yet to get the product or would just like to read up on it before installing it, click the topic headings below to open the PDF. I have also included the AutoCAD 2009 Preview Guide for your reading enjoyment.
AutoCAD_2009_Preview_Guide.pdf - Autodesk's official AutoCAD 2009 Preview Guide is another great document I use to get a heads-up on the new features.
acad_new_icons.pdf - There are 32 pages of images of the A2009 toolbars along with an image and definition of each button. Nice to have. [..AutoCAD 2009\Help\newfeatures]
The additional files below are also well worth a look.
acad_cue_cards.pdf - Concise overview of new features including Tips, Features & Variables for each of the following: Menu Browser, Action Recorder, Enhanced Layer Properties Manger, Ribbon, Ribbon Customization, View Cube, Steering Wheels, ShowMotion, Tools in the Application Window, Quick View, Quick Properties, DWFx, Geographic Location, Export Layout to Model Space Drawing. [..AutoCAD 2009\Help\newfeatures]
acad_byw.pdf - Coverage on the extensive 3D and Modeling features extensively refined in AutoCAD 2007 and elaborated upon in A2009. [..\AutoCAD 2009\Help\buildyourworld]
AutoCAD 2009 Need-To-Know
When you finally install A2009 (not IF, but WHEN), you will encounter a rather - shall we say "aggressive" - collection of tool tips. This will mess with your head. In an effort to reduce the negative impact on your experience of the product, the following tip-related variables are provided for your reference.
| DYNTOOLTIPS | 0 |
| GRIPTIPS | 1 |
| ROLLOVERTIPS | 0 |
| TOOLTIPMERGE | 0 |
| TOOLTIPS | 1 |
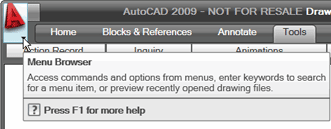
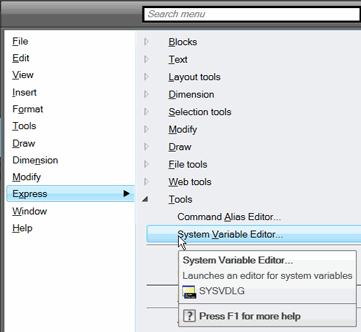
For a reference on what each of these variables controls, click the scarlet "A" in the corner to open the Menu Browser (heaven forbid it should remain across the top as it has since dirt), then click Express![]() Tools
Tools![]() System Variable Editor. On the left side of the System Variables dialog box, navigate to the variable of interest to view the description of each value and the default setting. All tip-related variables are saved in the Registry (as opposed to the Drawing).
System Variable Editor. On the left side of the System Variables dialog box, navigate to the variable of interest to view the description of each value and the default setting. All tip-related variables are saved in the Registry (as opposed to the Drawing).
As I learn more about AutoCAD 2009 - for better or worse - I'll pass it along.
Power Tool
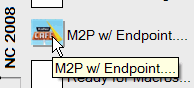
Custom Button #8: M2P, ready to go
Have you ever needed to grab the middle of a rectangle (such as a conference table) and put it in the dead center of a room? The M2P feature (superceding the former 'CAL![]() MEE process) can be used to automate the effort of finding the "Midpoint" between 2 "Points" that you pick.
MEE process) can be used to automate the effort of finding the "Midpoint" between 2 "Points" that you pick.
You are prompted for the First point of mid: then the Second point of mid:, after which AutoCAD picks the midpoint between those two points. The points can be essentially anywhere, but it would be wise to use the desired object snaps.
It's a wonderful feature, but it can be a bit tedious, especially if you are placing furniture using CAP Designer (www.2020technologies.com) and you only have Node snap on. In the following steps, you make a button that invokes the M2P feature and automatically turns on the Endpoint snap for each pick.
Instructions to Add a Toolbar Button to a Palette.
- Open the Tool Palette window, then you will need a blank button to work with (see Michael's Corner Odd Spot, April 2007).
- Right-click on the blank button, then click Properties to open the Tool Properties dialog box. Add a relevant Description such as M2P w/ Endpoint.
- Edit the Command String to read as shown below.
M2P;ENDP;\ENDP;
To test your button, create a rectangle, then launch the Move command. After selecting the rectangle and pressing Enter, click your M2P button and follow the prompts!
Bonus Round
So there I am, doing a training session in Dallas, and a couple of the guys thought it would be cool to carry the macro further, in case you had to find the midpoint of the room, too; essentially a repeat of the first sequence. Note the backslash (which pauses for the user response) at the end of the second Endpoint request.
M2P;ENDP;\ENDP;\M2P;ENDP;\ENDP;
Now test the button to move a rectangle into the middle of a room. Thanks to Scott & Tom down there at bkm of Texas!
The Odd Spot
Lock Viewport on the A2008 Status Bar

From the "Failed to Receive the Memo" files. If a viewport is active or you have selected the edge of the viewport frame while in Paper Space, the status bar displays a lock icon for Lock/Unlock Viewport. I'm not sure who passed that along to me, but that's cool!
The Basics
Dimension Continue

The Continue dimension command enables you to add a string of dimensions to an existing dimension where the intermediate dimensions appear to share a common extension line. You use the Continue dimension command once you have a dimension to continue from. When you click Continue, AutoCAD locates the most recent dimension added to the drawing… and presumes the side from which the dimension will continue.
Question: If there is more than one dimension in the drawing, how do you create a Continued dimension from a dimension other than the last dimension added to the drawing, or the side AutoCAD presumes you want to continue from, for that matter?
Answer: Use the <Select> option.
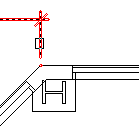
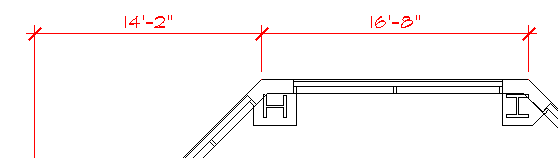
For this exercise, I have added a single, horizontal dimension.
Instructions to Add a Continue Dimension to an Existing Dimension.
- On the Dimension toolbar, click Continue (or click Dimension >Continue) and you see the following prompt:
Specify a second extension line origin or [Undo/Select] <Select>:
- At this point, AutoCAD has identified the most recently created dimension and as you move your cursor, you will see a dimension coming from one of the extension lines. Press Enter to accept the default option of <Select> and you see the following prompt:
Select continued dimension:
- Select the extension line of a dimension you want to continue from, then continue (so to speak) placing the dimension string. AutoCAD will continue (!) to generate Continued dimensions until you press Esc.
Left Field
The Mart - For 78 years, Chicago's Merchandise Mart has been the world's largest commercial building; it is also now LEED-EB (existing building) Silver.
Donate to CADTutor
If you found this article useful, you might like to consider making a donation. All content on this site is provided free of charge and we hope to keep it that way. However, running a site like CADTutor does cost money and you can help to improve the service and to guarantee its future by donating a small amount. We guess that you probably wouldn't miss $5.00 but it would make all the difference to us.
Note from Michael: I want to thank all of my customers for continuing to retain my training services (some for over three decades!) and let you know your donations do not go to me personally, but to the ongoing maintenance of the CADTutor ship as a whole and to support the yeoman efforts of my friend and CADTutor captain, David Watson, to whom I am grateful for this monthly opportunity to share a few AutoCAD insights.
Share this page:


The Basics
- Dual Dimensions in a Dim…
- UCSICON Options
- "Best of" Basics: Irreg…
- Tool Palette Basics
- Original Dimension Value
- Possible Solutions to th…
- Avoid Using 'Standard' i…
- Shorten the Plot Scales…
- Update the Source File B…
- User Increment Angles fo…
- Drawing Information
- 'Sign Language'
- Rotate with the Copy Opt…
- Use the INSERT Osnap on…
- To or From the Current L…


