

 Michael’s Corner #2
February 2003
Lisps 'n' Scripts
This month, Michael looks at two methods of AutoCAD automation that all users should become familiar with. The smart use of Scripts and Lisp routines are key to having AutoCAD behave just the way you want it to. There are great productivity gains to be made by setting variables automatically with scripts and by automating common tasks with lisp. Michael also continues his exploration of raster images in AutoCAD.
If you would like to contact me directly, you can do that also.
Blessings to one and all,
Michael
Lazy Lisp
It's not just "Lots of Insipid, Stupid Parentheses" and you don't have to understand it to use it
| (DEFUN C:UA()(COMMAND "UCS" "OB" PAUSE "PLAN" "")(PRINC)) | |
 |
 |
| Two characters went from this… | …to this. Interested? |
LISP actually stands for 'List Processing". It is the native programming language for all AutoCAD versions, therefore, any Lisp routine you write will work in any AutoCAD. Here's an easy one that automates the Zoom Extents option:
| (DEFUN C:ZE()(COMMAND "ZOOM" "E")(PRINC)) | |
|---|---|
| ( | AutoCAD takes off if you hit the spacebar so the open paren puts it on hold. |
| DEFUN | DEfine FUNction. You're telling the Lisp routine what you're setting up. |
| C: | Whatever characters come after C: is what you type to 'run' the Lisp. |
| ()( | The 'clutch'. Push it in (, change the gear ), let it out (. No options. Don't need to know. |
| Command | For all one line Lisps, you need to let AutoCAD know you are using Commands. |
| "fullcommand" | Don't put aliases here, you're not buying anything. Commands and options. |
| (PRINC) | Locking the door on the way out. Suppresses that 'nil' you see in some routines. |
| ) | Resolve all the open parens. |
Sample Lisp routines you all should be using…
There are several Lisp routines on my website, www.autocadtrainerguy.com. Go to the Michael's Kitchen link, then into the Junk Drawer.
The Lisp files in this section are zipped for ease of distribution from my website. The following procedures should answer most of the questions you have regarding what to do. These steps presume you have AutoCAD 2002 installed in the default location.
Note: Those of you only interested in the numbering routines of Objno, Wsnum and Prefix, there is a separate .zip file called Numbers.zip containing those files only.
Once you have downloaded the zip files, here's what you will need to do:
- Copy the files into the
C:\Program Files\AutoCAD 2002\Support folder. - Unzip the file which contains the Lisp routines.
- Go into AutoCAD and go to Tools/Load Application.
- Click on the little suitcase icon at the bottom to open the Startup Suite dialog.
- Click Add, then navigate to the
…\Support folder where the .lsp files are located. - Select the files from Step 2 (you can select each of them while you're in the dialog if you hold down the Ctrl key on your keyboard).
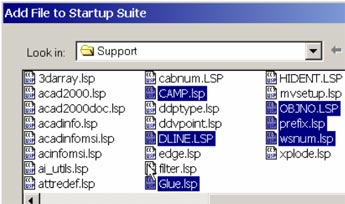
- After you have selected them, click the Add button to return to the Startup Suite dialog where you will see them listed.
- Click Close, then Close out of the Load Application dialog.
| Some functional routines from CAMP.lsp | |
|---|---|
| IF | This routine turns off the image frame of an inserted raster image. |
| II | This routine turns on the image frame of an inserted raster image. |
| TV | Rather than choosing Window/Tile Vertically, use this routine to tile the open drawings vertically. |
| DE | Use this to launch the Dist command with the Endpoint osnap for each pick. |
| ZE | Automates the Zoom/Extents routine. |
| UA | This routine will bring the selected line to horizontal in the drawing window along with the rest of the drawing. Works great when you want to work in a room at an odd angle but bring it square so you don't have to keep turning your head. You can then work on the drawing with Ortho on, too. |
| UW | This one puts the UCS back to World and takes the drawing with it. |
Power Tool
Variables in a Script
As many of you know, some variables in AutoCAD are registry settings (i.e., Cursorsize and Maxsort), but some variables are drawing settings (i.e. Filletrad and Mirrtext).
Try this: Using Notepad, create a simple text file with the variable name and the setting you most commonly use, similar to that shown here…
BLIPMODE OFF
CELTSCALE 1
CMDDIA 1
COLOR bylayer
DIMASSOC 1
DIMSHO 1
DRAGMODE AUTO
ELEV 0
FAC ETRES 2
FILEDIA 1
Include variables like DIMASO (now DIMASSOC in A2002), MIRRTEXT, etc. Save the file with an extension of .scr in a folder on your Search path. To run the script, you could either use the Script command and choose your .scr from the dialog, or you could drag 'n' drop it from Windows Explorer.
See this month's Odd Spot for another application of a script routine.
The Odd Spot
Hold onto that Hatch
It would be nice if it were as easy to load a hatch configuration as it is to load a block, but it's not. Although the Express Tools (and AutoCAD 2000) has the 'Superhatch' feature in which you can create a hatch out of existing objects, there isn't an out-of-the-box method by which you can hold onto current hatch conditions in any version of AutoCAD. Here's an idea:
Put the following variables with the desired values in a script file (.scr). The defaults are shown here. Replace them as necessary.
HPANG 0
HPBOUND 1
HPDOUBLE 0
HPNAME "ANSI31"
HPSCALE 1.0000
HPSPACE 1.0000
Now you can drag 'n' drop from Windows Explorer into a drawing at any time. For example, after setting up and applying a hatch pattern you commonly use in your drawings, check out these variables and then save them in a script, giving it a name that reflects how you used it (i.e., DeptArea.scr, BlockElev.scr, etc.).
The Basics
Raster Images 201
 In the last issue we took a look at what a raster image is and how you can place an image in a drawing. In this issue, we'll take a look at a couple editing features and how to improve your memory usage in a drawing with images.
Hidden tools
 The Reference toolbar contains seven tools relating to raster images. In this article, we take a look at Image Clip, Image Frame, and the Image dialog. If an image needs to be "cropped", use Image Clip. Select the image, and press Enter to accept the option for <New>, then choose the Polygonal or Rectangular clipping type. Pick points around the image to surround the area to keep, then press Enter. Finally, choose Image Frame, then enter OFF.
 The Image dialog contains a feature that will improve your operating efficiency if you have several raster images in your drawing, such as a detail sheet or digital images of the project. Select the image name in the dialog, then click Unload to take the image out of memory (and view). The image frame remains (if it's On) but the image won't be seen or plotted. Then Reload it as necessary. More next time!
Donate to CADTutor
If you found this article useful, you might like to consider making a donation. All content on this site is provided free of charge and we hope to keep it that way. However, running a site like CADTutor does cost money and you can help to improve the service and to guarantee its future by donating a small amount. We guess that you probably wouldn't miss $5.00 but it would make all the difference to us.
Note from Michael: I want to thank all of my customers for continuing to retain my training services (some for over three decades!) and let you know your donations do not go to me personally, but to the ongoing maintenance of the CADTutor ship as a whole and to support the yeoman efforts of my friend and CADTutor captain, David Watson, to whom I am grateful for this monthly opportunity to share a few AutoCAD insights.
Share this page:


The Basics
- Dual Dimensions in a Dim…
- UCSICON Options
- "Best of" Basics: Irreg…
- Tool Palette Basics
- Original Dimension Value
- Possible Solutions to th…
- Avoid Using 'Standard' i…
- Shorten the Plot Scales…
- Update the Source File B…
- User Increment Angles fo…
- Drawing Information
- 'Sign Language'
- Rotate with the Copy Opt…
- Use the INSERT Osnap on…
- To or From the Current L…


