

 Michael’s Corner #89
May 2010
More AutoCAD® 2011 Insights and some Customizing for Fun
AutoCAD 2011 really does bring some luster to the productivity features. I'm having a grand time updating the book with the current version because I'm discovering the subtle differences between A2011, and the previous Ribbon-based versions of A2009 and A2010. And I'm always excited when a customer has a question in training that requires some customizing. This month you'll learn…
…How to add a user-defined button (and an image) to the Quick Access Toolbar
…Some of the cool new selection features introduced to the A2011 shortcut menu
…How to display a toolbar WITH the Ribbon in A2011
…Some fundamentals of the Multiline Text (Mtext) command
Hopefully these tips and insights will enable you to get your job done more quickly so you can get out and enjoy this fabulous Spring weather!
If you would like to contact me directly, you can do that also.
Blessings to one and all,
Michael
Adding a User-Defined Button (with Image) to the Quick Access Toolbar
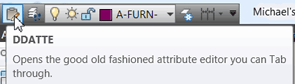 On a rare occasion, Autodesk will remove commands from AutoCAD. Usually, they just pile on and make older commands less accessible. Training in west Michigan this week we discovered that the good ole DDATTE command is nowhere to be found in the Help documentation. Oh yes, you can type it, but it's not in the list of commands in the CUI which is where I typically go to customize my palettes and the Ribbon.
So here's how to add a user-defined button to the Quick Access Toolbar along with an image.
How To Add a New Button to the Quick Access Toolbar
Type CUI to open the Customize User Interface.
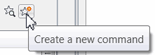 Under the Command list, click Create a New Command. This will add ‘Commandx’ to the command list.
Click your new ‘Commandx’ to open the Properties panel on the right side of the CUI.
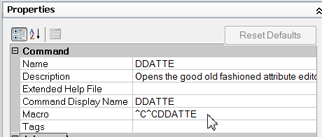
Add the values similar to those shown in this figure for Name, some type of Description, Command Display Name, and Macro.
To assign a button top image, first, click the name of your new command in the list to make it current.
In the upper right pane - Button Image - scroll through the available list of buttons, then click one that suits you. [Yes, you could make your own, but I attended a seminar at AU where the presenter said it's just not worth the effort; works for me.]
The name of the button will appear under ‘Images’ in the Properties area, as well as beside your new command in the Command list.

At this point, I would click Apply to apply your edits to your new command.
To add your new button to the Quick Access Toolbar, just drag it from the Command list and release it where you want it up on the Quick Access Toolbar. You should be good to go!
Power Tool
Selecting Objects in AutoCAD 2011
AutoCAD 2011 introduced several new selection and visibility features that can be found in third party applications, and are now a welcome addition to the shortcut menu. Each of these features are very intuitive and easy to use.
Note: Each of these features must be invoked prior to the launching of any command for which the selection is intended.
Select Similar
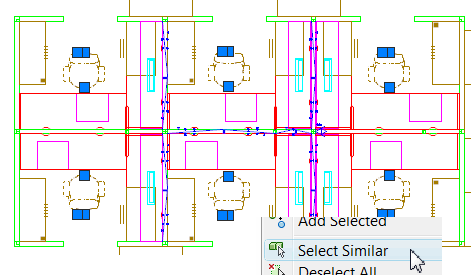
You will probably use this every day. Very similar to the Quick Select procedure (covered in March 2003), this process lets you pick a ‘guinea pig’ object, then use Select Similar to pick all the others.
With no command current, click on the object for which you want to select all the other similar objects.
Right-click, then click Select Similar.
Isolate Objects
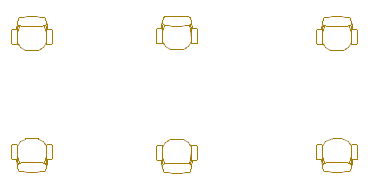
When you Isolate Objects, layers are not turned Off or Frozen. This is, essentially, a brand-new visibility feature. Also notice, in this exercise, although there may be other seating objects in this drawing created on the same layer(s), only the selected chair type was isolated. This has amazing possibilities!
How to Isolate, then Un-Isolate, Objects
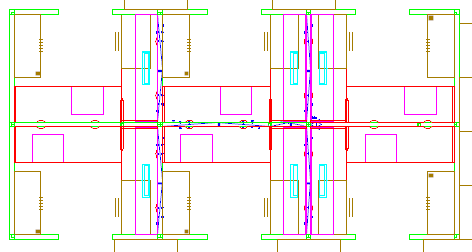
Open a drawing containing objects that are similar, such as doors, furniture objects, text objects, etc.
Click on one object for which there are others in the drawing.
Right-click, then click Select Similar to highlight all identical objects in your drawing.
To hide all objects other than the similar objects, right-click, then click Isolate, then Isolate Objects.

There are two ways to end the isolation of the other objects:
Select one object, then right-click, then click Isolate, then End Object Isolation.
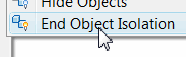
At the command line, type UNISOLATE, then press [Enter].
Hide Objects
The opposite of Isolate Objects is Hide Objects. After running the Select Similar routine - or whatever method you want to use to select objects to hide - right-click, then click Isolate, then Hide Objects.
Isolation and Hide Commands
FYI, here are the commands that relate to the selection features in this section: SELECTSIMILAR, ISOLATEOBJECTS, UNISOLATEOBJECTS/UNISOLATE, and HIDEOBJECTS.
The Odd Spot
Toolbars with the Ribbon in AutoCAD 2011
 Wonderful as the Ribbon may be (yes, I really did say that), until AutoCAD 2011, displaying a toolbar when you had a Ribbon workspace current was, shall we say, a wee bit less than intuitive. In AutoCAD 2011, they relented and realized that toolbars may have their place in some small way.
How to Add a Toolbar to a Ribbon Workspace
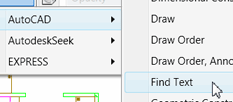 Click the View tab of the Ribbon.
On the Windows panel, click Toolbars to display the shortcut menu of available toolbars.
Hover on the AutoCAD item to display the available AutoCAD toolbars.
Nice.
The Basics
Multiline Text
 I was quite amazed to discover that, over the last 7+ years, I had not covered Multiline Text. My humble apologies. There are lots of powerful features in this command, so this may take another month or two to cover properly.
Multiline Text (Mtext) is what you would use for construction notes, specifications, or any body of text that would be in paragraph form.
How to Add Multiline Text to the Drawing
Set the desired layer and text style.
On the Home tab
 Annotation panel, click Multiline Text.
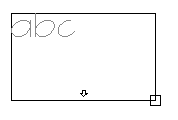 Specify the first corner of the Mtext box. After specifying the first corner, the option string is displayed:
Specify opposite corner or [Height/Justify/Line
	spacing/Rotation/Style/Width/Columns]:
To change the height, enter H, then enter the desired height for the Mtext.
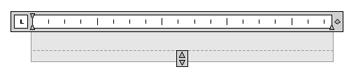
After you specify the opposite corner of the Mtext box, you will see the Mtext Editor window and the Text Editor contextual tab state.

 Note: With the introduction of the Text Editor contextual tab state, the Text Formatting toolbar is disabled by default. All the features from the Text Formatting toolbar are available on the Text Editor tab.
Mtext Editor Shortcut Menu Features
Right-click in the text area of the Mtext window and you get a shortcut menu.
Editor Settings
![]() There are a few things you may be interested in on the Editor Settings shortcut menu.
There are a few things you may be interested in on the Editor Settings shortcut menu.
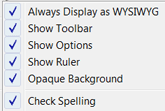 Always Display as WYSIWYG ("What You See Is What You Get") When you double-click an Mtext object to edit it, you may have encountered a situation where the Mtext Editor fills the screen in an effort to ‘help you’ see the text. This is usually the case when you have double-clicked on Mtext that is relatively small in the drawing area. Check this feature to have the editor open without enlarging itself to show the text in a magnified window.
Note: The ‘Always Display as WYSIWYG’ is the shortcut menu equivalent to the variable MTEXTFIXED found in Michael's Corner, November 2009.
Show Toolbar Although I think you will easily adapt to the Text Editor tab, if you want to display the former Text Formatting toolbar, check Show Toolbar.

Opaque Background If the Mtext editor window opens ‘over’ other objects in the drawing, it may be difficult to see the text in the editor, as shown in the first illustration. Check Opaque Background to suppress the default see-through condition of the editor window.

More Mtext insights next month!
Left Field
And… They're Off! - The 136th running of the Kentucky Derby is always the first Saturday in May (and at this writing, it looks like it's going to be a sloppy track). Here are some bits of Derby trivia I found, too, in case you happen to be watching and are looking for conversation starters.
- A horse named Aristides, with Oliver Lewis up, was the first winner of the what is now called the Kentucky Derby. He ran the race in 2:37.75 over a mile and a half course. The distance was changed to a mile and a quarter in 1896.
- The fastest Derby was in 1973, by Secretariat, who broke the two-minute mark and blazed the mile and a quarter in 1:59.4. Remarkably, each quarter mile split was faster than the one preceding it. No other horse has broken the two minute barrier in the Derby.
- Twenty one horses, from Day Star in 1878 to Winning Colors a hundred and ten years later, have led the race wire-to-wire.
- Many great horses - Man o' War, Seabiscuit, Kelso, Buckpasser, John Henry, Cigar - never raced in the Derby; others, such as Native Dancer, Nashua, Bold Ruler, Round Table and Alydar, ran and didn't win.
- Willie Shoemaker will never live down what he did in the Kentucky Derby in 1957. Leading on Gallant Man, he mistakenly pulled up 110 yards before the finish line and was passed by Iron Liege. But Shoemaker will also never be forgotten for what he did at Churchill Downs in 1986, when he became the oldest jockey to win the Kentucky Derby. He was 54 when he rode Ferdinand, trained by 73-year-old Charlie Whittingham, to the Derby win.
- Eight horses that have won the Kentucky Derby have been bred by Calumet Farm in Kentucky.
- Jockey Eddie Arcaro rode to two Triple Crown wins. The first on Whirlaway in 1941, and then on Citation in 1948.
- The first woman to ride in the Kentucky Derby was Diane Crump on May 2, 1970.
- And finally… Horse-racing regulations state that no race horse's name may contain more than eighteen letters. Names that are too long would be cumbersome on racing sheets.
Donate to CADTutor
If you found this article useful, you might like to consider making a donation. All content on this site is provided free of charge and we hope to keep it that way. However, running a site like CADTutor does cost money and you can help to improve the service and to guarantee its future by donating a small amount. We guess that you probably wouldn't miss $5.00 but it would make all the difference to us.
Note from Michael: I want to thank all of my customers for continuing to retain my training services (some for over three decades!) and let you know your donations do not go to me personally, but to the ongoing maintenance of the CADTutor ship as a whole and to support the yeoman efforts of my friend and CADTutor captain, David Watson, to whom I am grateful for this monthly opportunity to share a few AutoCAD insights.
Share this page:


The Basics
- Dual Dimensions in a Dim…
- UCSICON Options
- "Best of" Basics: Irreg…
- Tool Palette Basics
- Original Dimension Value
- Possible Solutions to th…
- Avoid Using 'Standard' i…
- Shorten the Plot Scales…
- Update the Source File B…
- User Increment Angles fo…
- Drawing Information
- 'Sign Language'
- Rotate with the Copy Opt…
- Use the INSERT Osnap on…
- To or From the Current L…


