

 Michael’s Corner #56
August 2007
Annotation & Customization
AutoCAD 2008 really is a nice piece of work. They made some nice refinements in the Mtext routine and gave us the ability to add columns, then gave us some flexibility with the Dashboard so we can customize it with our own commands. In the Power Tool I pass along an answer to one of the emails I received about adding some color to an area of a floorplan, then while I was working on the title blocks for one of my customers, I came across a feature in the Block Attribute Manager (Battman) that I wanted to remind you about.
Version conversion note: I don't usually do product promotions in these pages, but I think it's important to get the word out about Autodesk's TrueConvert product. With so many versions out there at this point, this utility is a "must have" for all offices.
If you would like to contact me directly, you can do that also.
Blessings to one and all,
Michael
A2008 Mtext Multiple Columns

Since its introduction in the waning days of DOS, the Multiline Text object has grown to be quite the dominant feature on the AutoCAD landscape. In AutoCAD 2008, we have an extensive array of features that enable us to customize an Mtext object to have multiple columns. When dynamic columns are configured, the Columns button will then appear with a yellow lightning icon on it (rather than the red slash). Here are a few insights to get your curiosity up.
Instructions to Use Columns in the Mtext Editor
- Double-click an Mtext object to open the Editor and the Text Formatting toolbar.
- Click the Columns button to open the shortcut menu from which you can choose from Dynamic Columns or Static Columns.
Dynamic Columns
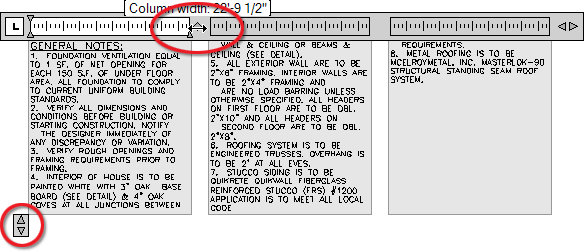
Auto Height - Adjust the width and height of the columns using the horizontal and vertical controls, and AutoCAD maintains the same height in the leading columns.
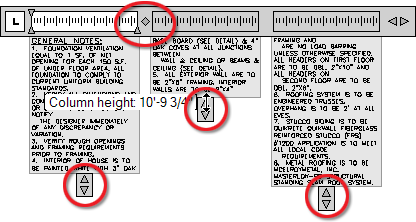
Manual Height - Independently adjust the width and height of the columns using the horizontal and vertical controls. AutoCAD adds columns as necessary.
Tip: To create a second column when using Dynamic Columns, position your cursor where you want the break, then press ALT+Enter.
Static Columns
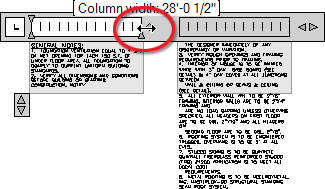
Specify the number of columns - You can adjust the width and height of the columns as well as the separation between columns and the height goes where it will.

Note: Any Mtext - using either Dynamic or Static columns - can be edited with the associated grips.
Power Tool
Getting Your Hatch in Order
When you need to hatch an area like you used to when you were in Design school (remember those Zip-A-Tone / Pantone stickyback sheets?), you can accomplish the same result using the Hatch command with the option of sending the hatch to the back.
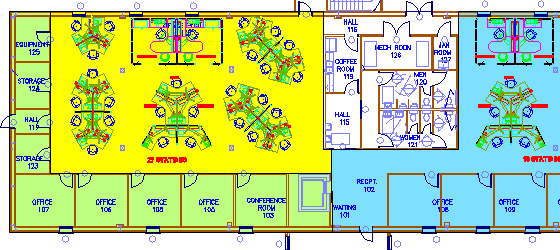
Instructions to Hatch an Area with a Solid Hatch
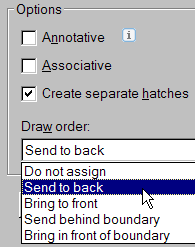
- First, you will need to have an object to select to be hatched, so create a polyline around the area.
- Launch the Hatch command to open the Hatch and Gradient dialog box, then set the Predefined hatch type to Solid.
- In the Swatch box, choose a color.
- Under the Options section, select Send To Back as the Draw Order.
- Click the Add: Select Objects button, then select the polyline you created in Step 1. Press Enter and click OK (or the Preview button to see it before you commit).
That should do it!
The Odd Spot
Battman Follow-Up
Last year (October 2006) I addressed using the Block Attribute Manager (Battman for fun) to edit the attributes of a block definition.
While editing the title blocks of one of my customers just recently, I used the Block Attribute Manager for a different purpose: The ordering of the attributes in the Enhanced Attribute Editor.
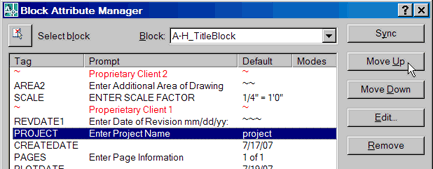
When you have an attributed block, in this case an attributed title block, when you double-click on that block, the Enhanced Attribute Editor opens. If you have several attributes, there's a possibility the order of the attributes may not be in a logical order. To order the attributes in a block definition, use BATTMAN.
Tips on using the Block Attribute Manager
- Click the Select Block button in the upper left corner so you can select the block containing the attributes you wish to order.
- Select the attributes one at a time, then use the Move Up or Move Down buttons.
- If you have several block references (locations) of the same block definition, use the Sync button to synchronize the new attribute order to all of the block definitions in the drawing. You will need to use the Sync button if you Remove attributes, too.
The Basics
A2008 Dashboard Custom Panel
 Although the Dashboard was introduced in A2007, you couldn't customize it, so last month (see July 2007) I covered how to add panels to the AutoCAD 2008 dashboard. I also promised that I would cover how to make custom panels this month. To that end, here's a quick lesson in creating a custom panel for the AutoCAD 2008 Dashboard. Once you have that panel, you can populate it with any command you want.
Instructions to Add a Custom Panel to the A2008 Dashboard
- Open the Dashboard (Tools
 PalettesDashboard). If there are no panels on the Dashboard, right click on the Properties icon at the bottom of the Dashboard title bar, then roll over to Control Panels and click a panel, just to get one going.
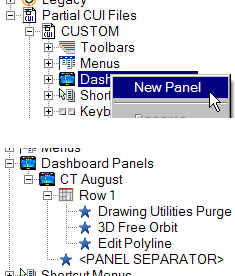
- Now that you have a panel on the dashboard, right-click in an empty area for the shortcut menu, then click Customize Commands to open the Customize User Interface (CUI).
- Expand the Partial CUI node, then expand the CUSTOM node to display the customizable elements.
- Right-click on the Dashboard Panels node, then click New Panel. Enter a name for the panel, then press Enter.
- To populate your new panel, from the Commands list at the bottom of the CUI, drag the desired command up and release it next to your new panel. As you add buttons to the panel, in the upper right quadrant of the CUI you will see a Panel Preview.
- Click OK to save your customization and now you have your own panel on the Dashboard!
Left Field
More Horse Sense - A horse has a wide range of vision. A horse can see completely around its entire body except for small blind spots directly in front of its face, underneath its head, and directly behind itself. This is why it's very important not to walk up right behind a horse - you are in its blind spot and if you startle it you may get kicked.
Donate to CADTutor
If you found this article useful, you might like to consider making a donation. All content on this site is provided free of charge and we hope to keep it that way. However, running a site like CADTutor does cost money and you can help to improve the service and to guarantee its future by donating a small amount. We guess that you probably wouldn't miss $5.00 but it would make all the difference to us.
Note from Michael: I want to thank all of my customers for continuing to retain my training services (some for over three decades!) and let you know your donations do not go to me personally, but to the ongoing maintenance of the CADTutor ship as a whole and to support the yeoman efforts of my friend and CADTutor captain, David Watson, to whom I am grateful for this monthly opportunity to share a few AutoCAD insights.
Share this page:


The Basics
- Dual Dimensions in a Dim…
- UCSICON Options
- "Best of" Basics: Irreg…
- Tool Palette Basics
- Original Dimension Value
- Possible Solutions to th…
- Avoid Using 'Standard' i…
- Shorten the Plot Scales…
- Update the Source File B…
- User Increment Angles fo…
- Drawing Information
- 'Sign Language'
- Rotate with the Copy Opt…
- Use the INSERT Osnap on…
- To or From the Current L…


