

 Michael’s Corner #57
September 2007
Learning Curves
In my copious "free time" I promised myself to look into material mapping. Well, push came to shove and I needed to get on the learning curve and figure this out, so that's what's front and center this month. My friend Lee Ambrosius [www.hyperpics.com] has authored the "AutoCAD 2008 3D Modeling Workbook for Dummies", just in case any of you want to take what you see here and continue your own learning curve.
The remaining articles are things I had in my "To Cover" list and in my recent training sessions, customers have bumped into some things that I needed to clarify… so hopefully the coverage on Copy with Basepoint, Otrack, and a really cool trick to run 3D Orbit will bring joy to some faces. Which is the point of this whole exercise.
If you would like to contact me directly, you can do that also.
Blessings to one and all,
Michael
Applying an Image to 3D Objects in A2008
 Recently I had the opportunity to do some training for Standard Textile in Cincinnati, OH, and since they have this great site where you can download fabric swatches in JPG format, I thought it would be helpful to understand the fundamentals of adding textures to 3D objects.
The main player will be the Materials palette. You will need to have a drawing with a 3D object in it in order to go thru this exercise. The process will work on a 3D Face, but you may also want to take a look at my coverage of 3D Orbit in February 2006, or my article on the A2007 command Presspull in December 2006. Either one of those will enable you to get to the point of getting some 3D geometry created. Also, if you don't have a swatch to use, click here to download some of the .JPG files like the one I am using in this exercise.
Instructions to Apply a Material Image to a 3D Object
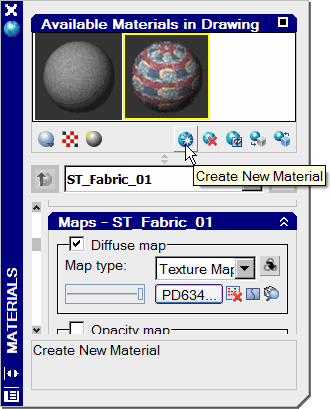
- Open the Material palette Tools
 PalettesMaterials, then click the Create New Material button. Enter a Name and a Description for this material, then click OK. You will see another ball show up in the Preview area and the name of your new material listed in the dropdown list.
 - The A2008 Materials palette has several headings. Collapse the Material Editor heading and the next one is Maps. In the Diffuse Map area, click the Select Image button, then navigate to your desired image (valid types are TGA, BMP, RLE, DIB, PNG, JPG, JPEG, TIF, GIF, PCX), then click Open to display that image name in the dropdown list. You will also see the image mapped to the sphere, but it may not be discernable.
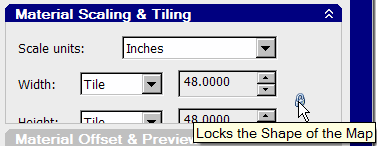
- If you're using one of the provided JPG files, expand the heading for Material Scaling & Tiling. Click the icon to Lock the Shape of the Map, then set the Scale Units to Inches. You can experiment with the size of the tiling of the image - and depending upon your object - set the size in either the Width or the Height field and see how it looks.
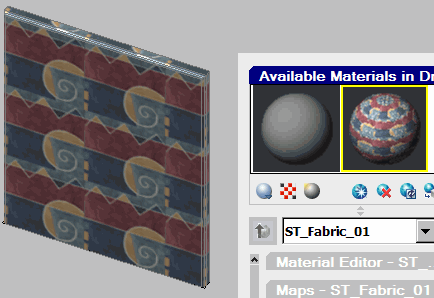
- In order to see the result of the application of the image to the object, you will need to open the Visual Styles Manager palette, ToolsPalettesVisual Styles.
- From the Visual Styles Manager, double-click the style named Realistic to assign that visual style to the drawing window.
- Now, from the Materials palette, in the preview of Available Materials in Drawing, drag and drop the sphere representing your newly created material onto the objects in the drawing!
That should keep you busy during your lunch hours for the next week or so…
Power Tool
Copy with Basepoint
This has been around for awhile, but just in case anyone missed it, here's how to copy objects easily from Drawing A into Drawing B… and specify a basepoint on the objects being copied.
Before You Begin… This procedure requires that the variable PICKFIRST be set to 1. Every now and then when folks try this and can't make it work, I find that their Pickfirst variable was set to 0.
Also… If you are in the habit of clicking the Minimize button for a drawing, the "tiling" of the drawings cannot take place. Maximize the drawing, then try Window![]() Tile Vertically again. Then stop using that Minimize button and try that handy process of CTRL + TAB to cycle between open drawings!
Tile Vertically again. Then stop using that Minimize button and try that handy process of CTRL + TAB to cycle between open drawings!
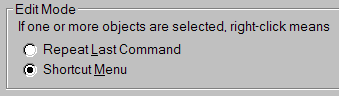 And Finally… Your Right-click Customization, Options
![]() User Preferences needs to have the right-click setting for the Edit Mode set to Shortcut Menu.
User Preferences needs to have the right-click setting for the Edit Mode set to Shortcut Menu.
Instructions to Use the Copy with Basepoint Feature
- First, you will need to have two drawings open. Now to up to the Window menu, then click Tile Vertically so you can see the two drawings side-by-side.
- In Drawing A, select the objects to be copied. If there are less than 100 grips, you will see them. If there are more than 100 grips, you won't. The maximum number of grips setting can be adjusted in OptionsSelection tab.
- Right-click in that drawing where you selected the objects, then click Copy With Base Point. If the grips are displayed you can specify one as the base point, or you can use your object snap method of choice.
- Now click in Drawing B, then you can either click Paste on the Standard toolbar or use CTRL+V to paste the selected objects into the target drawing… and you will see that your cursor is attached to the specified base point.
The Odd Spot
Hidden 3D Orbit
Where do they come up with this stuff? If any of you knew about this, I'm late to the party, but I was very jazzed to learn about this and I wanted to pass it along. So there I am, doing some AutoCAD training at a Herman Miller dealer in Michigan, when my good friend Beth says, "Hey, check this out!"
If you have your normal wheel-mouse that's set to zooming when you scroll it, and panning when you push it down like a button, here's what she found: Hold down the Shift key, then push the wheel down like it was a button… and drag it like you're panning.
Presto! 3D Orbit!
Ah yes. To put things back the way they were before you started that, use Zoom![]() Previous.
Previous.
The Basics
Object Snap Tracking (F11)
For those of you that were on the drafting board of years gone by, you will recall non-photo blue lead. We used that to essentially "track" points from different locations on the drawing, then where the lines intersected, we'd get out, say, our circle template and draw circles at those intersections. With that said, let's take a look at the Object Snap Track feature.
In this exercise (using the Db_samp.DWG found in the AutoCAD ..\Sample folder since about A2002), illustrate how to "acquire" the Endpoints from two existing objects, then place the center of a circle at their intersection.
Instructions to use Object Snap Tracking (Otrack)
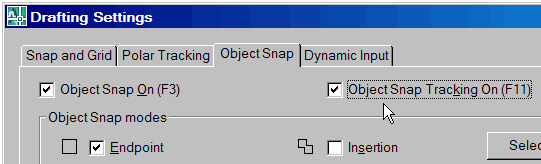
- Right-click on the Osnap button on AutoCAD's status bar, then click Settings to open the Drafting Settings dialog box on the Object Snap tab.
- For this exercise, just so you can get the feel of the procedure, only check the boxes for Object Snap On (F3), Object Snap Tracking On (F11), and Endpoint, then click OK.
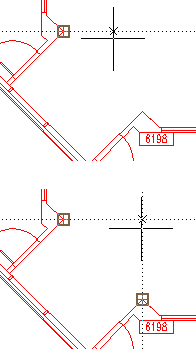
- Begin the Circle command, then acquire the Endpoint of an object by "visiting" that Endpoint so the tooltip displays "Endpoint". Don't click it, just visit. If you were successful, when you move your cursor away from that point, there will be a tracking line displaying dots.
- Now go visit another Endpoint on another object to acquire that endpoint (these are basically reference points for lines that intersect).
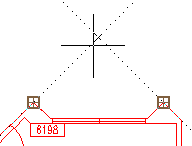
- Now move your cursor to where the tracking lines for those acquired points, and now you can CLICK to place the center point for the circle!
Additional Insights
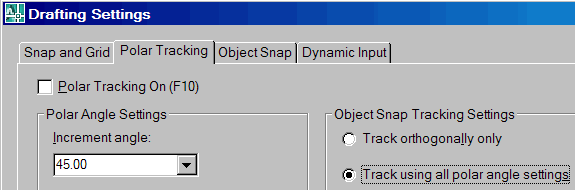
 In the Drafting Settings dialog box, on the Polar Tracking tab (see Michael's Corner, Basics February 2005), there's a check box in the Object Snap Tracking Settings area to "Track using all polar angle settings". In the illustration, you can see how acquiring a point with this setting enabled will track points at a 45 degree angle, too.
Left Field
What Color Are Your M&Ms? - If you average out the colors in the last umpteen bags of M&Ms you have consumed, you would find the following color percentages. Brown 13% / Yellow 14% / Red 13% / Blue 24% / Orange 20% / Green 16%. Now there's a perfectly good reason to go get a bag if I ever saw one!
Donate to CADTutor
If you found this article useful, you might like to consider making a donation. All content on this site is provided free of charge and we hope to keep it that way. However, running a site like CADTutor does cost money and you can help to improve the service and to guarantee its future by donating a small amount. We guess that you probably wouldn't miss $5.00 but it would make all the difference to us.
Note from Michael: I want to thank all of my customers for continuing to retain my training services (some for over three decades!) and let you know your donations do not go to me personally, but to the ongoing maintenance of the CADTutor ship as a whole and to support the yeoman efforts of my friend and CADTutor captain, David Watson, to whom I am grateful for this monthly opportunity to share a few AutoCAD insights.
Share this page:


The Basics
- Dual Dimensions in a Dim…
- UCSICON Options
- "Best of" Basics: Irreg…
- Tool Palette Basics
- Original Dimension Value
- Possible Solutions to th…
- Avoid Using 'Standard' i…
- Shorten the Plot Scales…
- Update the Source File B…
- User Increment Angles fo…
- Drawing Information
- 'Sign Language'
- Rotate with the Copy Opt…
- Use the INSERT Osnap on…
- To or From the Current L…


