

 Michael’s Corner #10
October 2003
Automating AutoCAD
Over the last few weeks I have been fixing over 100 drawings for a customer and in so doing, have come across several features that I'd like to share with you all. If you do repetitive procedures, having a "button" or tool to hit can be very efficient, especially if that tool combines several commands. This month I'll introduce custom toolbar fundamentals and we'll see where we go from there. We take a look at the semi-related feature of Profiles, as well as how to save some time when you launch AutoCAD and want to begin with your own template and newly-created Profile. Hopefully there will be a few insights here to take your AutoCAD "up a notch".
If you would like to contact me directly, you can do that also.
Blessings to one and all,
Michael
The Garden Variety Toolbar
Where does my custom toolbar live?

When you create a toolbar from within AutoCAD, it is automatically saved to the acad.mns file, not in acad.mnu. Therefore, it is a REALLY good idea to backup all menu files (*.mn?) before creating your own toolbar.
Note to AutoCAD 2004 users only: The acad.mns default location is (take a breath):
C:\Documents and Settings\Your Name\Application Data\Autodesk\AutoCAD 2004\R16.0\enu\Support.
Making a garden variety toolbar (this even works in LT!)
- Right-click on any AutoCAD tool and choose Customize to open the "Customize" dialog box with four tabs: Commands, Toolbars, Properties, & Keyboard (+ Tool Palettes in A2004).
- On the Toolbars tab, click New to open the "New Toolbar" dialog box.
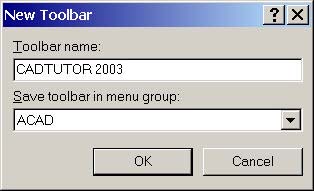
 Enter a name for the toolbar and choose OK. (It's best to leave it in the ACAD group). You will then see this very small toolbar with just one vertical bar in it.
- To see a listing of the available tools, go to the "Commands" tab. To see all the tools AutoCAD has to offer, scroll down in the Categories column and choose "All Commands". For a description of a command, click on a command name in the Commands column.

 To place a tool onto your toolbar, drag and drop the desired tool out of the Commands column onto your toolbar.
- To delete a tool from your toolbar, right-click on it and choose Delete from the context menu. Another way to get rid of a tool from a toolbar is to drag and drop it into space.
- After adding the desired tools, choose Close and AutoCAD does the rest!
 Tip 1: To get a vertical bar between tools, drag one tool just a slight bit away from the other one.
Tip 2: To COPY one tool from an open toolbar, hold down the Ctrl key while you drag 'n' drop. However, this only works if the "Customize" dialog box is open.
Power Tool
"Auto-Launch" AutoCAD

The Windows Start button enables you to select the programs you wish to launch, but there is a faster way to do it.
To setup a shortcut key to launch AutoCAD, do this:
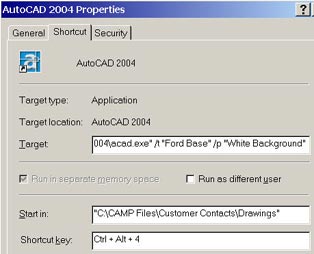
1. Right-click on the Desktop AutoCAD icon and choose "Properties" from the context menu.
2. Click in the Shortcut key area, then enter the letter you would like to use to launch AutoCAD. In the example, you see that AutoCAD 2004 will launch with a combination of Ctrl + Alt + 4. If you want to change it, backspace and put in a different one.
Tip: You can assign a "Shortcut key" to ANY application icon on your Desktop. You may want to consider Ctrl+Alt+W to launch Word, X for Excel, P for PowerPoint,… and F for Freecell!
 There are two other useful settings called "switches" that you can add to the launching of AutoCAD.
/t Notice the lower case "t". After the forward slash "switch", type the name of the template file you want AutoCAD to use when launched. If the template name contains a space, put the name in quotes.
/p Notice the lower case "p". Type the Profile name AutoCAD is to use on startup. For best results, put the profile name in quotes.
To automate the folder in which AutoCAD "looks" when you Open or Save, enter the path and folder name in the Start in: field (in quotes).
Tip: The REMEMBERFOLDERS variable must be set to <0> for the "Start in" folder to be enabled.
The Odd Spot
Hatch Base
Sometimes you need a hatch pattern to begin at a certain point. Other times, a line in the hatch is "too close" to the profile of the shape or object being hatched and compromises the clarity. To specify the origin point of a hatch, use the SNAPBASE command. Although this command, as the name suggests, enables you to specify the origin of the increment snap (F9), it also specifies the hatch origin as indicated in the figure.
The Basics
Profiles for Performance
The key to working with profiles is to remember that AutoCAD is 'recording' all the changes you make to the current profile… so think before you make the changes.
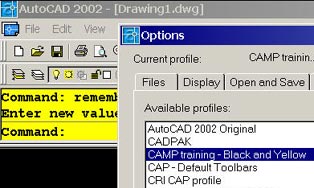
- To create a named profile, from the Profiles tab of the Options dialog click Add to List, then enter a name for your profile (Dash/Underscore are OK; no periods, etc.).
 Choose Apply & Close and you will see the name in the list… but it's not current.
- Double-click on the name (or choose Set Current) then configure AutoCAD the way to you want it (Cursor size, Color, Background, Command line position and size, Toolbars and position). Since AutoCAD is "recording" all changes to the current profile, you"re ready to go!
- Export each of your profiles using the Export button.
Back it Up
 Since there is always a possibility that you may mistakenly modify this profile, the next thing you should do is make one that you will use as your "working" profile. This will allow you to retain the integrity of the original if something happens.
Tip: If you're going to make a change to the toolbar or screen settings, confirm which profile is current before you do so.
Donate to CADTutor
If you found this article useful, you might like to consider making a donation. All content on this site is provided free of charge and we hope to keep it that way. However, running a site like CADTutor does cost money and you can help to improve the service and to guarantee its future by donating a small amount. We guess that you probably wouldn't miss $5.00 but it would make all the difference to us.
Note from Michael: I want to thank all of my customers for continuing to retain my training services (some for over three decades!) and let you know your donations do not go to me personally, but to the ongoing maintenance of the CADTutor ship as a whole and to support the yeoman efforts of my friend and CADTutor captain, David Watson, to whom I am grateful for this monthly opportunity to share a few AutoCAD insights.
Share this page:


The Basics
- Dual Dimensions in a Dim…
- UCSICON Options
- "Best of" Basics: Irreg…
- Tool Palette Basics
- Original Dimension Value
- Possible Solutions to th…
- Avoid Using 'Standard' i…
- Shorten the Plot Scales…
- Update the Source File B…
- User Increment Angles fo…
- Drawing Information
- 'Sign Language'
- Rotate with the Copy Opt…
- Use the INSERT Osnap on…
- To or From the Current L…


