

 Michael’s Corner #15
March 2004
Palette Parade
Tool palettes are quite the hit among my customers across in the US. Once they understand how they can be implemented I'm getting high fives and big smiles. This month will be an overview of the whole palette thing.
For those of you considering the upgrade to A2005 [it was announced last month and should be at a reseller near you soon], you will find some additional enhancements made to this timely feature. Suffice it to say that if you have yet to upgrade to A2004, it would be worth your while to go ahead and get in the A2005 boat.
If you would like to contact me directly, you can do that also.
Blessings to one and all,
Michael
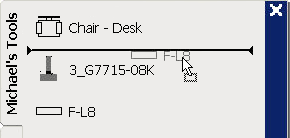
Tool Palettes in A2004
 DesignCenter's great, but when it comes to placing blocks, it's about 50% bigger than required for the task at hand. Thus the birth of tool palettes. Create a tool palette containing your most frequently used blocks and/or hatch patterns and you have minimized the need for DesignCenter (not eliminated, just reduced the access frequency).
Tool Palette Triplets
Make your own tool palette
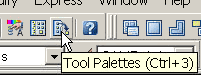
- Launch the tool palette with Ctrl+3 or click the Tool Palettes button on the Standard toolbar.
- Right-click on the current palette or the Tool Palette title bar and select New Tool Palette.
- Enter a name for the palette.
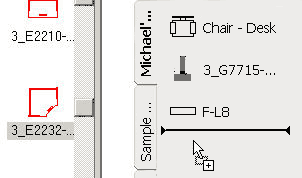
Copy a block from an existing palette
- Right-click on the block and select Copy.
- Set your palette to current, right-click and select Paste.
- When you have populated your palette with blocks, you can organize them by dragging them around.
Placing a block on the drawing from the tool palette
- Click the block on the palette (you don't have to drag it).
- Move your cursor into the drawing (Osnaps are OK).
- Click to place the block in the original orientation.
Tip: If you have the most recent version/patch for A2004, you will see an option string prior to specifying the insertion point for the block on the drawing. Some of you may not see an option string. In either case, simply type R and enter the desired rotation angle.
Please note, however, if that's not the orientation you expected, type R again …BUT… enter the new rotation value based on the original orientation of the block, not based on your first attempt.
Organize your palettes
- Set the desired palette to be current, then right-click on the palette tab itself.
- Select Move Up or Move Down from the menu.
- Select Delete from the menu to delete that tab from the palette.
Add your own blocks to a palette (unless you have A2005)
- Open DesignCenter and navigate to the drawing containing blocks you would like to put on the palette.
- Expand the drawing and click on the blocks icon in the tree view.
- Drag the desired block from the list view onto the current palette.
Note to you "cutting edge" folks: With A2005 you can drag the block directly onto the palette from the drawing. VERY nice.
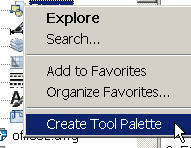
Tip: If you have created a drawing with your favorite blocks such as electrical components, HVAC/MEP blocks, doors for your architectural plans, etc., simply right-click on the block icon in either the tree view or list view and select Create Tool Palette from the context menu. AutoCAD will go about the business of creating a tool palette with the drawing name containing all the block definitions from that drawing.
Change the size and arrangement of the icons on the palette
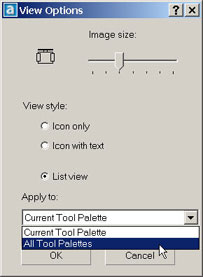
- Right-click on the palette and choose View Options.
- Scroll the slider to adjust the size of the image.
- Experiment with the view styles, too.
Adjust the size and display individually for each palette
- Set the desired palette to be current and open the palette context menu.
- Make the desired adjustments to the size and view style.
- Select the option for Current Tool Palette, and then click OK.
Change or add a block description
- Right-click on the block to edit.
- Choose Properties from the context menu.
- Add or edit the block Description.
Block icon Properties features
- Preset the Explode setting for block placement.
- Check the source drawing location for the block.
- Specify block scale (only recommended for unit blocks, not dimensionally accurate blocks).
Note: If you "relocate" the source file of a tool palette block, you may get what is cautiously referred to as "unexpected results". Simply re-establish the source location for the block using the Tool Properties dialog box and you should be fine.

Change the tool palette transparency
- Right click on the palette and select transparency from the context menu.
- Adjust the slider as necessary.
- Click OK and move the tool palette over something. Ooh. Ahh.
Note: For heavy 3D users, if you are using the hardware accelerator for your graphics [Options/System/Properties button/Hardware radio button at the bottom right], transparency is disabled.
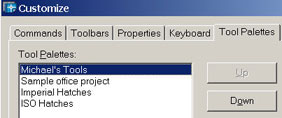
Share your palettes with others
- Right-click on the tool palette title bar and choose Customize.
- Select the desired tool palette to export from the list on the left of the Tool Palettes tab.
- Click the Export button and navigate to the folder where you want to save the XTP file.
Add a hatch to your tool palette (this is not pretty… in A2004)
- Set one of the sample palettes to current which contain a sample hatch pattern.
- Copy the hatch pattern and paste it onto your palette.
- Right-click the hatch icon on your palette and choose Properties to edit the pattern and description values.
Another note to you "cutting edge" folks: With A2005 you can drag a hatch directly onto the palette from the drawing.
My apologies to those of you without A2004 who did not find an AutoCAD tip in my column that you could use right away. I promise to have a broader range of tips next time.
Donate to CADTutor
If you found this article useful, you might like to consider making a donation. All content on this site is provided free of charge and we hope to keep it that way. However, running a site like CADTutor does cost money and you can help to improve the service and to guarantee its future by donating a small amount. We guess that you probably wouldn't miss $5.00 but it would make all the difference to us.
Note from Michael: I want to thank all of my customers for continuing to retain my training services (some for over three decades!) and let you know your donations do not go to me personally, but to the ongoing maintenance of the CADTutor ship as a whole and to support the yeoman efforts of my friend and CADTutor captain, David Watson, to whom I am grateful for this monthly opportunity to share a few AutoCAD insights.
Share this page:


The Basics
- Dual Dimensions in a Dim…
- UCSICON Options
- "Best of" Basics: Irreg…
- Tool Palette Basics
- Original Dimension Value
- Possible Solutions to th…
- Avoid Using 'Standard' i…
- Shorten the Plot Scales…
- Update the Source File B…
- User Increment Angles fo…
- Drawing Information
- 'Sign Language'
- Rotate with the Copy Opt…
- Use the INSERT Osnap on…
- To or From the Current L…


