 Michael’s Corner #8
August 2003
Something for Everyone
This month's features have come from questions I encountered over the last few weeks. This month I have a solution for an easy way to create walls or other parallel line applications, tell you how a non-continuous linetype could be affected by something other than the LTSCALE factor, explain why blocks have weird names sometimes, and let you in on the startling ability to select objects in some fashion other than a rectangle all the time. There's sure to be something in here for everyone.
If you would like to contact me directly, you can do that also.
Blessings to one and all,
Michael
Quick and Easy Parallel Lines
Quiz: What powerful Lisp routine was first introduced on the R11 "Bonus CD", incorporated into AutoCAD R12, disappeared starting in R13 but has been in the LT product since… forever? Dline!
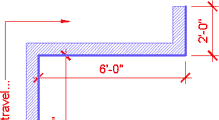

The DLINE Lisp routine is a powerful parallel line generating tool that performs automatic corner intersection cleanups, as well as a number of other features. The Dline routine draws Lines; nothing special. After each pick, parallel line segments are drawn on the current layer based upon the current settings. When you launch the routine (DL or DLINE), you will see the following:
Break/Caps/Dragline/Offset/Snap/Undo/Width/<start point>:The important options are Dragline, Offset, and Width:
Width - Sets the distance between the parallel lines. The default is around 1/16". If you are drawing medical equipment like catheters, this is all ready for you. In this series of illustrations, however, the Width is set to 6".
Dragline - Think 'justification'.
Set dragline position to Left/Center/Right/ <Offset from center = 0">:Specify Right, Center, or Left based upon the direction of travel. The default is Center justified and in the illustration I have drawn the Dline using a Right dragline setting.
In the first figure, the Dline began where I show the dot, then I proceeded north. I changed the lineweight property of the Right wall face to indicate the Dragline setting and hatched the wall cavity for clarity.
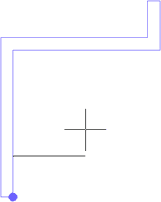
Offset This enables you to "offset" the Start point of a new Dline. You get three prompts which go as follows:
- 'Offset From' In the second figure, I picked the endpoint indicated by the dot. [Tip: Do NOT turn on Osnap, just use Endp to grab the offset point.]
- 'Offset Toward' Turn ON Ortho (if it isn't already) and pick a point in the direction of the start point for the new Dline relative to the offset point. In the figure, I picked a point directly north of the dot.
- 'Distance' Now you can enter how far the start point is from the offset point in the direction specified. For the figure I entered a distance of 20.
After following those prompts, the new Dline begins and off you go!
Other features:
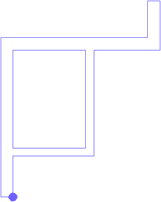
Break - Set to On, whenever a new Dline begins or ends on a line, an automatic "T" intersection is created as shown in this figure.
Caps - Set to Auto, a Dline that is not CLosed will automatically have endcaps placed at the beginning and ending locations.
Snap - Essentially a search radius within which the routine seeks another line to snap to; primarily for the beginning and ending points.
Click here to download the Dline routine, or go to http://www.autocadtrainerguy.com/AutoCAD_Stuff/AutoCADStuff.htm which will take you to the Productivity Downloads for AutoCAD page at my website. Scroll down and follow the directions for saving and implementing the Dline.lsp from the Load Applications dialog box.
Power Tool
Insta-Block!
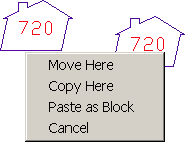 With no command current, select several objects you want to "block out". Right click anywhere (or where you want the base point to be, though Osnap is not available) and hold down your right mouse button until your cursor turns into a pointer, then drag the objects to where you want them placed.
When you release the right mouse button, a shortcut menu will appear from which you can choose several options. Unfortunately, implementation of an object snap cannot be done when using the Move Here or Copy Here features. The Paste as Block feature, however, can be a real time saver. Insta-block!
Tip: Use the Rename dialog to rename the now randomly named block.
The Odd Spot
Lyin' Type Scale

Non-continuous linetypes look just fine with the LTSCALE set to 1… if you're drawing anything smaller than a breadbox. Otherwise you will probably need to increase the value.
Note: The distance across one gap, the line, and another gap for the Dashed linetype is about 1.00" by default.
Several releases ago, the linetype variable CELTSCALE (Current Entity LineType SCALE) was introduced. CELTSCALE is actually a factor that is multiplied times the current LTSCALE. For example, If the current value for LTSCALE = 4, and you need just one line with a larger value, change the CELTSCALE to 2 and draw the line. The non-continuous linetype will appear as if the LTSCALE value was 8.
Some of the confusion surrounding CELTSCALE is found in the Properties window when editing the properties of an existing object. In the figure, the Dashed linetype was drawn with an LTSCALE value of 12, but notice in the Properties window (from A2004), the "Linetype scale" value is 1.0000. That's because that is actually the setting of the CELTSCALE variable, not LTSCALE. Check it out.
The Basics
Select the Right Stuff
With all of AutoCAD's available options by which you can select objects, you should never be unhappy with what you have selected to edit. First, to find out what all the options are, enter a ? at any Select objects prompt to display the following listing of available options:
Window/Last/Crossing/BOX/ALL/Fence/WPolygon/CPolygon/Group/CLass/Add/Remove/Multiple/Previous/Undo/AUto/SIngleRarely-used-but-powerful
Fence - This is essentially a crossing line. It does not need to be closed. Enter F at the Select objects prompt, then pick a series of points to place the fence line. Press Enter to select all the objects your fence line crossed.
WPolygon and CPolygon - To create a user-defined, closed area for object selection (rather than a rectangular Crossing or Window), enter WP or CP to place points around the objects to be edited in a free form.
Since these features create a closed area, you will essentially be placing points for a "rubberbanding" enclosure. Use WPolygon to select only those objects that fall completely within the bounding area of your shape (as shown in the illustration). Use the CPolygon feature to select all objects within, as well as those crossed by, the crossing lines of the shape.
Selection Tip 1: To deselect any selected object, hold down the Shift key and select the object(s) to deselect.
Selection Tip 2: If you enter ALL at a Select objects prompt, you will select objects on layers that are unlocked, thawed, on… and OFF. Only locked or frozen layers are safe from selection.
Donate to CADTutor
If you found this article useful, you might like to consider making a donation. All content on this site is provided free of charge and we hope to keep it that way. However, running a site like CADTutor does cost money and you can help to improve the service and to guarantee its future by donating a small amount. We guess that you probably wouldn't miss $5.00 but it would make all the difference to us.
Note from Michael: I want to thank all of my customers for continuing to retain my training services (some for over three decades!) and let you know your donations do not go to me personally, but to the ongoing maintenance of the CADTutor ship as a whole and to support the yeoman efforts of my friend and CADTutor captain, David Watson, to whom I am grateful for this monthly opportunity to share a few AutoCAD insights.
The Basics
- Dual Dimensions in a Dim…
- UCSICON Options
- "Best of" Basics: Irreg…
- Tool Palette Basics
- Original Dimension Value
- Possible Solutions to th…
- Avoid Using 'Standard' i…
- Shorten the Plot Scales…
- Update the Source File B…
- User Increment Angles fo…
- Drawing Information
- 'Sign Language'
- Rotate with the Copy Opt…
- Use the INSERT Osnap on…
- To or From the Current L…


