

 Michael’s Corner #19
July 2004
Summer Fun
The feature that really won me over to the whole DWF thing is the ability to plot to scale, a feature that's built into Autodesk's Express Viewer. The Viewer is included on your AutoCAD 2005 installation CD and can be downloaded from their website at www.autodesk.com/dwfviewer. This is where you want to send your contractors and collaborators who don't have AutoCAD so they can download it and view the DWF files. Then I found a couple other Text-related things that I thought were worthy of note that may escape the casual observer… or those of us who just don't take the time to investigate stuff because we're so darn busy. And finally, just to make sure we're all on the same page, a quick overview of the A2005 Revcloud routine; their fourth iteration of this feature. Carry on.
If you would like to contact me directly, you can do that also.
Blessings to one and all,
Michael
DWF: Writing and Reading
When you need to get a drawing into the hands of folks that don't have AutoCAD, there are a number of solutions, the most common of which is to create a PDF file. OK, so you're a small shop and you haven't shelled out the nominal currency for Adobe Acrobat. An alternative might be to use the fabulous product pdf995 ( www.pdf995.com), which costs less than US$10.00 and creates a PDF Printer Driver for any Windows application capable of output. But I digress.
Nonetheless, if you send a PDF file to the customer, chances are they will not be able to plot it to scale… or turn off layers… or access a hyperlink to a website. But if you send them a DWF file they can do all of that!
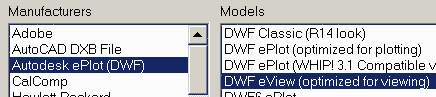
 To turn Off layers in a DWF file, you need to use the DWF eView (optimized for viewing).pc3. Since neither A2004 or A2005 have that driver installed by default, you will need to load it. We'll start there in the instructions.
Instructions to Create a DWF File in A2004 and A2005 (other versions are similar)
- Select File
 Plotter Manager…, then double-click the "Add-A-Plotter Wizard" icon.
 - Navigate through the screens to the point at which you can select the Autodesk DWF eView (optimized for viewing) Model.
- When configuring the output (in either Page Setup or Plot), select the DWF eView (optimized for viewing).pc3 device from your list of printers and plotters.
- Select the desired sheet size for the plot. Please note that the DWF file supports the full spectrum of sheet sizes, something you may not have available in your PDF plotting utility.
- In the Plot dialog box of A2004, specify a name for the DWF file at the bottom of the Plot Device tab BEFORE you click Plot (the default DWF path and name is that of the drawing file).
In A2005, if you have specified a DWF output, you are prompted for the DWF name WHEN you click Plot; there isn't a place in the Plot dialog to specify the output name.

Multi-Sheet DWF in A2004/A2005: For drawings with multiple layouts to be plotted, the Publish command (File![]() Publish) can create a Multi-Sheet DWF.
Publish) can create a Multi-Sheet DWF.
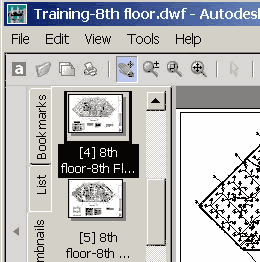
- Email the DWF file to your project associates who don't have AutoCAD.
If the Autodesk Express Viewer has been installed on the system, when they/you double-click the DWF file, the Viewer opens. If it is a Multi-Sheet DWF, you will see thumbnail views on the left in the viewer.
Features for Viewing the DWF File:
- Standard Pan and Zoom features are incorporated in the viewing area. Wheel mouse functions included.
- Hover over a hyperlinked object for the “CTRL + Click” tip.
- Right-click in the viewing area for a shortcut menu with items for Layers, Views, Zoom, and Printing.
- In the Print dialog box, select the area to print, the Orientation, and the Scale.
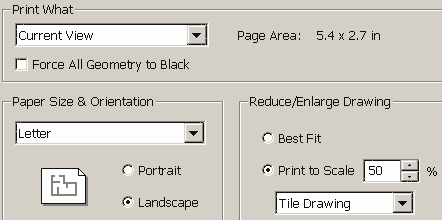
Tip: Since the printing is based upon the current view's lower left corner, zoom to the desired area first, then open the Print dialog box.
Power Tool
Convert Text to Mtext
If you have older, pre-Mtext drawings or drawings you may have received from other sources, the Express![]() Text
Text![]() Convert Text To Mtext is a real time-saver.
Convert Text To Mtext is a real time-saver.
Features:
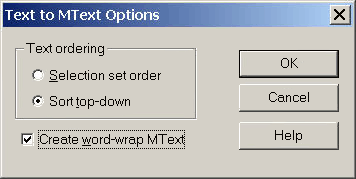
- Launch the routine, then enter O to open the Text to Mtext Options dialog box.
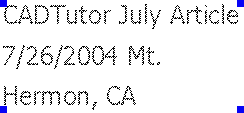
- The Create Word-Wrap Mtext option at the bottom of the dialog box ignores the separate lines of individual text and wraps them together with a width based upon the longest line as seen in the second figure.

- The Selection Set Order option uses the text object selected first as the "anchor" to which the other selected text objects are gathered. The Word-Wrap option also bears upon the resulting Mtext object.
The Odd Spot
Mtext Property Edits
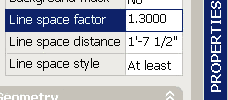
Tremendous improvements have been made across the history of the Mtext routine since it was originally introduced. Oddly, the only method by which the spacing between lines can be adjusted is in the Properties window for an Mtext object, not in the Mtext editor shortcut menu.
Make adjustments using the Line Space Factor (easiest method for finessing the distance between lines), Line Space Distance, or the Line Space Style.
The Basics
Revision Cloud IV
I. R14/Bonus. II. For Sale : Express Tools, Volumes 1-9. III. AutoCAD 2004. IV. AutoCAD 2005.
OK, some could argue that II and III were the same, but nonetheless, the routine has gone through several iterations. Of significant importance (for many of you) is the fact that the AutoCAD 2005 Revcloud feature brought back the Calligraphy option.
Select arc style [Normal/Calligraphy] <Calligraphy>:
Specify start point or [Arc length/Object/Style]
Instructions
- Always confirm the Min/Max arc length. Reset it if necessary by entering A to run the prompts for minimum and maximum arc lengths. The Maximum arc length cannot exceed 3x the Minimum arc length.
- If you are not converting an existing object into a revision cloud, specify a start point and guide your cursor around the area for the cloud. Return to where you started to automatically close it, or press ENTER to create an open cloud.
 If you have a shape to convert into a revision cloud, press ENTER to accept the default <Object> option.
 Select the object and AutoCAD converts the shape (any closed pline or polygon) into the revision cloud, then…
 …(and this ranks pretty high on the "Goofy" scale) after converting the polygon to a perfectly good revision cloud, you get the following prompt:
Reverse direction [Yes/No] <No>:
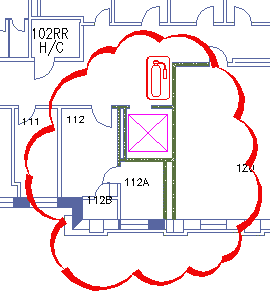
Press ENTER to keep the revision cloud as it is, or type Y to reverse the cloud as shown in figure 5.
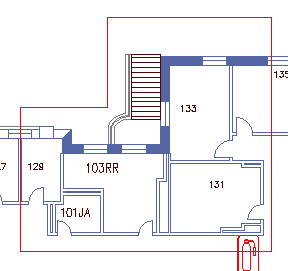
Note: If you opt to reverse the direction, there is no prompt along the lines of "Are you sure you really wanted to turn this inside out?". The command ends. If you Undo, you get the original pline shape back (figure 3), not the good cloud you had before you "experimented" with the reversed direction. Enjoy!
Donate to CADTutor
If you found this article useful, you might like to consider making a donation. All content on this site is provided free of charge and we hope to keep it that way. However, running a site like CADTutor does cost money and you can help to improve the service and to guarantee its future by donating a small amount. We guess that you probably wouldn't miss $5.00 but it would make all the difference to us.
Note from Michael: I want to thank all of my customers for continuing to retain my training services (some for over three decades!) and let you know your donations do not go to me personally, but to the ongoing maintenance of the CADTutor ship as a whole and to support the yeoman efforts of my friend and CADTutor captain, David Watson, to whom I am grateful for this monthly opportunity to share a few AutoCAD insights.
Share this page:


The Basics
- Dual Dimensions in a Dim…
- UCSICON Options
- "Best of" Basics: Irreg…
- Tool Palette Basics
- Original Dimension Value
- Possible Solutions to th…
- Avoid Using 'Standard' i…
- Shorten the Plot Scales…
- Update the Source File B…
- User Increment Angles fo…
- Drawing Information
- 'Sign Language'
- Rotate with the Copy Opt…
- Use the INSERT Osnap on…
- To or From the Current L…


