

 Michael’s Corner #132
February/March 2014
There He Is, Out Standing in His Field

 It's old news to many of you by now, but I'm still pretty excited about receiving the Autodesk University Speaker Award for Hands-On Labs. My seminar, ‘Click My Ride: Customizing Autodesk® AutoCAD® for How You Work’, received the highest feedback rating among all the labs at AU. With over 700 seminars and labs, the competition was pretty substantial, so this award—for me—is the top of the heap. So however you may want to look at it, I guess I'm out standing in my field.
To continue with that ‘Click My Ride’ theme, in this (now bi-monthly) column, I want to take a look at a couple automation tools, as well as some of the things that we go back and forth with in our daily AutoCAD activities.
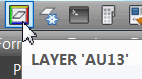
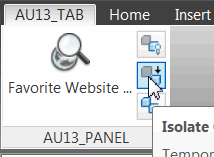
…Running a script from the Quick Access Toolbar
…Useful routines for the ACADDOC.LSP file
…Layer column arrangement options
…The fundamental power of Layer Previous
Hope this finds you all well on your way to a productive and prosperous 2014, and keep up the good work!
If you would like to contact me directly, you can do that also.
Blessings to one and all,
Michael
Running a Script with One Click
Although we covered a lot of customizing ground in my (award-winning!) lab at AU, there was one method I didn't cover, but will definitely have next year: the Script. Several years ago in January 2008, my friend, Lee Ambrosius, stepped in and showed you what scripts can do. Scripts are like a poor man's Lisp, and for a one-liner like me, they're just as effective and much easier to understand.
When to Use What
So what really is "best"? Should you make your own Tab on the Ribbon, put things on the Tool Palette, populate the Quick Access Toolbar, create an Alias? It all depends on how you like to work—and for many of us, it's a combination—but here's my take on those particular customizable components.
Quick Access Toolbar
 Officially my favorite customization location. You can add single commands, macros, make your own button, run a Script (see below), and it's always visible. I'm a typer, but I love my buttons on the Quick Access Toolbar.
Alias
To run a single command by typing, use an alias. For example, I set my system up to use ‘C’ for Copy. No options can be configured when defining an alias; it's just what you want to type to run a singular command.
Tool Palette
 Although the QAT is now my favorite, the most powerful customization tool is the Tool Palette, mainly because I can specify the properties—Color, Layer, Style—for the command I'm running, even if that component doesn't exist in the current drawing. Best used when working with drawings from others where you need to be consistent in your standards such as Text style, Dimension style, and Layout tabs.
One-Line Lisp
You can string a command and options into a single one-line Lisp. Once created and added to the Startup Suite (or acaddoc.lsp), it will always be available.
Tab on the Ribbon
 Probably the coolest customization for those wanting to click, rather than type, anything you can put on the Quick Access Toolbar, you can put on the Ribbon.
The Script [.SCR]
When you run the .SCR, every line in that file is implemented. For example, you may have a script file that sets up several conditions for the current drawing; the Units, the current Layer, and then Zoom Extents. With a script, it's all or nothing.
By comparison, a .LSP file can contain a single one-line routine that does all those things, but it can also include three separate routines that you can launch one at a time with a simple keystroke.
In the following exercise, you write a script that launches the command line version of the Units command and sets the values to the ones shown in this figure.
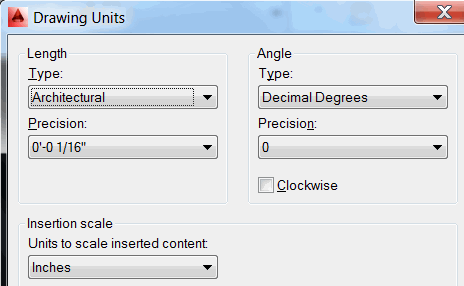
If you would like to configure the values to something other than what is shown here, type -UNITS at the command line and follow the prompts, then use those numbers to replace the ones here.
Also, you may replace the layer being created in the following script—A-FURN—to one that you would like to have in each drawing you work on.
How to Write a Script
Launch Windows Notepad.
Add the lines in red (below) with this understanding:
* The underscore preceding each line means use the English language version.
* The hyphen means use the command line version of the command (scripts can't respond to a dialog box).
* The <SP> means a space goes here; when you hit the spacebar, it's the same as pressing [Enter]_-UNITS<SP>4<SP>16<SP>1<SP>0<SP>N<SP>(so this line reads _-UNITS 4 16 1 0 N )
_-LAYER<SP>MAKE<SP>A-FURN<SP><SP><SP>(yes, three spaces)
_ZOOM<SP>EXTENTS<SP>…but don't press [Enter] after typing the last spaceWhen you save this file, it must have the extension of .SCR. I named mine, MC_FEB14.SCR, and I would recommend you save it to AutoCAD's ..\Support folder [C:\Program Files\Autodesk\AutoCAD 201x\Support].
Next, we need to put it on the Quick Access Toolbar, so we'll Duplicate the existing ‘Run a Script’ button and edit it to select our Script.
How to Add a Script to the Quick Access Toolbar
Open the CUI.
Expand the Quick Access Toolbars, then Quick Access Toolbar 1.
Under the Command list, navigate to Run Script.
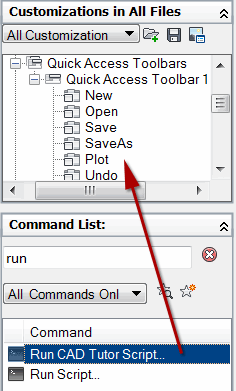 Right-click on Run Script, then click Duplicate. This is essentially a Copy/Paste routine which retains the integrity of the original command. We will edit the one that has an Element ID with the prefix of ‘MMU’ (before you ask, I have no idea).
Here's what I put in the Properties fields:
Name Run CAD Tutor Script Command Display Name Drawing Setup Macro '_script;MC_FEB14 Drag your new command up and release it in the list of commands under Quick Access Toolbar 1.
Click OK to save your edits and close the CUI.
To test your script, begin a new drawing, then set Layer 0 to current and draw a small rectangle.
Click your new Script button. When it's finished, the drawing should have done a Zoom Extents and the layer you put in the 2nd line of the script should be current!
So the next time you open a drawing where the units are not in keeping with what you prefer, or your favorite layer isn't in that drawing, hit your Script button and carry on!
Power Tool
ACADDOC.LSP
First, I do not write full routines in Lisp. Ben & Lee are my go-to guys if I have any worthwhile ideas. I can, however, write one-liners which have randomly appeared on these pages over the last 10 years. For future reference—or to see what other commands you can add to the following exercise—take a look at Michael's Corner for February 2012.
It has been many years since I encountered the benefit of ACADDOC.LSP, and I was reminded of it when I was preparing this article and came across the following information in acad2014.lsp:
Note:
This file is normally loaded only once per AutoCAD session.
If you wish to have LISP code loaded into every document,
you should add your code to acaddoc.lsp.
Let's say that occasionally you would like to turn off the Selection Preview feature—such as when you're working on complex 3D drawings in a Visual Style other than 2D Wireframe—and there are also times when you would like to split your Model Space into 2 views. Both of these requests would require more than a single click to accomplish… unless you add them to a .LSP file.
How to Add Routines to ACADDOC.LSP
Launch Windows Notepad.
Enter the following lines. For reference, take a look at my very first article on Lisp back in February 2003. (And yes, it does appear that I have a tendency to write about .LSP file in February!)
;Michael's Corner, Feb/Mar 2014
;
;This routine sets the Selection Preview feature to Off (the Default is On)
(DEFUN C:P0()(COMMAND "SELECTIONPREVIEW" "0")(PRINC))
;
;Split Model space into 2 vertical halves
(DEFUN C:S2()(COMMAND "-VPORTS" "2" "VERTICAL")(PRINC))
;
;Set Model space to a Single viewport
(DEFUN C:S1()(COMMAND "-VPORTS" "SI")(PRINC))
In these routines, if you type what follows the C:, you will run the command and options that follow. Type P0 and it turns off the Selectionpreview condition. Type S2 to split Model space into 2 vertical section, then type S1 to put it back to a single view.
To make this work, you must name the file ACADDOC.LSP, and save it to AutoCAD's ..\Support folder [C:\Program Files\Autodesk\AutoCAD 201x\Support].
Since this is the first ACADDOC.LSP file that you have created, you will need to close AutoCAD, then relaunch.
To test it, draw a rectangle and confirm that the variable SELECTIONPREVIEW is set to something other than 0. Now enter S2 to split your screen. Enter P0 to turn off the preview feature, then hover over the rectangle and it doesn't highlight. Now type S0 to put your screen back to a single view.
The Odd Spot
Layer Column Positioning
If you would like to reorient the column position in the Layer Properties Manager window, you could do one of two things.
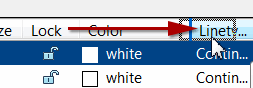
First, you could simply pick and drag the columns to where you want them, or…
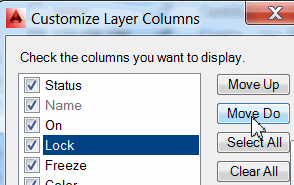
…you could right-click on one of the headers, then click Customize to open the Customize Layer Columns dialog box.
The Basics
Layer Previous
 Layers are the lifeblood in AutoCAD, and efficient management thereof is the key to your own quality of life; specifically, your sanity.
The Layer Previous button can be a real time saver and is, at its core, a Layer-specific ‘Undo’.
How to Use Layer Previous
Open a drawing, then make a new layer [MC_FEB2014], give it a color and make it current; this will be our testing layer.
Change the Color of any other layer in the current drawing, but don't make that layer current.
On our test layer, draw a small rectangle somewhere.
Click Layer Previous and the rectangle remains, but the color of the layer you changed is restored.
Freeze several existing layers, then Rotate the rectangle.
Click Layer Previous and the previously frozen layers are thawed… but the rectangle is still rotated!
Left Field
 The Origin of the Necktie: As I was putting on my every-other-week-or-so tie, I thought I'd look up the origin and found some interesting reading on the Today I Found Out website. The concept began with a Chinese army a couple thousand years ago, then made its way through France and England as stylish neckwear, and finally the Industrial Revolution led to the current state of the sartorial art. I'm personally partial to skinny leather ties, several of which I purchased when training and traveling in Europe many years ago… but it depends on the field I'm standing in.
Donate to CADTutor
If you found this article useful, you might like to consider making a donation. All content on this site is provided free of charge and we hope to keep it that way. However, running a site like CADTutor does cost money and you can help to improve the service and to guarantee its future by donating a small amount. We guess that you probably wouldn't miss $5.00 but it would make all the difference to us.
Note from Michael: I want to thank all of my customers for continuing to retain my training services (some for over three decades!) and let you know your donations do not go to me personally, but to the ongoing maintenance of the CADTutor ship as a whole and to support the yeoman efforts of my friend and CADTutor captain, David Watson, to whom I am grateful for this monthly opportunity to share a few AutoCAD insights.
Share this page:


The Basics
- Dual Dimensions in a Dim…
- UCSICON Options
- "Best of" Basics: Irreg…
- Tool Palette Basics
- Original Dimension Value
- Possible Solutions to th…
- Avoid Using 'Standard' i…
- Shorten the Plot Scales…
- Update the Source File B…
- User Increment Angles fo…
- Drawing Information
- 'Sign Language'
- Rotate with the Copy Opt…
- Use the INSERT Osnap on…
- To or From the Current L…


