

 Michael’s Corner #11
November 2003
Automating AutoCAD 2
This month follows up with the next level of tool-making in which you create your own tool, button image included. It's quite fun, really, and once you have learned the key features of this customizing procedure, you will find many opportunities to give it a try. I also have included another real-time application involving the fundamentals of paper space, along with some insights into what I refer to as the poor man's document management utility: Hyperlink. For those of you needing to run area calculations, take a look at this month's Basics section. Carry on!
If you would like to contact me directly, you can do that also.
Blessings to one and all,
Michael
Tool Time: Kick 'em Up a Notch
Making a Power Tool
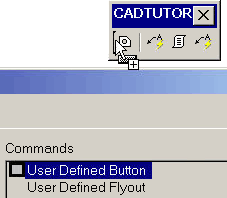
- To make your own tool open the "Customize" dialog box, then choose "User defined" at the bottom of the Categories column.
- From the Commands column, drag the "User Defined Button" onto your toolbar.
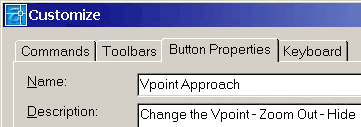
- Click on the blank tool on your toolbar and the Customize dialog box automatically switches to the Button Properties tab.
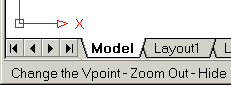
- Enter a Name and a Description for your tool. The Name is for the tooltip; the Description will be displayed on the status bar.
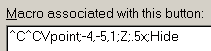
- In the Macro area, type the name of the command you want to run with this tool.
Tip: When writing the macro for a custom tool, the semi-colon ";" means <Enter>.
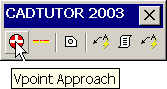
^C^CVpoint;-4,-5,1;Z;.5x;Hide
This routine:
 Cancels any currently running command (^C^C), then…
Issues the Vpoint command, then…
Enters the x,y,z values of -4,-5,1 then…
Launches Zoom, then…
Specifies a reduction of 50%, then…
Launches Hide.
- To create the button, click the Edit button under the empty button image to open the "Button Editor" dialog box.
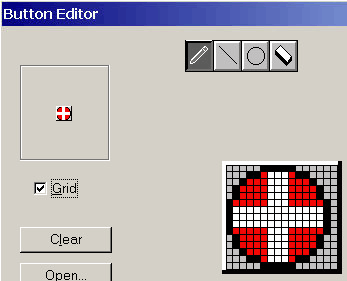
- Turn the Grid on, grab a color, pick a tool and off you go. If you make a small mistake, click Undo. Click Clear if you want to start over.
 Tip: When you're finished with your graphics, click Save As, navigate to the desired folder and give this .bmp a name that you will understand.
- After saving the button image by name, click Close to close the Button Editor.
- Choose Apply at the bottom of the "Customize" dialog box, then Close out of the Customize dialog and you"re finished!
Power Tool
Hyperlink for document management

Wouldn't it be cool if you could launch one drawing from within another one. Or how about automatically going to a website containing product specification.
- Click the "Insert Hyperlink" tool on the Standard toolbar (Ctrl+K or Insert/Hyperlink in A2004).
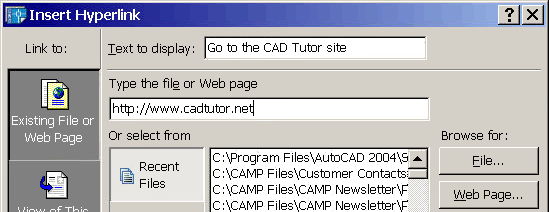
- Select the object to receive the hyperlink, then press <Enter> to open the Insert Hyperlink dialog.
- Enter the internet URL or click the File button to select a file… any file!
- Change the "Text to display" to something more concise.
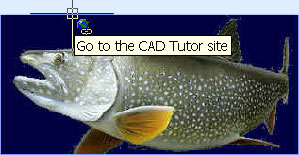
- Choose OK, then hover over the object to see the hyperlink tip.
- To open the linked file, select, then right-click on the hyperlinked object, then choose Hyperlink
 Open…
Open…

The Odd Spot
Remember Tilemode?
Once upon a Release 11-14, to switch over to "Paper Space" (now known as a Layout for those of you just joining us), you changed the Tilemode variable. When Tilemode was set to 0, the Paper Space environment was set to current. Set the Tilemode variable to 1 and the environment switches over to Model Space. This is the same as clicking on the Paper or Model button on the A2000-A2004 status bar.

What I discovered recently working on a drawing with about 25 layouts is that this variable can be extremely helpful if you are, let"s say, about 20 layouts into the multi-tab layout list and you want to jump over to Model. Rather than scrolling back to the Model tab, simply enter the default alias of TM for Tilemode, then enter 1. Once you have finished with your needs on the Model tab, use TM and enter 0… to return to the same Layout!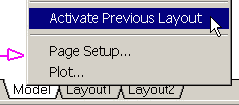
For those of you on A2004: If you have AutoCAD 2004, it would appear as though Autodesk recognized this need to go back to the previous layout (better late than never, I suppose). Right-click on the Model tab and choose "Activate Previous Layout"!
The Basics
Area Additions and Subtractions
Whether you"re calculating areas on a corporate office floorplan or the total material area for a plate, the Area command can help.
 The procedure will go much more smoothly if the bounding area and any internal shapes are polylines. In floorplans, you may want to consider using the Boundary command, or you could use Osnap and create a polyline on a separate layer.
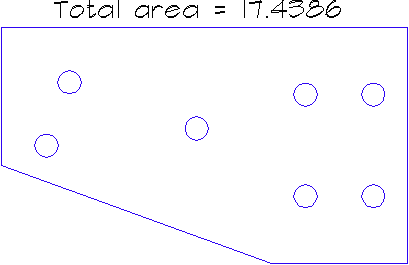
To calculate the total area of the plate, (subtracting the area of the seven circles), do this:
- Launch the Area command and begin with the Add option. This establishes the bounding area from which you will subtract the internal objects.
- Since the object is a Polyline, use the Object option and select the object, then AutoCAD will display the following information:
Area = 18.0882, Perimeter = 17.8008
Total area = 18.0882
(ADD mode) Select objects:
If you don't have a pline to select, the prompt to "Specify first corner point" provides a method by which you can pick the points on the perimeter of the area to be calculated.
- Press <Enter> to end the ADD mode, at which point you will have an option to Subtract.
- With the Subtract option, select each of the objects (or circles in the case of this example), and AutoCAD maintains a running tally of the Area of the object selected and it's perimeter, as well as the Total Area after the subtraction.
(SUBTRACT mode) Select objects:
Area = 0.0928, Circumference = 1.0799
Total area = 17.5314
Donate to CADTutor
If you found this article useful, you might like to consider making a donation. All content on this site is provided free of charge and we hope to keep it that way. However, running a site like CADTutor does cost money and you can help to improve the service and to guarantee its future by donating a small amount. We guess that you probably wouldn't miss $5.00 but it would make all the difference to us.
Note from Michael: I want to thank all of my customers for continuing to retain my training services (some for over three decades!) and let you know your donations do not go to me personally, but to the ongoing maintenance of the CADTutor ship as a whole and to support the yeoman efforts of my friend and CADTutor captain, David Watson, to whom I am grateful for this monthly opportunity to share a few AutoCAD insights.
Share this page:


The Basics
- Dual Dimensions in a Dim…
- UCSICON Options
- "Best of" Basics: Irreg…
- Tool Palette Basics
- Original Dimension Value
- Possible Solutions to th…
- Avoid Using 'Standard' i…
- Shorten the Plot Scales…
- Update the Source File B…
- User Increment Angles fo…
- Drawing Information
- 'Sign Language'
- Rotate with the Copy Opt…
- Use the INSERT Osnap on…
- To or From the Current L…


