

 Michael’s Corner #123
March 2013
The AutoCAD Workbench, 2nd Edition: Finally a Reality!
 It's quite humbling, actually, and a pretty significant body of work, weighing in at 330 pages if you start numbering from the front cover and go to the back.
If you're interested in purchasing a copy—the ring-bound book, the .PDF or both—the best thing to do would be to visit my website, www.cadtrainerguy.com where you will find a PayPal button, as well as the Order Form.
To answer a question that has already come in, this edition contains everything from the first edition, plus an additional 70+ topics, all updated to AutoCAD 2013. It looks like I'll be putting the first ones in the mail on March 15th if all goes according to plan.
However, you will want to continue your subscription to Michael's Corner, because two of the topics this month aren't in AWB2. Does that mean there will be an AWB3? Most likely!
In the meantime, here are a few things you can take a look at while you wait for your copy to arrive!
…See how to copy a default panel from the Express Tools to your custom tab.
…Learn how to zoom up to a ‘dot’ in space without scrolling.
…Add a path to your Support File Search Path list to point to an exported tool palette file [.XTP]
…Create an Angular dimension and edit a couple of the properties.
At the risk of being repetitive, I want to thank David Watson, our CADTutor webmaster and prolific professor at University of Greenwich for providing the opportunity, and an all-inclusive ‘Thank You!’ also goes to my hundreds of customers who provide the bulk of the content for these pages.
With a grateful heart to you all.
If you would like to contact me directly, you can do that also.
Blessings to one and all,
Michael
Copy a Default Panel to Your Custom Tab
While editing Chapter Five: Customizing AutoCAD in ‘The AutoCAD Workbench, 2nd Edition’, I took a moment to see if I could copy an entire panel from one of the default tabs to my custom tab. And the answer, of course, is Yes!
 Since this will require a custom Tab and Panel, I'll refer you to my August 2009 coverage on that particular topic. For those of you with first edition of The AutoCAD Workbench, that coverage begins on page 170. If you're reading this after purchasing the 2nd Edition (thank you!), the coverage is on page 211.
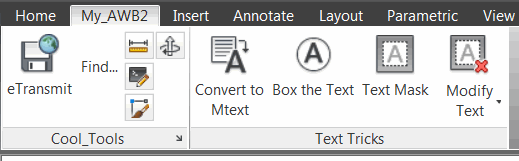
In this exercise I'm going to copy the Text panel from the Express Tools, so once you have created your custom tab and panel, come on along.
How to Copy a Default Panel to Your Custom Ribbon
Create a custom tab and panel, then open the CUI.
Under Customizations in All Files, scroll down to, and expand, Partial Customization Files, then expand EXPRESS.
Under EXPRESS, expand Ribbon, then Panels.
Right-click on Express Tools—Text, then click Copy.
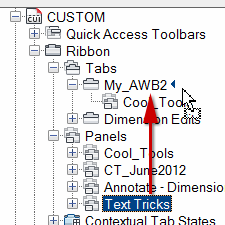
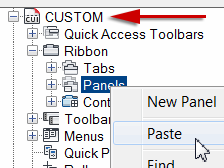 Now go up and expand CUSTOM, then expand Ribbon.
Right-click on Panels, then click Paste. Expand Panels to see the Express Tools—Text in the list.
Next, you're probably going to want to edit the Text panel.
How to Edit the Panel and Add it to your Custom Tab
Under your custom tab, click on the name of the new panel to display the Panel Preview pane.
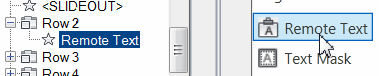
 To delete one of the tools, such as Remote Text, click on the tool name in the Preview to reveal where it is among the panel rows. Now, in the list of tools in the panel, right-click on the name—or the Row—then click Delete.
 To move a tool out of a Row or Sub-Panel, simply drag it into Row 1.
To change the display of a tool, click on the name in the list, then under Appearance, change the Button Style to Large with Text (Vertical).
When you're ready, drag your new customized Panel up and release it next to your custom Tab.
Click OK to apply and save your changes. Now when you click on your custom tab, you'll see your new panel!
Power Tool
Zoom to an Object
 Let's begin when you get those drawings that ‘disappear’ when you Zoom
![]() Extents. There are a series of things you do when that happens, one approach involving Qtext and Grips was covered back in the Odd Spot section in February 2005.
Extents. There are a series of things you do when that happens, one approach involving Qtext and Grips was covered back in the Odd Spot section in February 2005.
But once you find the respective dots that are sometimes, literally, miles apart, what do you do?
Zoom with the Object option. The what??
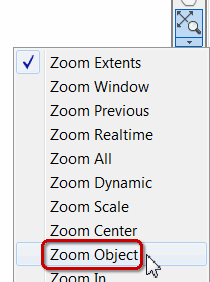
Most of us (especially this author) stick pretty much with the zoom features available on the wheel mouse—Zoom In, Zoom Out, Zoom Extents and Pan. But let me point out to you the many features that the good ole ZOOM command actually has had since the dawn of 0's and 1's—all of which are listed on the Zoom tool of the Navigation Bar. (And our intrepid captain of the CADTutor ship, David, is now saying "I told ya so!")
So, next time you ‘lose’ your drawing in Model space, once you have found the general vicinity of your objects are, use the Zoom Object feature—also available from the ZOOM command on the Command line—and AutoCAD will zoom right up to it!
Drawing found!
The Odd Spot
Source File vs. Support File Search Path
 As many of you know, I think you get the biggest return on your customizing investment with tool palettes. Blocks, Commands, Hatches, and Macros can all go on a tool palette, but only Blocks are pulled from a ‘Source File’.
If you're unfamiliar with the Import/Export feature of tool palettes, take a look at the Basics back in May 2007. It still applies!
Scenario
Someone sent you their exported tool palette [.XTP], along with the relevant source file drawing for the blocks.
Dilemma
The path for their source file is one that you can't replicate… or don't have the time to do so.
Solution
 In Options
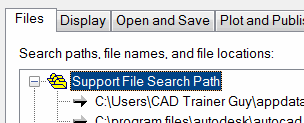
![]() Files tab, expand the Support File Search Path. Now click Add, then Browse, then navigate to the path where you saved the source drawing [.DWG] for the blocks on the imported tool palette. Click OK to close Options and save your changes, and after importing the .XTP file, you'll be good to go!
Files tab, expand the Support File Search Path. Now click Add, then Browse, then navigate to the path where you saved the source drawing [.DWG] for the blocks on the imported tool palette. Click OK to close Options and save your changes, and after importing the .XTP file, you'll be good to go!
The Basics
Angular Dimensions
 The addition of Angular dimensions is pretty straightforward, but I also want to pass along some editing insights.
How to Add an Angular Dimension
Set the desired layer and dimension style to current first.
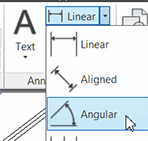
On the Home tab
 Annotation panel, expand the dimension flyout, then click Angular.
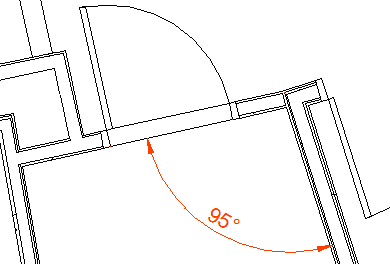
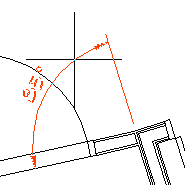 To find the angle between two lines—as shown in the figure with the doorway—pick the first line, and the prompt sequence will follow as shown here.
Select arc, circle, line, or <specify vertex>: [PICK]

Select second line: [PICK]

Specify dimension arc line location or [Mtext/Text/Angle/Quadrant]:
When positioning the dimension line location after picking two lines, move your cursor to any position defined by the vectors of the two lines, then specify the final location for the dimension line.
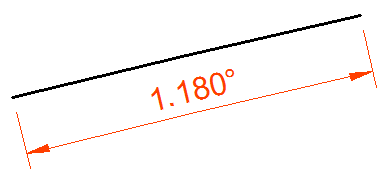
To dimension an arc, simply click on the arc, then position the dimension line.
Insights
To reposition the dimension line of an existing dimension, select it, then click in the grip on the dimension line and reposition it.
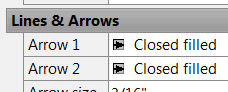
To edit the components of the dimension, select it, then right-click >Properties [or Ctrl +1].
If you want different arrowheads, make the adjustment under the Lines & Arrows heading.
Under the Primary Units heading you can tweak the precision.
My apologies for not having any coverage over the last decade(!) on how to create a Dimension Style. Although it's on page 171 in AWB2, I promise to make amends in a future Corner.
Left Field
Another Marvel from Germany:
In addition to their automotive marvels… as well as the home of my friend and AWB2 Tech Editor, Ben Senior… Germany can also lay claim to the invention of the Printing Press.
"By the middle of the 15th century, several print masters were on the verge of perfecting the techniques of printing with movable metal type. The first man to demonstrate the practicability of movable type was Johannes Gutenberg (c.1398-1468), the son of a noble family of Mainz, Germany. By 1452, with the aid of borrowed money, Gutenberg began his famous Bible project. Two hundred copies of the two-volume Gutenberg Bible were printed, a small number of which were printed on vellum. The expensive and beautiful Bibles were completed and sold at the 1455 Frankfurt Book Fair, and cost the equivalent of three years' pay for the average clerk. Roughly fifty of all Gutenberg Bibles survive today."
You can read the full story here: http://www.historyguide.org/intellect/press.html
FYI
Appendix C of AWB2 contains a compilation of all the Left Field articles from their beginning through December 2012.
Donate to CADTutor
If you found this article useful, you might like to consider making a donation. All content on this site is provided free of charge and we hope to keep it that way. However, running a site like CADTutor does cost money and you can help to improve the service and to guarantee its future by donating a small amount. We guess that you probably wouldn't miss $5.00 but it would make all the difference to us.
Note from Michael: I want to thank all of my customers for continuing to retain my training services (some for over three decades!) and let you know your donations do not go to me personally, but to the ongoing maintenance of the CADTutor ship as a whole and to support the yeoman efforts of my friend and CADTutor captain, David Watson, to whom I am grateful for this monthly opportunity to share a few AutoCAD insights.
Share this page:


The Basics
- Dual Dimensions in a Dim…
- UCSICON Options
- "Best of" Basics: Irreg…
- Tool Palette Basics
- Original Dimension Value
- Possible Solutions to th…
- Avoid Using 'Standard' i…
- Shorten the Plot Scales…
- Update the Source File B…
- User Increment Angles fo…
- Drawing Information
- 'Sign Language'
- Rotate with the Copy Opt…
- Use the INSERT Osnap on…
- To or From the Current L…


