

 Michael’s Corner #3
March 2003
Geometry Calculator?
This month Michael takes a look at a couple productivity features of AutoCAD, the Quick Select window and the little-known Geometry Calculator. Quick Select can be used with a wide range of user-specified criteria and comes in handy particularly when you are working on someone else's drawings. The need for the Geometry Calculator is less frequent, but when the time comes, you'll be glad to have it. Additionally, we get the third of three installments on the fundamentals of Raster images as well as an Odd Spot with some insight on the tooltip for hyperlinks.
If you would like to contact me directly, you can do that also.
Blessings to one and all,
Michael
Quick Select
Quickly select to change all the text of a particular style
When you work with drawings from others, sometimes you need to make global changes. One of those needs may be to change the style or height of existing text. You can do this quickly and easily with the Qtext routine from the Properties window. Before you begin, make sure you have a text style to send the selected text to before you begin.
- Zoom into an area with the text to be changed and select one text object (Dtext or Mtext).
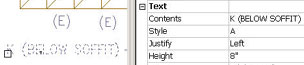
Note: This procedure has a unique anomaly, therefore it is important to first select one piece of text for which you will be making the change.
- Open the Properties window (Ctrl+1). Notice the name of the Style of the text selected.
- Click on the Quick Select funnel to open the Quick Select dialog.
- Make the following settings in the Quick Select dialog:
| Quick Select settings | |
|---|---|
| Apply to | Entire drawing |
| Object type | Text |
| Properties | Style |
| Operator | = Equals |
| Value | The name of the existing style for the selected text |
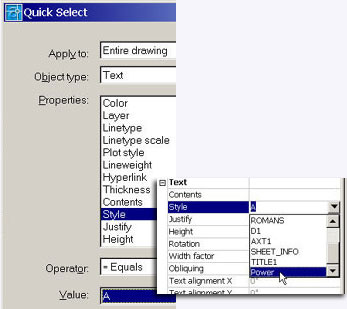
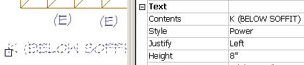 Now choose the desired text style from the list for the selected text objects.
Other uses for Quick Select
- Select objects on an existing layer to change them to another.
- Select blocks to delete.
- Select dimensions in style A and change them to style B.
Power Tool
Midpoint between Your Choice
The Geometry Calculator has been around since R13 and has the automated feature, MEE, which enables you to find the midpoint between the two endpoints that you specify (see my web site for more on that). But what if you want to find the midpoint between two quadrants or between a quadrant and an endpoint? Then you'll have to write your own routine. Thankfully, it's not that hard.
Premise: You need to begin a new line midway between the midpoint of a line and the quadrant of a circle.
- Launch the Line command, then enter 'CAL at the prompt for the first point. This nested request launches the Geometry Calculator.
- At the prompt for "Expression", enter (mid+qua)/2. This effectively requests that you be prompted to select the objects for a midpoint and a quadrant, then divide that distance in half and place the first point of the line at that calculated location.
- You will get the following prompts based upon your request. Please note that you need not use the requisite object snaps, AutoCAD takes care of that:
>>Select entity for MID snap
>>Select entity for QUA snap
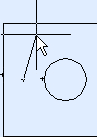
- After you have picked those two points, AutoCAD places the first point of the line at the calculated location and off you go!
The Odd Spot
Oh, that tooltip
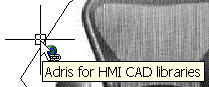
![]() The ability to hyperlink AutoCAD objects to files and URL's was introduced in R14 and has been improved in each version. An annoying condition recently appeared, however, in which I could see the little hyperlink icon, but there was no hyperlink tooltip displayed when my cursor was over the hyperlinked object.
The ability to hyperlink AutoCAD objects to files and URL's was introduced in R14 and has been improved in each version. An annoying condition recently appeared, however, in which I could see the little hyperlink icon, but there was no hyperlink tooltip displayed when my cursor was over the hyperlinked object. 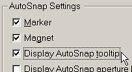 The User Preferences tab of Options had the Hyperlink boxes checked, as shown, but still no tooltip. I then came upon the Autosnap variable and discovered that the default setting is 63. Mine was set to 61. Upon further investigation I found that the 'Display AutoSnap tooltip' in the Drafting tab of Options also needs to be on in order to see the hyperlink tooltip! So now ya know…
The Basics
Raster Images 301
 |
 |
 In this final review of raster images, we take a look at the remaining Image tools on the Reference toolbar. The Image Quality tool prompts for quality settings, Draft and High. In Draft mode, inserted raster images are more pixelated as shown in the figure (near right). The High mode softens the image (far right). Depending upon the drawing and the image, you may not need to change the default setting of High.
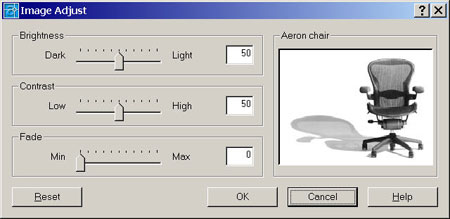
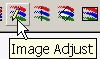
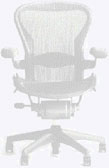 It's easy to make graphic adjustments to your image, too. Double-click on an image frame in A2002, you get the Image Adjust dialog shown here. To achieve a 'watermark' effect, adjust the Fade slider and you will see the selected image fade in the Preview box. Adjust the Contrast slider and the image takes on a less realistic quality. Although the Darkness slider renders a similar effect to the Fade feature visually, as you make the adjustments, you will see the obvious differences.
Tip: Double-click the image frame and the Image Adjust dialog opens.
There's a Reset button to go back to the defaults. Once you have made your adjustments, choose OK to close the dialog, turn the image frame off and you're ready to plot!
Donate to CADTutor
If you found this article useful, you might like to consider making a donation. All content on this site is provided free of charge and we hope to keep it that way. However, running a site like CADTutor does cost money and you can help to improve the service and to guarantee its future by donating a small amount. We guess that you probably wouldn't miss $5.00 but it would make all the difference to us.
Note from Michael: I want to thank all of my customers for continuing to retain my training services (some for over three decades!) and let you know your donations do not go to me personally, but to the ongoing maintenance of the CADTutor ship as a whole and to support the yeoman efforts of my friend and CADTutor captain, David Watson, to whom I am grateful for this monthly opportunity to share a few AutoCAD insights.
Share this page:


The Basics
- Dual Dimensions in a Dim…
- UCSICON Options
- "Best of" Basics: Irreg…
- Tool Palette Basics
- Original Dimension Value
- Possible Solutions to th…
- Avoid Using 'Standard' i…
- Shorten the Plot Scales…
- Update the Source File B…
- User Increment Angles fo…
- Drawing Information
- 'Sign Language'
- Rotate with the Copy Opt…
- Use the INSERT Osnap on…
- To or From the Current L…


