

 Michael’s Corner #27
March 2005
OLE and Assorted Snapping
Given where it started, this product with which we spend a serious percentage of our lives has actually come quite a long way. I was first introduced to OLE when I was a co-author on my first book for New Riders Publishing, "AutoCAD Release 13 for Beginners". Since that time they have made significant improvement. I particularly like the A2005 feature that automatically turns incoming Excel data into a table. This month I also took a look at a couple features that essentially enable you to snap to mid-air. Read on and you'll see what I'm talking about. And finally, I'm surprised I haven't given grips but one comment in the previous 104 tips. I corrected that this month and we'll see where it goes from there.
If you would like to contact me directly, you can do that also.
Blessings to one and all,
Michael
Excel and AutoCAD: OLE
"Object Linking and Embedding". That should take care of the first question. An OLE object is data from another application, such as Word or Excel, that is then inserted into AutoCAD. When the application file from which the OLE object is modified, the OLE object in AutoCAD automatically updates.
When you need to bring Excel data into AutoCAD, there are two scenarios to consider
Q1. Do I want to be able to edit the data in Excel and have the data automatically update the OLE object in AutoCAD?
Q2. Do I just want the data in AutoCAD as editable AutoCAD objects?
Instructions for inserting an OLE object linked to the data in Excel:
- To begin with, both the Excel file and the AutoCAD drawing need to be named before you begin, otherwise Windows won't have valid filenames to make the association.
- In Excel, select the data cells to copy, then click Copy.
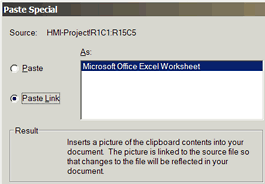
- In AutoCAD, select Edit
 Paste Special, then click the Paste Link radio button.
 - Specify a point in the drawing where you want to place the data.
Your drawing updates all instance of the edited block with the changes. The original block from the tool palette is not effected by this procedure, just the references in the current drawing.
Note 1:
If you are on AutoCAD 2000-2004, the size of the incoming OLE object depends upon the size of your display. For example, let's say you selected a cell size of 5 cols x 15 rows and pasted it into Model Space. If you zoom into or away from the drawing, then paste the same size again, the OLE object will not be the same size. Therefore, if you have a bunch of Excel stuff to bring in, I would suggest creating a rectangle in AutoCAD that you can Zoom![]() Window around prior to each paste. Clunky but effective.
Window around prior to each paste. Clunky but effective.
Note 2:
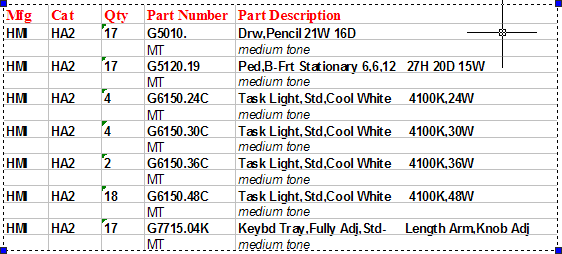
If you are on AutoCAD 2005 (gold star!!), the size of the text in the data cells of the incoming Excel OLE object is 3/16" by default. This means that you could be zoomed in or out, the cell data still comes in the same size.
Note 3:
I saw something from Leonid Nemirovsky that mentioned the size limit of incoming Excel data into A2002-A2005 is 52 rows by six columns. Visit his website for more tips: http://home.pacifier.com/~nemi.
Instructions for inserting data that becomes editable AutoCAD objects
- In Excel, if you want the resulting AutoCAD data text to be in a grid, I would highlight the content in Excel and click the borders button for full matrix of borders.
- Select the data cells to copy, then click Copy.
- In AutoCAD, select EditPaste Special, then in the list, select AutoCAD Entities.
- Specify a point in the drawing where you want to place the data.
 If you have A2000-A2004, you now have editable single-line text and lines, although the lines don't happen to meet around the edge of the data cells. It's been like that every since I can remember. Also, the text format from Excel is not translated into AutoCAD. The text is imported into a style named WMF-Arial.
If you have A2005, however, you now have a table and the format of the text from Excel is also displayed in the table. See my January 2005 article for more information on Tables.
Other OLE Tidbits
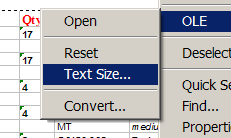
- Select the OLE object, then right-click and you will see you have an OLE-related list of items.
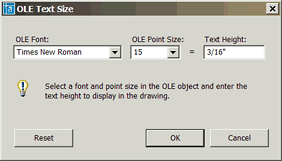
- Be careful with the Text Size feature. I got "unexpected results" when I made too many changes. Thankfully there's a Reset item on the shortcut menu.
- Double-click the OLE object in AutoCAD and the Excel file from which it was generated automatically opens. Make changes in the Excel file and save it. Return to AutoCAD to see the changes.
- The OLELINKS command opens a dialog box from which you can break the link to the Excel file when necessary.
Power Tool
Snap From or… “Put it this far from here”
 How many times have you had to place a fixture, a bracket, the center of a circle, a column or do anything based upon an existing point? The Snap From feature has been around for years but when I show it to my customers, they're always amazed. Use it in any procedure, drawing or editing, in which you need to place a point on the screen, can use this feature. You launch it when AutoCAD is asking you where you want to place the point in question.
Instructions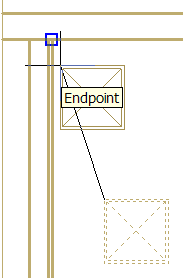
Say I'm moving column and I've picked the base point and now AutoCAD wants to know the "Second point of displacement", do this…
- Choose "Snap From" from the Object Snap toolbar or type FRO at the prompt.
- You now get a prompt for a "Base point", pick the point from which you will enter an offset distance for the new position, as shown in this figure.
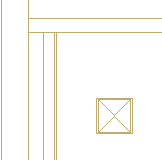
- When prompted for the <Offset>, enter the displacement from the base point in the format @X,Y. This syntax effectively states that from where I'm "at". To place the column, I entered @4',-4' as shown in the final figure.
The Odd Spot
M2P (midway between 2 points)
 So while we're on the subject of snapping to mid-air, what about that M2P feature that was slipped into AutoCAD 2005? It's an elaboration of the MEE feature (see my March 2003 article). When you use the M2P feature, you specify any two points (object snaps are probably helpful here), then AutoCAD places the next point midway between those two points.
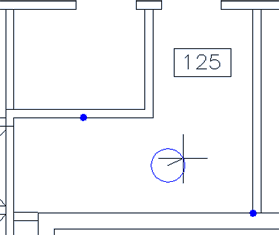
In this illustration, at the prompt to place the Center of the circle, I entered M2P, then specified the lower right corner of room 125, then the midpoint of the opposite wall. Pretty cool.
The Basics
The Lost Art of Grips
 It has come to my attention recently that folks are not very familiar with these things. First, every object in AutoCAD has at least one grip. To display an object's grip(s), simply click on it.
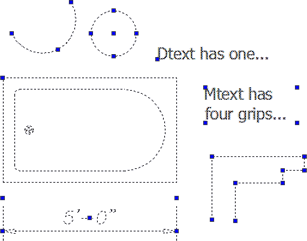
By default, the grip for a block is the insertion point, circles and associative dimensions each have five, each line and arc have three and you see four grips on mtext. Polylines have a grip at each "knuckle" and also includes rectangles and polygons.
Beginning in A2004, grips are a solid color and you can also set a "Hover color". This feature is helpful if your grip size is small and you need to know if you're in the grip or not. Beginning in A2005, you could specify the object selection limit for grips. Go to the Options/Selection tab to change these grip settings.
Quick grip tip: Modify an associative dimension by relocating one of the grips on the definition points.
Donate to CADTutor
If you found this article useful, you might like to consider making a donation. All content on this site is provided free of charge and we hope to keep it that way. However, running a site like CADTutor does cost money and you can help to improve the service and to guarantee its future by donating a small amount. We guess that you probably wouldn't miss $5.00 but it would make all the difference to us.
Note from Michael: I want to thank all of my customers for continuing to retain my training services (some for over three decades!) and let you know your donations do not go to me personally, but to the ongoing maintenance of the CADTutor ship as a whole and to support the yeoman efforts of my friend and CADTutor captain, David Watson, to whom I am grateful for this monthly opportunity to share a few AutoCAD insights.
Share this page:


The Basics
- Dual Dimensions in a Dim…
- UCSICON Options
- "Best of" Basics: Irreg…
- Tool Palette Basics
- Original Dimension Value
- Possible Solutions to th…
- Avoid Using 'Standard' i…
- Shorten the Plot Scales…
- Update the Source File B…
- User Increment Angles fo…
- Drawing Information
- 'Sign Language'
- Rotate with the Copy Opt…
- Use the INSERT Osnap on…
- To or From the Current L…


