But wait, there's more!… at NeoCon® 2007
On June 11th, I'll be presenting my AutoCAD Toolbelt Seminar at the NeoCon® 2007 World's Trade Fair. This is the fifth year in a row that my CEU seminar was selected for presentation at this prestigious conference held annually in Chicago.
This month I decided to grab the bull by the proverbial horns in a couple areas. First, the Annotative Text in AutoCAD 2008 is, in my estimation, the big dog of this release. It's a bit complex, but given the right setup and conditions, I think you will all appreciate the power it packs. The other major hurdle I addressed was the creating of a Plot Style that pre-A2008 folks can use to highlight certain objects when they plot. For those of you with AutoCAD 2008, next month I'll be covering the (extremely) cool features found in the Layer Properties Manager.
In the Odd Spot, I addressed the importance of the position of the Alignment Parameter since there have been a couple instances in the last few months where I overlooked emphasizing this in training causing the alignment feature to misbehave. This month's Basics is being driven by customer questions, too, since sometimes you may get, shall we say, "unexpected results" when using the Layer Freeze feature from the Layers II toolbar. My hope is that it clarifies some of the things you may have encountered.
Have a wonderful summer!
If you would like to contact me directly, you can do that also.
Blessings to one and all,
Michael
The Big Dog: Annotation in A2008
 Doberman's get a bad rap; they're actually very friendly, you just need to get to know them… kinda like the new Annotative Text feature in A2008. This article is intended as a "Meet and Greet". There's more to know about it, but we need to make the introductions, first. We'll do so using an existing drawing with text objects.
Intended to make annotation more "viewport-compliant", a text object with Annotative Text set to "Yes" in the Properties window will automatically adjust if the viewport scale changes. Essentially, you get to specify the text height if it were to be measured in Paper space, and AutoCAD automatically adjusts the text to that height. It's really pretty sweet.
Along the bottom of the AutoCAD 2008 drawing window… and above the Status Bar… is the new Infobar. Along the Infobar are the following items that relate to annotative text in an active viewport:
![]()
| Lock/Unlock Viewport | Unlock it to see how this feature works |
| VP Scale | The recommended method to set the viewport scale for annotative objects in a viewport |
| Annotation Scale | Scale for the text in a viewport; typically synchronous with the VP Scale |
| Annotation Visibility | Typically turned on to see the annotation height change if the VP Scale changes |
| Add Annotative Scales | Turned on if you have multiple viewports using multiple Annotation scales |
To follow along with the exercise, you will need text in Model Space and a layout with a viewport. If you would like, you can use Blocks and Tables – Imperial.DWG found in the ..\Sample folder of A2008. I'll be using that to illustrate these fundamental principles.
Begin the exercise from a layout tab with a viewport active.
Instructions to Set Existing Text in Model Space to Be Annotative Text
- After activating a viewport, unlock the VP Scale, and toggle on the Annotation Visibility for All Scales and Add Annotative Scales features.
- Set the Annotative Scale value to the same value as the current VP Scale. In the sample drawing, the viewport for the Second Floor Plan is 1/4″ = 1′-0″.
- Select all the objects in that viewport, then open the Properties window.
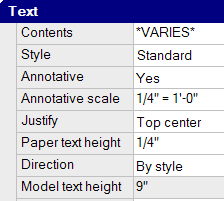
 In the dropdown list at the top, select Mtext (or Text), then under the Text heading of the Properties window, set the value for Annotative to Yes. Press Esc to clear the grips of the selected objects.
 On the Infobar, change the VP Scale value to 1/8″ = 1′-0″. The annotative text objects change… then the objects in the viewport update!
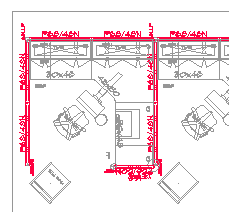
Note: To perform a simple proof of the integrity of the text, in the illustrations, the red box was drawn in Paper space around annotative text in Model space. In the first figure, the VP Scale is 1/4″ = 1′-0″. In the second figure, the VP Scale is 1/8″ = 1′-0″.- To change the height of the text objects in Model space, use the Properties window to select all the text objects again, then change the Paper Text Height to 3/16″. Press Esc to clear the grips on the text objects.
I'll have more coverage on this feature in the months ahead. Hopefully, you feel a bit more advised on the mechanics of annotative text. Less than intuitive, but quite nice once you understand the setup. In the meantime, for additional information, you may want to take a look at the New Features Workshop under AutoCAD's Help menu.
Power Tool
Plot Styles to Punch It Up
 I'm aware of how they work, but since I don't plot out drawings for my customers, I haven't had a chance to investigate the power of Plot Styles. However, one of my customers in New Jersey turned me onto this really simple method to emphasize objects using a Color-based plot style table (CTB).
The goal of the exercise is to use color to emphasize specific geometry in a drawing. For example, you may want to emphasize the fixtures in a reflected ceiling plan or the utility lines of a site plan. In those circumstances, the objects to be emphasized may have a unique color or color number.
The best approach is to begin with the default acad.CTB (or aclt.CTB for those of you with AutoCAD LT), then create a new one from there.
Instructions to Create a New Color-Based Plot Style Table (CTB)
- Go to , then click Add-A-Plot Style Table Wizard. Click Next.
- Click the item for Use An Existing Plot Style Table, then click Next.
- Select acad.ctb from the list of available plot style tables, then click Next.
- Enter a name for the table that reflects the intent. For example, I'll name this one Punch 240 since I have set the object color to 240 for those objects I want to emphasize.

- Click the Plot Style Editor button to open the dialog box in which you can make the necessary edits to the colors.
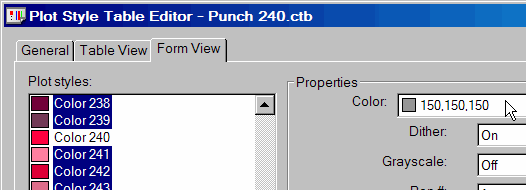
- On the Form View tab, select all the colors (using standard Windows-compliant selection methods), then use the Ctrl key and click the color you will be emphasizing.
- Click the Color dropdown list, then choose a new color for the selected colors, or click Select Color to open the Color dialog box where you can choose a color from the three tabs available.
- After choosing a color for the selected color numbers, click Save & Close, then click Finish to complete the wizard.
 In the Page Setup dialog box, select your newly created plot style from the dropdown list. Since I want the objects with the color number 240 to be emphasized in the space plan, I opened the Layer Properties Manager and set the panel layers to the color 240.
- Click the Preview button to see how it works!

Power Tool Follow-up…
![]() Last month in my coverage of adding a button on a palette to automate text placement in Model or Paper space, I forgot to mention that in the Tool Properties dialog box you can also specify the Text Style to be used for that button.
Last month in my coverage of adding a button on a palette to automate text placement in Model or Paper space, I forgot to mention that in the Tool Properties dialog box you can also specify the Text Style to be used for that button.
The Odd Spot
Alignment Parameter Set to 0,0
 The Power Tool in November 2005 covered how to create multiple insertion points on a block by adding more than one Alignment Parameter. What I failed to mention is that if you're only using one Alignment Parameter, it must be placed at the 0,0 location of the block. If the placement of the alignment parameter is off by just a fraction, the alignment parameter… won't align.
Guaranteed Procedure for Proper Placement of an Alignment Parameter
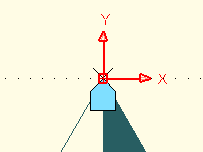
- In the Block Editor, turn on the UCS icon if it isn't on already and set it to the Origin ().
Note: You may have to Zoom Out so the UCS icon has enough room to park itself on the origin. - On the Parameters tab of the Block Authoring Palette, click Alignment Parameter.
- When prompted to specify the base point of alignment, enter 0,0; your call on the alignment direction.
The Basics
Freezing Individual Layers in a Single Viewport
 Over the last several years ( ! ) I've covered various Express Tool features, but the one I keep having to show folks is the Layer Freeze option regarding blocks. When a layer is frozen, you cannot see the objects on that layer. When it comes to blocks, there's another element to consider.
Setup: As you may recall, a block can be created on one or more layers, for example A, B, and C. However, there is a very real possibility that the block could be inserted on a totally different layer.
![]() For example, the geometry for a particular line of panel symbols in the CAP Designer software (available from www.2020technologies.com), is created on A-FURN-P-PNLS, and the attribute tag is created on A-FURN-P-PNLS-T, a logical approach to creating contract furniture symbols that works very well. However, when placing the panels and components into the drawing, by default they are inserted on A-FURN.
For example, the geometry for a particular line of panel symbols in the CAP Designer software (available from www.2020technologies.com), is created on A-FURN-P-PNLS, and the attribute tag is created on A-FURN-P-PNLS-T, a logical approach to creating contract furniture symbols that works very well. However, when placing the panels and components into the drawing, by default they are inserted on A-FURN.
Consider this: If you freeze one of the layers on which a block was created, only the geometry on that layer is frozen and cannot be seen. If, however, you freeze the layer on which a block was inserted, all blocks (and other objects, for that matter) that are on that layer, are frozen.
Dilemma: When using the Layer Freeze command from the Layers II toolbar in A2007 & A2008… formerly the Express: Layer Tools toolbar in previous versions… how does AutoCAD know which layer to freeze? More importantly, how do you specify which layers are to be frozen, the "created" layer or the "inserted" layer?
Solution: For a majority of circumstances, make sure the Block Nesting Level is set to "Entity". When you launch the Layer Freeze command from the Layers II toolbar, you will see the current settings displayed on the command line. If the current setting reads Block Level Nesting = Block, do the following.
- After launching the Layer Freeze command, enter S for the Setting options.
- In the options for the settings, you want B for the Block settings.
- Enter E for the Entity option. At this point, you can click on the objects in the viewport to freeze and only the geometry on the layer on which the blocks were created will be frozen.
Note: You may encounter some drawings in which the opposite may be true; rare, but possible. Bottom line, you want to set that Block Level Nesting to the one that works. The good news is, there's only two to choose from. If, however, the block was created and inserted on the same layer… this whole issue is moot. Sorry.
Export AutoCAD 2008 Settings
The Export AutoCAD 2008 Settings routine results in a Zip file. This feature is designed to allow you to transport A2008 settings easily to another system, but is also a great method by which to retain the settings of your original installation. This is especially important if you're contemplating customization. If you gom up the customization and you need to put AutoCAD 2008 back the way you found it, you can then use Import AutoCAD 2008 Settings to help you do so.
Left Field
Ancient Water Colors - Cleopatra had a thing for purple, which was too bad for snails, since they were the source of a lovely purple dye. It took thousands of those edible critters, soaked for 10 days by Cleo's servants, to extract one ounce of the highly prized Tyrian purple dye.
Donate to CADTutor
If you found this article useful, you might like to consider making a donation. All content on this site is provided free of charge and we hope to keep it that way. However, running a site like CADTutor does cost money and you can help to improve the service and to guarantee its future by donating a small amount. We guess that you probably wouldn't miss $5.00 but it would make all the difference to us.
Note from Michael: I want to thank all of my customers for continuing to retain my training services (some for over three decades!) and let you know your donations do not go to me personally, but to the ongoing maintenance of the CADTutor ship as a whole and to support the yeoman efforts of my friend and CADTutor captain, David Watson, to whom I am grateful for this monthly opportunity to share a few AutoCAD insights.
The Basics
- Dual Dimensions in a Dim…
- UCSICON Options
- "Best of" Basics: Irreg…
- Tool Palette Basics
- Original Dimension Value
- Possible Solutions to th…
- Avoid Using 'Standard' i…
- Shorten the Plot Scales…
- Update the Source File B…
- User Increment Angles fo…
- Drawing Information
- 'Sign Language'
- Rotate with the Copy Opt…
- Use the INSERT Osnap on…
- To or From the Current L…


