

 Michael’s Corner #42
June 2006
AutoCAD Yard Sale
Last month we did some Spring cleaning, this month we're going to have a Yard sale. Here in the US, when things pile up in the basement or garage, we put them out on the garage apron or out in the front yard near the street. This month we have Estate Items which are things I should have covered long ago that are legendary features that still have many versions left in them.
Then we have the Fix-It Table and Odd Lots which both contain a few items you may find useful and informative when things aren't coming out as you had hoped. Pots and Pans of course are fundamentals that have their place even if it's not every day… but they probably will be. Thanks for hanging with me this month as I just needed to get this information out to you and giving you just four this month wasn't going to cut it.
If you would like to contact me directly, you can do that also.
Blessings to one and all,
Michael
Bargain tips and tricks I
 Estate Items
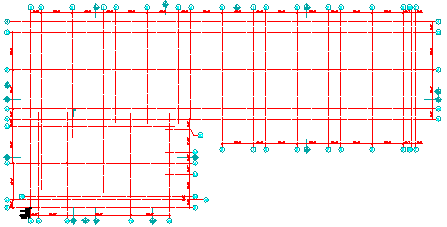
Hatching
A couple of very useful options were included in the Hatch routine over the last few versions. Specifically the ability to create separate hatches as well as the ability to specify a start point for the hatch. The latter can also be accomplished using Snapbase, but the separate hatches feature is pretty fine.
Instructions to Specify a Hatch Origin
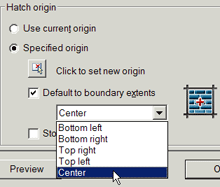
- After setting your hatch type and scale, in the Hatch Origin area, check the box for Default to Boundary Extents. In this example, I'm adding a lay-in 2' x 4' ceiling so I selected the Center option from the drop-down list.
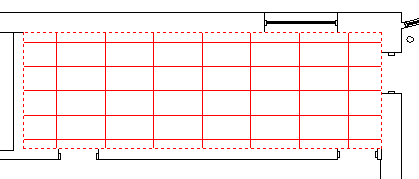
- Click the Add: Pick Points button, then click within the area to be hatched or use the Add: Select Objects. The example illustrates two hatch patterns in the same area; one set to 2' at 0 degrees, then the other pass was 4' at 90 degrees.
![]() Note: If you are adding a 2' x 4' lighting fixture to the ceiling grid and need to snap to the intersection of the hatch patterns, you will need to go to Options and make sure you clear the check box for Ignore Hatch Objects. The default is On.
Note: If you are adding a 2' x 4' lighting fixture to the ceiling grid and need to snap to the intersection of the hatch patterns, you will need to go to Options and make sure you clear the check box for Ignore Hatch Objects. The default is On.
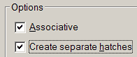 When the Create Separate Hatches box is checked, a single hatch procedure will result in each hatch area being recognized individually.
The WBLOCK Command
Prior to the introduction of DesignCenter, virtually every AutoCAD user knew how to create a DWG using the Wblock command. They could then use the Insert button to insert that DWG into any other DWG. It is still an important command, especially if you simply want to create a DWG of the floorplan so you can Xref it back in.
Instructions to Create a DWG Using Wblock
- After configuring the layers to be selected, at the command line, type W to open the Write Block dialog box.
- Similar to using the Block command, select the objects, then specify a Base Point. If the selected objects are to be Xref'd into another drawing, you may want to consider leaving 0,0,0 as the base point.
- At the bottom of the dialog box, under Destination, click the browse dots then navigate to the folder where you will be saving the DWG, then name it.
One of the side effects of Wblock is that the draw order of all objects is reversed. Objects drawn most recently, appear as though they were drawn way back at the start of the drawing. This isn't of much importance these days, but in the days before it was possible to control the display order of objects, this was a really neat trick.
Uses for Grips
I recently came across some users that turned off the grips! That's nigh on to sacrilegious, but then I got to thinking, well, maybe that's not a bad idea. So I started a list of why grips are a good thing and came up with the following:
- Change Wipeout Geometry
- Adjust size of Image frames (when frames are on)
- Sizing of viewports
- Moving Attributes
- Connect geometry at grip locations
- Adjust Arcs
- Adjust Dimension definition points (Defpoints) and dimension line placement
In the meantime, I would be very interested in hearing where or when you use grips. I'll post your replies in July.
Bargain tips and tricks II
Fix-It Table
Unrecognized Fonts (.SHX files)
If you receive drawings from someone and there is a dialog box that pops up regarding a .shx file, in the lower left corner of the that dialog box is the name of the file AutoCAD is unable to find. Chances are it's a bigfont, too. So here's what you do.
Instructions to "Create" an Unrecognized Font
- Identify the name of the .SHX file that is not recognized.
- In Windows Explorer, navigate to <Install Drive>:\Program Files\AutoCAD xxx\Fonts
- Copy the file named Bigfont.shx to the same folder.
- Scroll down to "Copy of Bigfont.shx" and rename it to the name identified in Step 1 above.
Now when you re-launch AutoCAD and open that drawing, AutoCAD will see the font and open the drawing without the dialog box. You should do that for a font called "Special.shx". That's one that seems to have a life of its own and is not part of the AutoCAD Font collection.
Another option is to set the value for Fontalt to Simplex.shx. That will substitute the Simplex font when AutoCAD can't find the one it's supposed to have with that drawing.
Toggle Frames
Images and Wipeout objects have frames. Each object has its respective procedure to turn the frames on or off. Modify![]() Object
Object![]() Image
Image![]() Frame
Frame![]() OFF or Draw
OFF or Draw![]() Wipeout
Wipeout![]() Frame
Frame![]() OFF. Don't do that anymore. If you need to toggle the frames for images and/or wipeouts on and off, use the variable TFRAMES.
OFF. Don't do that anymore. If you need to toggle the frames for images and/or wipeouts on and off, use the variable TFRAMES.
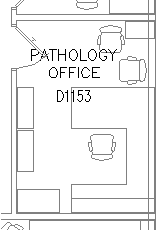
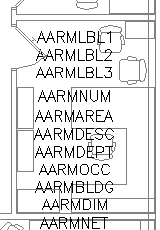
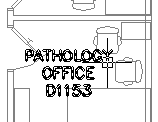
Turn Attributes Into Text
The command is actually called Burst but it's on the Express menu under Blocks as Explode Attributes To Text. As shown in these three figures, the first illustration shows the attributed block including room name and number. If it's exploded, you see all the attribute definition tags. If, however, you use the Express tool, you get something a little less wacky and retain the integrity of the values for the visible attributes.
 |
 |
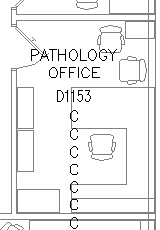 |
Instructions to Convert Attributes to Text
- On the ET: Blocks toolbar, click Explode Attributes to Text, then select the attributed block. The result is a collection of Dtext which can then be edited as necessary.
- Use Quick Select to select the text with the same content, or any other method you would like, then erase them.
- Use Express
 TextConvert Text To Mtext to convert several lines of Dtext into a single Mtext object.
Bargain tips and tricks III
Odd Lots
Did you know?
- When you Ctrl+V to paste text copied from the Text Window, it is oriented to the WCS, not UCS.
- When working with tables and you're in the Mtext Editor on the last row of a table, hit Tab to create a new row!
- If you create a block in a DWG that's open as Read-Only, the block won't go to the palette. If you save the drawing with a new name, the block explodes!
- Don't use fonts with @ in front of them; it "adversely affects" the rotation of text in Mtext.
- When in Windows Explorer, if you drag a DWG file into the drawing window of AutoCAD, it is inserted as a block. If, however, you drag and drop a DWG onto the Command line of AutoCAD, it opens it as a drawing.
- Double-click the wheel of a wheelie mouse and in most situations… you'll get a Zoom Extents.
- Adjust Dimension definition points (Defpoints) and dimension line placement.
- When your wheelie mouse doesn't Zoom and just Pans up and down, turn off the Display Scroll Bars in Drawing Window feature in OptionsDisplay.
Bargain tips and tricks IV
Pots & Pans
Zoom to an Object
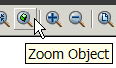
Beginning in AutoCAD 2006, an option was introduced to the Zoom command called "Object". You can either click the button on the Zoom toolbar, or launch the Zoom command and then enter O for the Object option. You can use any object selection procedure, but as soon as you press <Enter> those objects fill the drawing window!
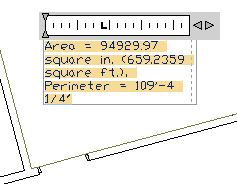
Mtext from Area
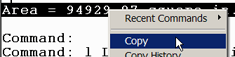 Use the Area command to query an area and the result is displayed on the Command line.
Instructions to put Area Text into the Drawing
- Hit F2 to go to the Text Window, then highlight the text, right-click and click Copy.
- Come back to the drawing window and either hit Ctrl+V or click the Copy button on the Standard AutoCAD toolbar. Beginning in A2005, it will attach the text to your cursor for you to place it on the drawing.
- Double-click the Mtext to open the Editor window and make the necessary changes to the height and content.
Express Tools Not Loaded on First A2006/A2007 Installation
This is the strangest thing. If you didn't install Express Tools in A2006/A2007 when you first installed the program, if you put in the install CD, it will Auto-Launch and tell you that AutoCAD is already installed… and won't let you Add a program.
OK, so put in the A2006/A2007 Installation CD, then go to Windows Explorer. Double-click ACAD.MSI to run the "Add or Remove Programs" from the CD, and check "Express Tools". OK then Finish.
Left Field
The age old question: So, if dog years are age x 7, how do you tell the age of a horse in people years? The age of the horse is age x 3 plus 8.
Courtesy: A visit to the Kentucky Horse Park.
Donate to CADTutor
If you found this article useful, you might like to consider making a donation. All content on this site is provided free of charge and we hope to keep it that way. However, running a site like CADTutor does cost money and you can help to improve the service and to guarantee its future by donating a small amount. We guess that you probably wouldn't miss $5.00 but it would make all the difference to us.
Note from Michael: I want to thank all of my customers for continuing to retain my training services (some for over three decades!) and let you know your donations do not go to me personally, but to the ongoing maintenance of the CADTutor ship as a whole and to support the yeoman efforts of my friend and CADTutor captain, David Watson, to whom I am grateful for this monthly opportunity to share a few AutoCAD insights.
Share this page:


The Basics
- Dual Dimensions in a Dim…
- UCSICON Options
- "Best of" Basics: Irreg…
- Tool Palette Basics
- Original Dimension Value
- Possible Solutions to th…
- Avoid Using 'Standard' i…
- Shorten the Plot Scales…
- Update the Source File B…
- User Increment Angles fo…
- Drawing Information
- 'Sign Language'
- Rotate with the Copy Opt…
- Use the INSERT Osnap on…
- To or From the Current L…


