

 Michael’s Corner #111
March 2012
Customizing For Fun & Profit
OK, it may not be necessarily for 'Profit', but I think customizing is fun, and hopefully some of you will agree. After checking out these ideas, perhaps your productivity will go up, and you will 'profit' from some time-savings!
The topics from the trenches (I just made that up; you can use it) for this month include…
…Automating the 'No Island' setting for hatching on a Tool Palette
…Making a button on the QAT to set your favorite Osnap conditions
…Configuring the Ctrl + F keyboard shortcut to be more 'Windows-compliant'
…Using the Delete Duplicate Objects command to clean up your drawing
Hope you're looking forward to Spring as much as I am!
If you would like to contact me directly, you can do that also.
Blessings to one and all,
Michael
Change the Quick Preview in Hatch to ‘No Islands’
 “Live and Learn”. That's why I love training AutoCAD, because during any given month of training, I'm going to bump into another way of doing something. Such as hatching an object that has 'islands' in it, but more specifically, how to put it on a Tool Palette button.
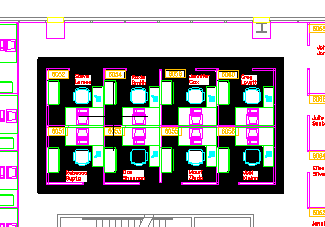
Case in point, you place a rectangle/pline around an area on the floor plan that is, say, the Accounting Department. Now you want to hatch that area, but by default, when you hover in a closed area with furniture 'islands', the hatch goes around the furniture.
Driven from the Tool Palette, you will need 2 buttons. The first one will set the HPISLANDDETECTION variable to <2>, which means 'No Islands'. The second button you will need will be one with the hatch you want to place.
How to Automate a 'No Islands' Hatch
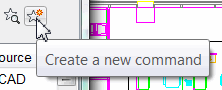 Open your Tool Palette (Ctrl + 3), then right-click on the title bar and click Customize Commands. This opens up a nominal view of the CUI.
Just above the Command list, click the button for Create A New Command. This will add Command 1 to the list of commands.
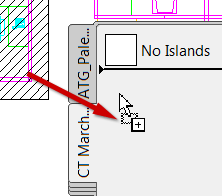
Now, drag Command 1 out of the list and drop it onto the palette. You will see a white box labeled Command 1.
Right-click on the Command 1 box, the click Properties and change the Command String to read as follows:
^C^CHPISLANDDETECTION;2
Change the name of your button to something like 'No Islands', then click OK to save your changes and close Properties.
Now you'll want to draw a hatch on the desired layer with the settings you will want to use each time you hatch a Department or when you will want to select an object for hatching.
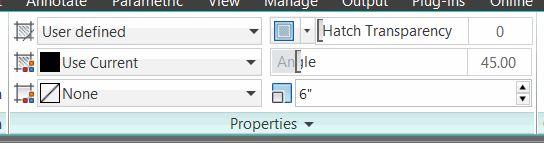
In this exercise, I created a crosshatch pattern using the User Defined hatch pattern with a distance of 6″ at an angle of 45 degrees.
After configuring the hatch properties, add the hatch to your drawing.
 After the hatch has been placed, click on the hatch to select it, then click on a line of the hatch and drag and drop it onto the tool palette.
At this point, the next time you have created a shape around an area in your drawing, and you want to hatch the shape and not go around the 'islands' in the drawing, click the No Islands button, then click your hatch button and add the hatch!
Note: Curiously, there is also the variable HPISLANDDETECTIONMODE which has a range of 0 or 1. I left this variable set to <1>. It relates to 'legacy island detection', so I'm going to have to dig into this one at a later date. Just FYI.
Power Tool
OSMODE on the QAT
It's been 8 years since I covered this, and I encountered a need for it last month, so let's take a quick look at adding yet another button to the Quick Access Toolbar.
Why is it that all the crazy things in AutoCAD happen when you're in a hurry?? You go to snap to something, and for some reason your Osnap is Off. Wouldn't it be cool if you could just hit a button and have the Osnap settings just the way you want 'em? The variable OSMODE contains a bitcode that represents the current collection of object snaps you have turned on.
This exercise shows you how to identify the OSMODE value for your favorite settings, then make a button to retrieve that value.
How to Add a Custom Osnap Button to the QAT
On the Status bar, right-click OSNAP, then click Settings to open the Drafting Settings dialog box on the Object Snap tab.
Check the boxes for your favorite(s), then click OK. I'm just going to set it to Node.
At the command line, type OSMODE, then press [Enter] to see the value for the snaps you selected. The OSMODE value is derived from the current setting of snaps on the Drafting Settings tab. For Node snap only, the value is <8>.
 Gold Star Tip: To find how the OSMODE variable is calculated, go to Express Tools tab
 Tools panelSystem Variable Editor. Scroll down the list and click OSMODE to see the bitcode used to calculate the value.
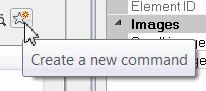
Open the CUI. Under Command List, click Create a New Command to create Commandx.
Click your new 'Commandx' to open the Properties panel on the right side of the CUI.
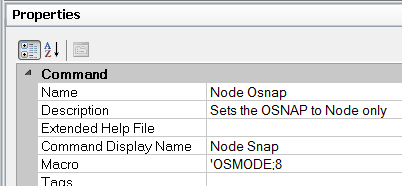
 Add the values similar to those shown in this figure for Name, some type of Description, and Command Display Name. Your button will now be alphabetized in the Command list.
Edit the Command String field to read as follows (notice the apostrophe at the beginning)
'OSMODE;8;
The apostrophe runs the OSMODE command transparently. Since you usually discover that the Osnap is off when you're in the middle of a command, this button will set the Osnap while the command is still running.
At this point, click Apply to apply your edits to your new command.
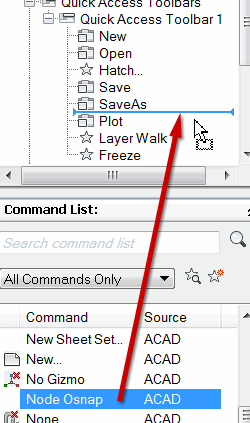
To add your new button to the Quick Access Toolbar, drag it from the Command list and release it where you want it up on the Quick Access Toolbar. You should be good to go!
The Odd Spot
Change Ctrl + F to Find
 Many of you may use Ctrl + S in Word or Excel or AutoCAD to Save your file. When you're in Word or in your browser, you can use Ctrl + F to launch the Find routine. Except in AutoCAD… where it toggles your Osnap On and Off.
So let's say we set Ctrl + F to be the Find command!
How to Assign the Find Command to Ctrl + F
Open the CUI dialog box by typing CUI at the command line.
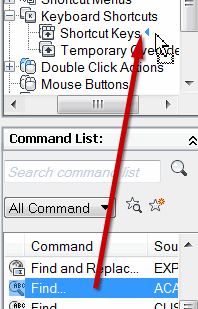
In the Customizations pane, expand Partial CUI Files, then expand Custom. Now expand the Keyboard Shortcuts node.
Under Command List, drag the Find command up into the Customizations pane and release it next to Shortcut Keys to add it to the listing.
Note: If the recently added command does not initially appear in the Shortcuts pane, you may have to OK out of the CUI, then re-open it.
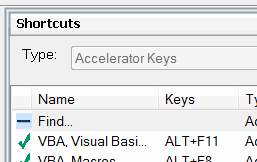 In the Shortcuts pane next to the Find command, click in the Keys column to display an edit box — confirm NumLock is Off — then hold down Ctrl + F and press [Enter]. The Find command will now alphabetize in the list, and you should now see a green checkmark in the column preceding the Find command name.
Click OK to close out of the CUI, then hit Ctrl + F to launch Find!
The Basics
Delete Duplicate Objects [Overkill]
 It's not uncommon to find objects that are copied on top of each other. Sometimes you do it because you forget that the Copy command is now in Multiple mode by default, or sometimes you simply 'discover' duplicates.
The Delete Duplicate Objects command was made for just those occasions.
Note: You can also type OVERKILL to launch this command, too.
How to Use Delete Duplicate Objects
To set this up, open a drawing, then copy something on top of itself.
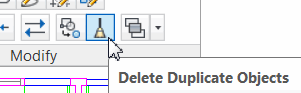
On the expanded Modify panel (Home tab), click Delete Duplicate Objects.
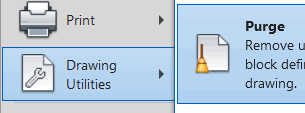 Note: Yes, the Delete Duplicate Objects icon looks virtually identical to the Purge 'broom', which is why I didn't see it at first. Purge is located on the File pulldown menu or in the Application menu (red 'A')Drawing Utilities. But most folks just type PU (the alias for Purge).
When prompted, you can select the area where you suspect duplications, or type ALL to select all the objects in the drawing.
Press [Enter] after selecting objects, and the dialog box comes up with the default settings.
I find that the defaults are just fine, so click OK and you will get a report regarding what was deleted.
207 duplicate(s) deleted

1202 overlapping object(s) or segment(s) deleted
Left Field
Chicago = Garrett's
Of all the places I have traveled, my favorite US destination continues to be Chicago. I've been going there since the mid-80's and I continue to enjoy being up there. I first discovered Garrett Popcorn Shops early on in my visits downtown, and although they closed everybody's favorite Michigan Avenue location, the devoted will make the necessary adjustment. If you find yourself in Chicago and have a passion for caramel corn, you have to check 'em out. http://www.garrettpopcorn.com
Donate to CADTutor
If you found this article useful, you might like to consider making a donation. All content on this site is provided free of charge and we hope to keep it that way. However, running a site like CADTutor does cost money and you can help to improve the service and to guarantee its future by donating a small amount. We guess that you probably wouldn't miss $5.00 but it would make all the difference to us.
Note from Michael: I want to thank all of my customers for continuing to retain my training services (some for over three decades!) and let you know your donations do not go to me personally, but to the ongoing maintenance of the CADTutor ship as a whole and to support the yeoman efforts of my friend and CADTutor captain, David Watson, to whom I am grateful for this monthly opportunity to share a few AutoCAD insights.
Share this page:


The Basics
- Dual Dimensions in a Dim…
- UCSICON Options
- "Best of" Basics: Irreg…
- Tool Palette Basics
- Original Dimension Value
- Possible Solutions to th…
- Avoid Using 'Standard' i…
- Shorten the Plot Scales…
- Update the Source File B…
- User Increment Angles fo…
- Drawing Information
- 'Sign Language'
- Rotate with the Copy Opt…
- Use the INSERT Osnap on…
- To or From the Current L…


