

 Michael’s Corner #122
February 2013
Got Text?
Maybe it has to do with Groundhog Day (the movie) and doing things over again, but this month it turns out that three of the four articles involve Text. Purely unintentional, honest. The lead article, however, actually comes from my friend, Ben Senior. Ben did the tech edit on the 2nd Edition of The AutoCAD Workbench, and as I was going through his edits in Chapter Two on Creating & Editing, I came across his comment on editing the insertion point of a block. In store this month:
…Adjust the Insertion Point of a Block
…Edit the UCS condition to add text to a 3d view
…Change the highlight color in the Single Line text editor
…Snap to the insertion point of text
Hopefully next month I can announce the release of the 2nd Edition, but in the meantime, keep an eye on my website, www.cadtrainerguy.com where I will make the announcement as soon as the first one rolls off the press.
Thanks to all of you for your continued support and friendship!
If you would like to contact me directly, you can do that also.
Blessings to one and all,
Michael
Change the Insertion Point of a Block
 If we assign the basepoint for a block, most of us would Explode the thing, the Redefine the block. My friend, Ben Senior (tech editor, extraordinaire) suggested this very straightforward solution!
How to Use Block Editor to Change a Block's Insertion Point
Single click on the block with the misplaced basepoint, then click Block Editor from the shortcut menu. If your right-click isn't set up that way, type BE, then select the block and press [Enter] to open the Block Editor.
Note: If it's not an attributed block, you can double-click on the block to open the Edit Block Definition dialog box, then press [Enter] to open the Block Editor.
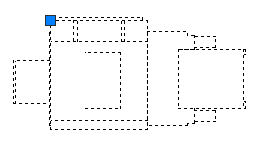
By default, in the Block Editor, the UCS icon is placed at the Base Point of a block. With that understanding, enter UCSICON, then OR for the ORigin option. This will position the UCS icon where the Base Point is located on this block.
Note: Unfortunately, in the Block Editor, you cannot manipulate the UCS icon using grips.
 Launch the Move command, select the objects and specify a base point where you want the Insertion point of the block to be.
For the 'Second point of displacement', enter 0,0.
Click Close Block Editor and Save the changes. Click on the block to see a grip at the new Insertion Point!
I think you now understand the fundamental principle that dimensions are all about the current XY plane. The nice thing about creating the dimensions in Model space is that you can now tweak the view in 3D and the dimension is treated like any other object in 3D.
To put the UCS back to <World>, you could type PLAN and press [Enter] twice, or you could click on the UCS icon again, hover in the 0,0,0 grip, then click World.
Power Tool
Adding Text to a 3D View
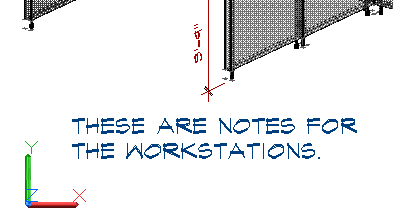
 Last month we covered adding dimensions to 3D objects, this time let's add some text to the drawing while it's in a 3D view. It's easier than you might imagine.
How To Add Text to a 3D View
Set the desired 3D view.
On the View tab
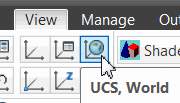
 Coordinates panel, click UCS, World. This will retain your view position, but simply puts the UCS back to the World Coordinate System position; the default. For those of you who are typers, that would be UCS, then V for the View option.
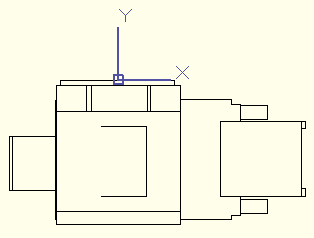
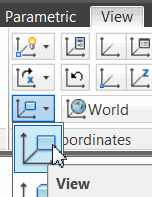 Now — and this is the key to the activity — on the View tabCoordinates panel, click View. This sets the UCS to be parallel to the surface of your screen.
Set the desired layer and text style, then launch either Mtext or Single Line text and add your notes!
The Odd Spot
Highlight Color for Single Line Text
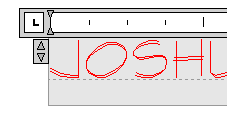 The curious thing about this, is that the Text Highlight Color setting only applies to Single Line text objects. Double-click on an Mtext object after setting the color, and there's no difference; Opaque Background doesn't affect it either.
How to Set a Highlight Color for Single Line Text
-
Double-click on a Single Line text object to open it in the frameless editor.
Note: The frameless editor is only enabled if the DTEXTED variable is set to <2>.
 Right-click in the editor, then got to Editor SettingsText Highlight Color to open the Select Color dialog box.
Make your color selection, then click OK, to see the color displayed in the editor.
The Basics
Snap to Text
 One of my customers needed to clean up a drawing, so she wanted to move the employee names/room numbers and line them up… but didn't know how to snap to text. My suggestion: Use Insertion snap to hold the text, then use Nearest to 'hang' the text on a horizontal line.
How to 'Line Up' Existing Text
Draw a horizontal line across the drawing where you want to 'hang' the text.
Right-click on OSNAP on the Status bar, then click Settings and turn on Nearest and Insertion.
Launch the Move command, then select one of text objects and press [Enter].

 Hover on the text to display the Insert object snap on the insertion point of the text.
Now move up the line where the Nearest object snap lets you slide along and 'hang' the text where you want it.
Left Field
Horse sense: Horses typically greet each other nose to nose, and come to recognize each other by scent as well as by sight. Most horses also greet humans in the same way. When you introduce yourself to a horse for the first time, notice how the horse reaches out his muzzle to sniff you. Given this, the most polite way to approach a horse is with the back of your hand extended so the horse may take in your personal scent. Letting a horse breathe in your scent tells the animal that you are a fellow herdmate (not a predator), and usually makes the horse more agreeable to being handled.
Donate to CADTutor
If you found this article useful, you might like to consider making a donation. All content on this site is provided free of charge and we hope to keep it that way. However, running a site like CADTutor does cost money and you can help to improve the service and to guarantee its future by donating a small amount. We guess that you probably wouldn't miss $5.00 but it would make all the difference to us.
Note from Michael: I want to thank all of my customers for continuing to retain my training services (some for over three decades!) and let you know your donations do not go to me personally, but to the ongoing maintenance of the CADTutor ship as a whole and to support the yeoman efforts of my friend and CADTutor captain, David Watson, to whom I am grateful for this monthly opportunity to share a few AutoCAD insights.
Share this page:


The Basics
- Dual Dimensions in a Dim…
- UCSICON Options
- "Best of" Basics: Irreg…
- Tool Palette Basics
- Original Dimension Value
- Possible Solutions to th…
- Avoid Using 'Standard' i…
- Shorten the Plot Scales…
- Update the Source File B…
- User Increment Angles fo…
- Drawing Information
- 'Sign Language'
- Rotate with the Copy Opt…
- Use the INSERT Osnap on…
- To or From the Current L…


