

 Michael’s Corner #118
October 2012
Here & There
I would really like to have the 2nd Edition of The AutoCAD Workbench ready for publication by my birthday. It will be close, but I'm not sure if I'll make it. (Friday, October 12th, for those of you wondering. Thank you.)
That's pretty much where I've been recently — "Here & There". I really enjoy seeing my regular customers and meeting new ones, but this year has been woven nicely with time at home. (Thank you, God.)
This month's offerings are courtesy of customer emails and onsite training requests.
…A Review (and hopefully 'clarification') of the Xclip feature
…A Solution to your Single-Screen Woes (if you have a Dual-Screen Setup at Work)
…Practical Application for the <Displacement> Option in the Move Command
…Using Search in DesignCenter to Find a Specific Layout Tab Name
I think you'll enjoy each of these insights and hopefully something in there will bring a smile to your face… along with a boost in your productivity!
Keep up the good work!
If you would like to contact me directly, you can do that also.
Blessings to one and all,
Michael
XCLIP Update
 When I encounter the same situation in the course of two weeks, I know it's time to write about it.
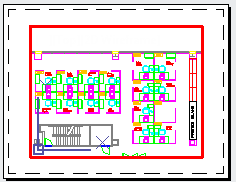
XCLIP — though powerful in its own right — can be confusing if you're not familiar with what's going on. The point of the exercise is to essentially isolate an area of a drawing that has an Xref. A similar visual result can be accomplished by creating a viewport on a layout tab (see figure). Clipping the Xref, however, takes place in Model Space.
That said, here's a review of how to set it up, and what to do if you get a drawing that's a bit, shall we say, off the reservation.
How to Clip an Xref with Xclip
 Begin a new, blank drawing, then save it. Set the necessary layer to be current for the Xref attachment.
On the Insert tab, click the small arrow on the Reference panel to open the External References Manager.
Attach the DWG named 'db_samp' located in AutoCAD's ..\Sample\Database Connectivity folder.
Empty all the check boxes for Specify on-screen, then Zoom
 Extents to see the attached drawing.
To clip the Xref, click on the Xref to display the External Reference contextual tab.
On the Clipping panel, click Create Clipping Boundary.
You have several options to choose from, but the default is <Rectangular>, so press [Enter].
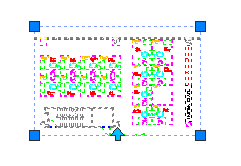 Specify two points to define a rectangle around the area you wish to isolate; i.e., the area to remain visible. Your drawing now displays a rectangular frame around the area selected and highlights the clipped area. Press ESC to end the procedure.
Insights
To remove the clipping frame, click on the reference to display the External References contextual tab, then click Remove Clipping.
You can change the shape of the clipping area using the grips.
Similar to a clipped image file, the blue arrow at the bottom of the image will toggle an inverted display of the Xref.
To display the Xclip frame after cancelling the command, set XCLIPFRAME to <1>.
If you Erase the displayed frame, the Xref it is clipping is also erased; curiously, the frame is linked to the Xref.
Scenario
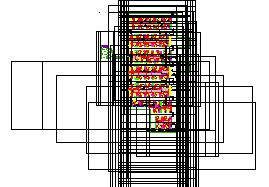 If you encounter a drawing such as that shown in the final figure, you have an Xclip condition gone awry. My customer sent this to me, and when I clicked on a frame, the External References contextual tab did not show up. So here's what I told Amanda…
Solution
Set XCLIPFRAME to <1>.
Type XCLIP to launch the command, then select several of the displayed frames and press [Enter].
You now have several options on the prompt line, enter D for the Delete option. Repeat as necessary.
Sanity returns.
Power Tool
Toggle Your Window Back from a Dual Screen
Have you ever taken your laptop home — missing your dual screen setup at work, of course — and then launch a command… and realize the dialog box is on your 2nd screen. At work.
 Multiple solution to this conundrum have been suggested to me over the last few years, but my new friend, Victoria, at a prominent contract furniture dealership in Lincolnshire, IL got the ‘Hero of the Week’ award on this one.
Hold down the Windows key, then hit the ⇐ ⇒ arrow keys until ‘lost’ window appears. I've also seen that you may need to include the Shift key in that combination. Bottom line, you get your window back!
The Odd Spot
Move with a <Displacement>
 When moving an object with the Move command, after selecting the objects, you're given the option of specifying a basepoint — which virtually everyone will do — or enter a <Displacement>. A what??
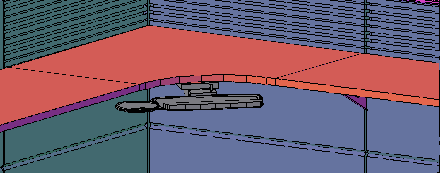
This recently came up when a my customer needed to move several furniture objects in 3D. In this exercise, I move the three work surfaces and the keyboard tray up by 12″.
Insights
The key to this option is to enter the distance (the 'Displacement') in X, Y, Z format.
If you're only moving in the X or Y axis, you don't have to enter the Z value.
You don't need to precede the entry with the @ sign if you have not specified a base point.
After entering the desired displacement value, you need to press [Enter] a second time to complete the command.
How To Move Selected Objects Using <Displacement>
 Launch Move, select the objects, then press [Enter].
At the prompt to
Specify Basepoint… or <Displacement>:, enter the distance of the move in X,Y,Z format. To move the three work surfaces and the keyboard tray up, I entered 0,0,12.At the prompt to
Specify second point or <use first point as displacement>:press [Enter].
The Basics
Using Search in Design Center to Find a Layout
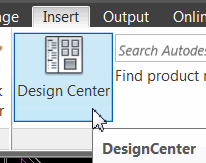 It's been awhile since I wrote about this, but I wanted to revisit this feature in DesignCenter. DesignCenter [Insert tab
![]() Content panel] was introduced in AutoCAD 2000 and has several features that are quite powerful, one of them being Search.
Content panel] was introduced in AutoCAD 2000 and has several features that are quite powerful, one of them being Search.
My friend, Tracy Lincoln, sent me a note about the Search feature in DesignCenter and it really is amazing! Let's say you're looking for all the drawings with an 18x24 title block on the Layout tab.
How to Search for a Layout Tab Containing Specific Text
 Open DesignCenter (Ctrl + 2) then click Search to open the Search dialog box.
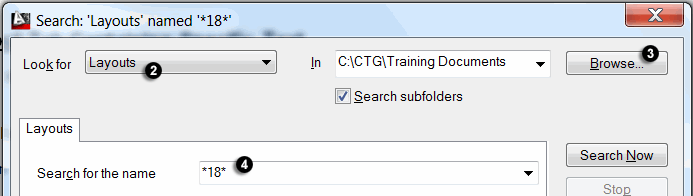
In the ‘Look for’ drop-down list, click Layouts.
Click the Browse button, then navigate to a folder or drive containing the drawings you want to search through.
In the ‘Search For The Name’ field, enter the text string — such as *18* to find all layout tabs with 18x24 in the name — then click Search Now.
After the search is complete, double-click on the layout you to want access and DesignCenter will then navigate to the drawing matching that search criteria ("18" and a Layout tab in this example).

Left Field
Birthday Facts (for all of us, not just me)
• Since your last birthday 31,536,000 seconds have passed.
• In the past year your hair will most likely have grown 12 cm (no comments, please) and your nail about 4 cm.
• You breath at a rate of about 30 breaths per minute so, since your last birthday you have taken approximately 15,768,000 breaths.
• The average garden snail (not one that has entered the Olympics 100 meters race) moves at around 0.03 mph. If one set out on your last birthday, and crawled non-stop, it would have traveled 263 miles. If you walked this distance non-stop you would complete it in around three days.
• During the past year there have been more than 50,000 earthquakes throughout the world.
Read more: Weird Birthday Facts
Donate to CADTutor
If you found this article useful, you might like to consider making a donation. All content on this site is provided free of charge and we hope to keep it that way. However, running a site like CADTutor does cost money and you can help to improve the service and to guarantee its future by donating a small amount. We guess that you probably wouldn't miss $5.00 but it would make all the difference to us.
Note from Michael: I want to thank all of my customers for continuing to retain my training services (some for over three decades!) and let you know your donations do not go to me personally, but to the ongoing maintenance of the CADTutor ship as a whole and to support the yeoman efforts of my friend and CADTutor captain, David Watson, to whom I am grateful for this monthly opportunity to share a few AutoCAD insights.
Share this page:


The Basics
- Dual Dimensions in a Dim…
- UCSICON Options
- "Best of" Basics: Irreg…
- Tool Palette Basics
- Original Dimension Value
- Possible Solutions to th…
- Avoid Using 'Standard' i…
- Shorten the Plot Scales…
- Update the Source File B…
- User Increment Angles fo…
- Drawing Information
- 'Sign Language'
- Rotate with the Copy Opt…
- Use the INSERT Osnap on…
- To or From the Current L…


