

 Michael’s Corner #120
December 2012
10 x… a Lot!
 When I first did that (shameless) Google search on my name over ten years ago, I never thought it would come to this. 120 months x four tips per month = a lot of AutoCAD insights and tidbits, tips & tricks, customizing and basic, and the random buried treasure. Then there are the Left Field bits that I'll be compiling and including in the 2nd Edition of The AutoCAD Workbench (hopefully available at year's end).
As is the case most of the time, this month is mainly a collection of requests from customers…
…Set the 'No Plot' layer option from the QAT
…Changing a visible attribute's value without using the Attribute Editor
…Accomplishing a Fade with Transparency
…Clarifying the Lock options
Recent CAD Trainer Guy Updates
As far as social media goes, I have been encouraged to get on Twitter, so I'll be tweeting an AutoCAD tip every Tuesday & Thursday. It would be great to have you follow me at www.twitter.com/cadtrainerguy. I may be using Twitter as a 'sticky note' to let you know what may be in an upcoming Corner.
Then, at Autodesk University last year, at the last minute I was asked to step in for Heidi Hewett who was under the weather, and Autodesk taped several short clips of AutoCAD tips. Although the videos have been out there for a while, my son just recently helped me get my own CAD Trainer Guy YouTube channel where I have re-posted them and will hopefully be adding more in 2013.
And, yes, I'm on LinkedIn, www.linkedin.com/in/cadtrainerguy, and I invite all of you to join my network!
So this is a wrap for the 10th year of Michael's Corner, the production of which could only have been made possible by the kind invitation in 2003 from Professor David Watson to become a part of his CADTutor site. It has been an honor and a royal privilege to be a part of this cruise. Lord willing, we'll have an opportunity to meet face to face in 2013.
Wishing you all a glorious and safe Christmas season, and may the New Year be one in which we all become a wee bit better in all we do.
If you would like to contact me directly, you can do that also.
Blessings to one and all,
Michael
For an Image That's Path-Free — OLE!
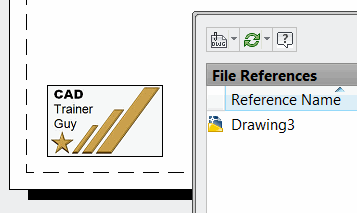 Referencing files — DWGs, specifically — is a wonderful and powerful feature. I understand the logic to Xrefs, the mechanics, and the benefits. I take a lot of support calls from my customers, however, when it comes to the logos on their title blocks on layout tabs. Not long ago a customer sent me their drawing with the logo I could see on the layout tab. But what I didn't see was the raster image in the External References palette! It's an embedded OLE! [Object Linking & Embedding]
After bouncing around on the Internet for a while, I finally found what I was looking for: How to embed a JPG/raster image in a drawing that can be opened by anyone without an external reference to the JPG. (Notice in the image that my logo is not referenced in the drawing.)
The extra step is to simply Copy and Paste your image into a Word or Excel document.
How To Embed a Raster Image
Open Windows Explorer (My Computer), then navigate to the image, right-click on it, then Copy (or CTRL + C).
Open Microsoft Word, then use CTRL + V to Paste the image.
Now click on the image in Word, then Copy it. This is the golden key to the exercise. You need to paste the image into a Word document first, then Copy it from there.
Open the AutoCAD drawing to receive the image, then Ctrl + V to Paste it. If the OLE Text Size dialog box opens, just click OK.
You can now use grips to size the image!
Power Tool
Edit an Attribute Sans Editor
 The source of this tip goes back a way, but I saw it most recently on Kate Morrical's LT Unlimited blog.
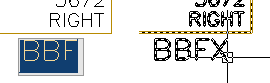
Scenario: You only want to change the value/string of the visible attribute of an attributed block.
Dilemma: You double-click on the attributed block and the Enhanced Attribute Editor opens and now you may have to scroll through the attributes to find the one you want to change.
Solution: Hold down CTRL, then double-click the visible attribute you want to change to open the 'frameless' text editor. Job done!
The Odd Spot
Mistaken Lock
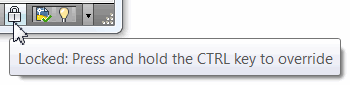
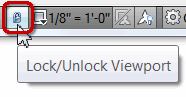 After setting the Viewport scale, it's always a great idea to Lock the Viewport. When a viewport is active, you can easily lock it with the small padlock icon that is either yellow for Unlocked or gray for Locked (shown).
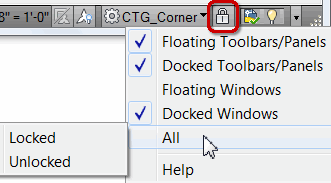 Then there's another padlock icon further to the right, that locks the Floating or Docked elements of your workspace, palettes, toolbars, etc. This feature was added many versions ago because we would quickly click an icon on a toolbar, and the toolbars would come along because we didn't release the mouse button soon enough and the toolbar would drag off of where it was docked.
Soooo, just make sure you know what you're aiming for when you click the padlock icons on the Status bar.
Note: If you have locked your workspace elements and want to temporarily override the locked condition of, say, your tool palette, check out the tooltip when you hover on that padlock: "Press and hold the CTRL key to override".
The Basics
Layer Fade with Transparency
While we're on the subject, you probably know that by default, layers that are Locked, fade.
You may also know that, by default, Xrefs fade, too. To minimize the confusion, however, I typically encourage my customers to set the layer fade percentage for Xrefs to <0>. [Options >Display tab]
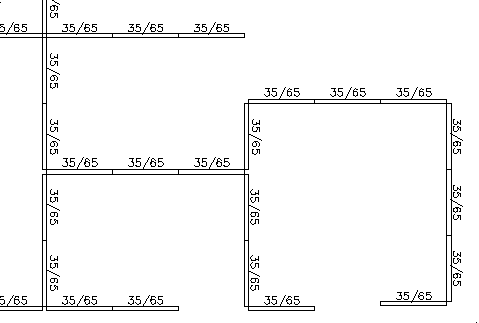
There's actually an additional method by which your objects may be faded, and that's using the Transparency feature in the Layer Properties Manager.
In the following example, I set the transparency for the panel tags to 65%.
How to Set the Layer Transparency
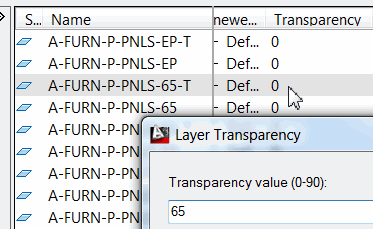 Open the Layer Properties Manager, then select the layer for the transparency setting, just so you can line it up.
Scroll over to the column for Transparency, then click the current value (probably 0).
You can either enter a new value, or choose from the available values in the drop-down list. The change in the drawing will be immediate.

Two Major Insights:
The Show/Hide Transparency [TPY] button on the Status bar needs to be enabled to see the transparency result in the drawing.
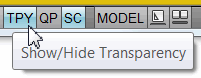
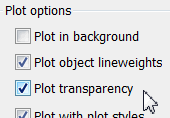
In the Plot dialog box, under Plot Options, check the box to Plot Transparency to see the result in the plot.
Left Field
Christmas Colors:
After the death of Christ many Christians began to celebrate his birth on the 25th of December. They incorporated many of the traditions that they already knew of into their Christmas celebrations. Holly wreaths from the celebration of natalis solis invicti were used and red berries were added. The use of the evergreen tree to decorate houses also remained. Green still symbolized life, but with an added meaning of eternal life. Red berries, apples and other items were added to symbolize the blood that was shed by Jesus.
There are a variety of stories telling the reason for the colors, but there's only one story telling the reason for Christmas. Blessings to you and yours for a warm and glorious Christmas season.
Donate to CADTutor
If you found this article useful, you might like to consider making a donation. All content on this site is provided free of charge and we hope to keep it that way. However, running a site like CADTutor does cost money and you can help to improve the service and to guarantee its future by donating a small amount. We guess that you probably wouldn't miss $5.00 but it would make all the difference to us.
Note from Michael: I want to thank all of my customers for continuing to retain my training services (some for over three decades!) and let you know your donations do not go to me personally, but to the ongoing maintenance of the CADTutor ship as a whole and to support the yeoman efforts of my friend and CADTutor captain, David Watson, to whom I am grateful for this monthly opportunity to share a few AutoCAD insights.
Share this page:


The Basics
- Dual Dimensions in a Dim…
- UCSICON Options
- "Best of" Basics: Irreg…
- Tool Palette Basics
- Original Dimension Value
- Possible Solutions to th…
- Avoid Using 'Standard' i…
- Shorten the Plot Scales…
- Update the Source File B…
- User Increment Angles fo…
- Drawing Information
- 'Sign Language'
- Rotate with the Copy Opt…
- Use the INSERT Osnap on…
- To or From the Current L…


