

 Michael’s Corner #69
September 2008
My Customers Rock!
As I was putting this month's column together, I realized that each one of the featured articles were insights that my customers either suggested in training or discovered on their own as they were going through the training workbook. As a matter of fact, I typically encourage my students to show me things that they may have found as they were working through a training exercise.
I will readily admit the CUI is sometimes a mystery to me, but I knew RJ (Sheppard's Business Interiors in Omaha) would have an answer on how to export a toolbar. For the tool palette button this month, the wonderful ladies that oversee all things facilities-related at Lawrence Berkeley Labs asked me if they could put the Express tool feature of Enclose Text With Object on a button… so we did! Then I was training the folks responsible for the space planning of the corporate facilities of Union Pacific Railroad in downtown Omaha, and they encountered a few other things that comprise the remaining topics of interest this month.
Finally, I want to thank Herman Miller for inviting me to speak at their first-ever North Area Design Forum in Chicago later this month. I'll be covering the AutoCAD and furniture-specification areas of interest and I'm looking forward to seeing all those who will be in attendance, many of whom are existing customers.
Bonfires, S'mores, and roasted marshmallows are just around the corner!
If you would like to contact me directly, you can do that also.
Blessings to one and all,
Michael
Exporting Your Custom Toolbar
 The Customize User Interface (CUI) has a quirk or two, but once you find out what they are, you can manage quite nicely. In the case of exporting your custom toolbar, you need to have somewhere for the toolbar to go before you can send it there. That ‘somewhere’ is a customization file - a new CUI. The procedure given has been successful in transferring toolbars between AutoCAD 2008 and 2009 (LT versions included).
Insurance Policy Statement: Export AutoCAD 200x Settings. The process of exporting a toolbar involves the Customize User Interface. Prior to modifying the CUI, it's always a good idea to have a back-up, just in case you encounter "unexpected results". To that end, I want to remind you about Export AutoCAD 200x Settings [June 2007]. This utility can be found from the Windows Start button, then All Programs![]() Autodesk
Autodesk![]() AutoCAD 200x
AutoCAD 200x![]() Migrate Custom Settings
Migrate Custom Settings![]() Export AutoCAD 200x Settings. The result is a .ZIP file such that if you gom up the menus in the CUI, use the Import utility to put Humpty Dumpty back up on the wall.
Export AutoCAD 200x Settings. The result is a .ZIP file such that if you gom up the menus in the CUI, use the Import utility to put Humpty Dumpty back up on the wall.
Memo: The following instructions are based upon you having a toolbar to transfer. To create a new toolbar, take a look at Michael's Corner, January 2006.
Instructions to Transfer Your Custom Toolbar to Another Computer
- Open the Customize User Interface by typing CUI, then press <Enter>.
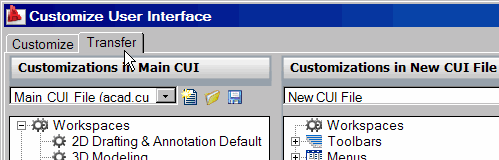
- At the top of the CUI, click the Transfer tab.
- In the right pane, click the button with the starburst on it for Create a New Customization File, then click Save.
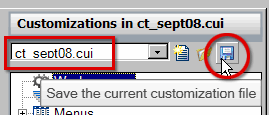
- In the Save As dialog box, navigate to the folder you want to save the new CUI, then enter a name and click Save. The name of your CUI will be displayed in the dropdown list. In this exercise I named it ct_sept08.
- Now click the Customize tab.
- Navigate to the location of your custom toolbar. As was suggested in the January 2006 article, your toolbar would ideally be located under Partial CUI Files
 CUSTOMToolbar.
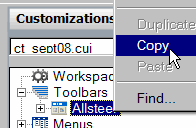
- Right-click on your custom toolbar, then click Copy. In this exercise I'm copying the toolbar I made when I was training Allsteel.
- Click the Transfer tab, then right-click on the Toolbars node for your new CUI, and click Paste.
- Click Save to save your custom CUI, then click OK to close the CUI dialog box.
At this point, you have a .CUI containing a single toolbar. The CUI file can obviously contain lots of additional customization elements, but the point of this exercise is to be able to transfer the toolbar to another system. The next few steps show you how to do just that.
- After copying your custom CUI to the other system, launch the CUI and click the Transfer tab.
- Click the Open Customization File button then navigate to where you copied your custom CUI and open it.

- On the Transfer tab, expand the Toolbars node to display the custom toolbar, then right-click on the custom toolbar and click Copy.
- Now click the Customize tab.
- Navigate to Partial CUI FilesCUSTOMToolbar, then right-click the Toolbar node and click Paste.
Bottom line, I would prefer that you customize a tool palette which has far and away more potential than a customized toolbar. However, if you're going to customize your toolbar, at least now you know how to transfer it from system A to system B.
Power Tool
Custom Button #9: Enclose Text with Object
 Once again, one of my customers came up with this idea, so during training we implemented it. Several years ago (June 2004), I took a couple months to cover some cool Express Tools, one of which was the routine to enclose existing text with the shape of your choice: Circles, Slots, or Rectangles. [Express
![]() Text
Text![]() Enclose Text with Objects]. The Facilities Planning team at Lawrence Berkeley Labs found that routine very entertaining, so we automated it.
Enclose Text with Objects]. The Facilities Planning team at Lawrence Berkeley Labs found that routine very entertaining, so we automated it.
Memo: The following instructions take you through the setting up of the properties to automate the "Enclose Text With Object" routine. Since the procedure requires the selection of text objects (and since it's not real easy to create a simple routine that knows when you're finished selecting), after creating the button to run the routine, you will need to select the objects FIRST, then click the button.
Instructions to Button-ize "Enclose Text with Objects"
- Open the Tool Palette window, then you will need a blank button to work with (see Michael's Corner Odd Spot, April 2007).
- Right-click on the blank button, then click Properties.
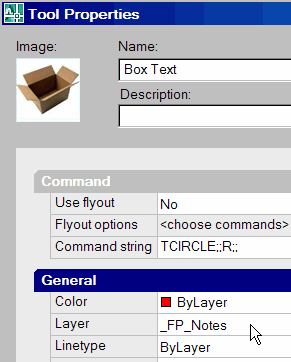
- Edit the Command String field to read as follows:
TCIRCLE;;R;;
The name of the command is Tcircle. I selected six text objects, then ran the command. The following is sequence of prompts you will get when using this command along with comments regarding the characters in the above macro.
Command: TCIRCLE
Initializing…
Select TEXT, MTEXT or ATTDEF objects…6 found
The first semi-colon presses Enter for the selection after launching the command…
Enter distance offset factor <0.3500>:
Second semi-colon for the offset factor prompt…
Enclose text with [Circles/Slots/Rectangles] <Circles>: R
You could use R, S, or C in the macro, then the semi-colon after your choice…
Create rectangles of constant or variable size [Constant/Variable] <Variable>:
The last semi-colon is to accept the default size of "variable"…
Creating Rectangles…Done.
6 Rectangles created.
- Under the General heading, modify the Color, Layer, and Linetype to accommodate the proper placement of the objects.
To test the button, select several text objects in your drawing, then click your new button and all the text you selected will be enclosed with the requested object type!
The Odd Spot
Update: A2008 & A2009 Import Layer States
 In February 2007 I addressed the saving of a layer state, and in that article I also mentioned - albeit in passing - that you could Export a layer state from Drawing A, then use the Import feature to import those layer states into Drawing B.
As it turns out, my customer at Union Pacific Railroad discovered that, in fact, you need not Export a layer state from another drawing, you can just select it from a list! When checking on the version in which this was introduced, I see it has been there since AutoCAD 2008. Here's what Jim discovered…
Instructions to Load a Layer State from Another Drawing
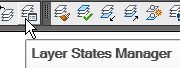
- On the Layers toolbar, click Layer States Manager.
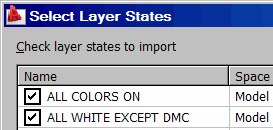
- Click Import to open the Import Layer State dialog box.
- From the Files of Type dropdown list, you can select Drawing (*.DWG), Standards (*.DWS), Drawing Template (*.DWT), or Layer State (*.LAS). Choose "Drawing (*.DWG)".
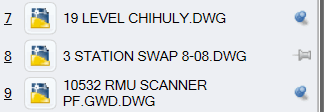
- Navigate to the folder containing a drawing that has layer states already in it, then click Open.
- All available layer states will be listed. Toggle off any layer states you don't want to load, then click OK.
Although exporting a layer state enables you to transfer the resulting .LAS to another system, if you have access to the drive containing the drawings of interest, use above procedure to load a layer state directly from a drawing.
Memo: For those of you who created layer states using the Express Tools Layer Manager (LMAN) - and I know there are quite a few of you - when using the above method to load a layer state, any layer state that is listed with the LMAN- prefix will not be loaded. To make it work, if you open the drawing containing the LMAN- states, restore each one, then save the drawing, those layer states are now fair game when using the above method of loading layer states.
The Basics
Triple Scoop
As summer winds down, I thought I'd pass along a triple scoop treat, courtesy of my customers at Union Pacific.
AutoCAD 2009 Pin-A-Drawing [A2009]
 In A2009, I had yet to investigate the purpose of that push-pin used in the Recent Documents list displayed when you clicked the big red "A" (technically known as the "menu browser".)
As many of you know, the File menu/Menu Browser retains a list of the last nine (9) drawings you opened. As it turns out, Dave was opening drawings and noticed that when you click the pushpin for a drawing in the list, it won't let that drawing "drop off" the bottom when you have opened 8 additional drawings since you opened that one. It will stay in the listing until such time as you un-pin it!
Copy Multiple Layout Tabs with CTRL [A2008 + A2009]
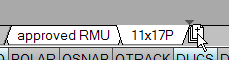 One of the features I cover in training is the recent feature that enables you to move a layout tab by dragging it to another location.
In my training workbooks, I also mention that if you pick and drag a layout tab to another position… then hold down the CTRL key(!)… you will copy that layout tab.
As Michelle was experimenting with these features, she used CTRL to select more than one tab - something that was in the workbook - but then also used CTRL to copy both of the tabs she had selected. The things you can learn if you just keep pickin' & proddin'.
Ortho Off for Revcloud [A2009]
And finally, when introducing the Revision Cloud as we make our way toward putting it on a palette (see October 2007), one of the things I suggest is to turn off Ortho so you can move your cursor more smoothly to create the revision cloud. It was (graciously) pointed out to me that if Ortho is on when you launch the Revision Cloud command, it is automatically turned off… only available in A2009.
Left Field
Muscatine's Claim to Fame - Muscatine, Iowa was known as the "Pearl Button Capital of the World". A button company was founded in 1884 by a German immigrant named J.F. Boepple, producing buttons by punching them out of clam shells harvested from the Mississippi River. Hole-punched clam shells can still be found along the riverfront. (Yes, one of my customers, Allsteel, Inc., is located there.)
Donate to CADTutor
If you found this article useful, you might like to consider making a donation. All content on this site is provided free of charge and we hope to keep it that way. However, running a site like CADTutor does cost money and you can help to improve the service and to guarantee its future by donating a small amount. We guess that you probably wouldn't miss $5.00 but it would make all the difference to us.
Note from Michael: I want to thank all of my customers for continuing to retain my training services (some for over three decades!) and let you know your donations do not go to me personally, but to the ongoing maintenance of the CADTutor ship as a whole and to support the yeoman efforts of my friend and CADTutor captain, David Watson, to whom I am grateful for this monthly opportunity to share a few AutoCAD insights.
Share this page:


The Basics
- Dual Dimensions in a Dim…
- UCSICON Options
- "Best of" Basics: Irreg…
- Tool Palette Basics
- Original Dimension Value
- Possible Solutions to th…
- Avoid Using 'Standard' i…
- Shorten the Plot Scales…
- Update the Source File B…
- User Increment Angles fo…
- Drawing Information
- 'Sign Language'
- Rotate with the Copy Opt…
- Use the INSERT Osnap on…
- To or From the Current L…


