 Michael’s Corner #121
January 2013
There's Always Something New in the Year
None of us knows what's in store for 2013, but one thing we DO know, is that there's always something new to learn about. I hope this finds you all well and looking forward to the new things that lie ahead in your respective areas of expertise.
Many years ago when I was working with Hugh Bathurst and presenting the 'Mastering Today's AutoCAD' series around the USA, I met folks who used AutoCAD in some very unique industries; fire plug design, rail car design, and prison cafeterias were some of the ones that come to mind. Absolutely fascinating and very 'new' to me. If you work in an industry with similar unique drawing requirements, I would be interested in seeing a small sample drawing of your work.
This month, ask yourself the following questions, and then see if your answers are the same as what I came up with. You may just find something new!
…Do you know how to add a dimension to a 3D object?
…Were you aware of the Layer option when you use the Offset command?
…Have you ever noticed the background mask in Mtext needs adjusting?
…When you plot a Window from Model space, do you know how to estimate the plot scale?
Thank you all so very much for your continued support of Michael's Corner and CADTutor, and we hope you have a fabulous New Year!
If you would like to contact me directly, you can do that also.
Blessings to one and all,
Michael
Adding Dimensions to a 3D Object
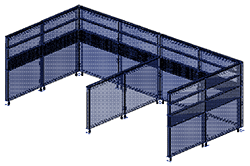 The majority of my customers use AutoCAD for contract furniture space planning of corporate facilities, and placing dimensions on 3D furniture is not necessarily intuitive.
The solution lies in the orientation of the User Coordinate System (UCS). By default, AutoCAD can only draw primitive objects — which includes dimensions — in the XY plane, so the goal is to get the XY plane oriented appropriately. Several years ago I covered adding Paper space dimensions to Model space objects, but that is not my preference for dimensioning, so we will dimension in Model space here.
Note: Grips were added to the UCS Icon in AutoCAD 2012, so if you have an older version, please feel free to contact me for an alternative approach using your version.
The following exercise presumes you have objects in 3D that you can work with, and that you have oriented your drawing to a 3D view. I set my Visual Style to X-Ray just for fun, and set the PDMODE to <35> so I can see the points for my Node snap. We'll be dimensioning the height of the nearest panel that is shared between the two workstations.
How To Dimension 3D Objects in Model Space
After orienting your drawing to a 3D view, right-click on the UCS icon, then click .

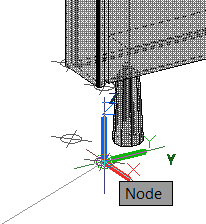 Click once on the UCS Icon to display the grips, then click the grip at 0,0,0.
Zoom up to the base of the panel, then enable Node snap and click the point at the bottom of the panel, or at the base of the object being dimensioned.
At this point, the XY plane is still oriented on the 'floor'. The strategy, in this circumstance, is to orient the XY plane so it is parallel to the panel, with the X Axis horizontal along the floor, and the Z Axis pointing toward us.
Click on the UCS icon again, then hover in the round grip at the end of the Y axis and click Rotate Around X Axis.
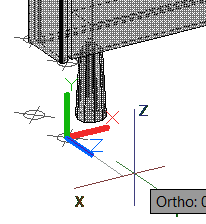 Turn on Ortho, then move your cursor straight up so the Y axis is vertical.
Click on the UCS icon again, then hover in the round grip at the end of the Z axis and click Rotate Around Y Axis. At the end of this procedure, your UCS icon should display as shown in the figure at right.
Set the desired Layer and Dimension style to be current, then launch the Linear Dimension command.
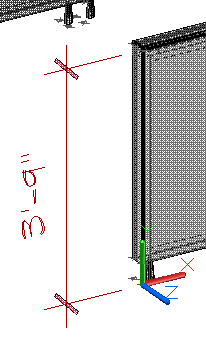 For the first point, you can either pick the point, or enter 0,0.
Now move your cursor up and specify the second point for the dimension, then move it out and place it!
I think you now understand the fundamental principle that dimensions are all about the current XY plane. The nice thing about creating the dimensions in Model space is that you can now tweak the view in 3D and the dimension is treated like any other object in 3D.
To put the UCS back to <World>, you could type PLAN and press [Enter] twice, or you could click on the UCS icon again, hover in the 0,0,0 grip, then click World.
Power Tool
Offset with the Layer Option
 They added this a while back, but until my customer in DC asked me about it, I had forgotten all about it.
How to Offset Objects to the Current Layer
Set a layer to be current that will receive the offset objects.
Launch the Offset command [] and you see the following prompt:
Current settings: Erase source=No Layer=Source  OFFSETGAPTYPE=0

Specify offset distance or [Through/Erase/Layer] <0′-6″>:
Enter L for the Layer option, then enter C for the Current layer option.
Specify the offset distance. In this exercise, I'm offsetting a wall line 12″ to the Floor_Covering layer.
Click on the object to offset, then move your cursor to one side or the other to get the preview(!) of the distance and the resulting layer.
Click to complete the offset for that object, then continue to make additional offsets as needed. The command does not terminate until you press [Enter] or click Exit (in AutoCAD 2013).
Note: The object being offset must have its Color property set to ByLayer, otherwise you will not notice if the Layer option is being implemented.
The Odd Spot
Mtext Wrinkles
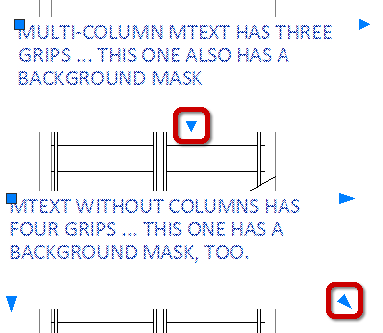
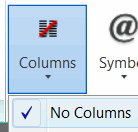 First, if you're using Multiple Columns with Mtext — see my coverage of this feature in August 2007 — when you click on the Mtext, you see 3 grips (upper text in the large figure).
If you have Mtext that is set to No Columns, when you click on the Mtext, you see 4 grips (lower text in the large figure).
So far, no harm, no foul.
The curious bit comes when you have a Background Mask associated with the Mtext (covered many years ago in June 2005, albeit still applicable).
In each Mtext configuration — columns or no columns — when you use the upper right grip to resize the Mtext, you may notice that the background mask does not automatically adjust to accommodate the new size. The solution is to use the grips I have noted on the respective Mtext objects in order to bring the background mask into its proper condition.
The Basics
Estimating a Plot Scale
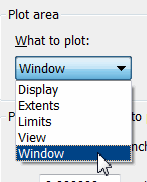 Most of the time we plot from Paper space, but occasionally we need a quick print from Model space. When plotting from Model space, it's very common to use the Window option… but how do you figure out the scale?
I never noticed this, but I thought it was a pretty cool trick when one of my new customers pointed it out: After picking the two points to define the Window, if you empty the box for Fit to Paper, you will see the calculation of the scale.
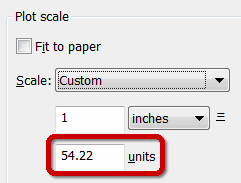
From this illustration, it looks like 1/4″ = 1′0″ [1:48] would be a standard plot scale that would be close to the calculated scale! Not something you encounter every day, but a nice fundamental trick that may come in handy.
Follow-Up
…to Embedding an Image
Every now and then I'll hear from a reader with an insight on a recent article, and I pass those along when appropriate. The December 2012 coverage on using OLE to embed an image was appreciated by many of you, one of whom was the IT guy at Robert A.M. Stern Architects in New York. He wisely suggested that if you don't have Word — which, in our current cloud-based app environment is entirely possible — that you can use MS Paint to accomplish the same task suggested in my article:
"…the method that works for me is simply to Open the image in MS Paint, Ctrl+A to select it, Ctrl+C to copy it to the clipboard, then, in AutoCAD, Ctrl+V to paste it at a specified insertion point. I like this method because it is very simple and takes advantage of the lowly MS Paint application which is available to every MS Windows user."
Thanks, William!
Left Field
Snow:
 Right after Christmas, we finally had our first snowfall that lasted for more than a day here in Kentucky; a whopping 3″. Fascinating stuff, snow. Here are a few bits to add to what you probably already know…
* A snowflake consists of roughly 1019 water molecules, which are added to its core at different rates and in different patterns, depending on the changing temperature and humidity within the atmosphere that the snowflake falls through on its way to the ground. As a result, it is extremely difficult to encounter two identical snowflakes.
* The water equivalent of a given amount of snow is the depth of a layer of water having the same mass and upper area. For example, if the snow covering a given area has a water equivalent of 50 centimeters (20 in), then it will melt into a pool of water 50 centimeters (20 in) deep covering the same area. New snow commonly has a density of around 8% of water. This means that 33 centimeters (13 in) of snow melts down to 2.5 centimeters (1 in) of water.
* The two most recent world records for the highest seasonal snowfall both belong to the state of Washington. The Mount Baker Ski Area, outside of the town Bellingham, Washington received 2,896 cm (1,140 in) of snow during the 1998–1999 season. The previous record holder, Mount Rainier, Washington received 2,850 cm (1,120 in) of snow during the 1971–1972 season.
Donate to CADTutor
If you found this article useful, you might like to consider making a donation. All content on this site is provided free of charge and we hope to keep it that way. However, running a site like CADTutor does cost money and you can help to improve the service and to guarantee its future by donating a small amount. We guess that you probably wouldn't miss $5.00 but it would make all the difference to us.
Note from Michael: I want to thank all of my customers for continuing to retain my training services (some for over three decades!) and let you know your donations do not go to me personally, but to the ongoing maintenance of the CADTutor ship as a whole and to support the yeoman efforts of my friend and CADTutor captain, David Watson, to whom I am grateful for this monthly opportunity to share a few AutoCAD insights.
The Basics
- Dual Dimensions in a Dim…
- UCSICON Options
- "Best of" Basics: Irreg…
- Tool Palette Basics
- Original Dimension Value
- Possible Solutions to th…
- Avoid Using 'Standard' i…
- Shorten the Plot Scales…
- Update the Source File B…
- User Increment Angles fo…
- Drawing Information
- 'Sign Language'
- Rotate with the Copy Opt…
- Use the INSERT Osnap on…
- To or From the Current L…


