

 From: AutoCAD Productivity Articles #112
Originally published: April 2012
Add an Arc to a Polyline
AutoCAD 2011 introduced the 'multi-function' grip; a concept that was applied to the standard square grip, as well as the dot-grip for hatches, and the rectangular multi-function grip located at the mid-point of polylines. Now when you hover in any type of grip, you get a shortcut menu.
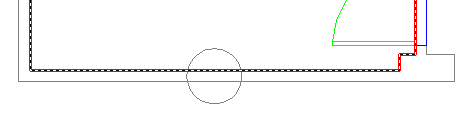
Let's say you have drawn a polyline around a room so you can calculate the area, but the polyline went straight through a circular column… and now you want to make the polyline follow the arc of the column.
How to Add an Arc to a Polyline
-
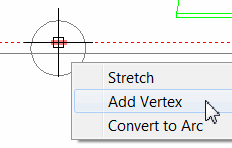 Select the polyline to display the grips.
 Hover in the multi-function grip at the midpoint, then click Add Vertex.
-
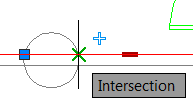 Use Intersection snap and add a vertex at one of the polyline/circle intersections. Repeat the process for the other side of the circle so you now have a vertex on both sides of the circle.
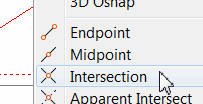 Note: To quickly access the Intersection snap, use Shift + Right-click to open the object snap shortcut menu, then click Intersection. I typically set my Osnap to Endpoint and Node, then use this method if I need any other object snap for a single shot.
 Click the polyline again, hover in the grip in the middle of the circle, then click Convert to Arc.
-
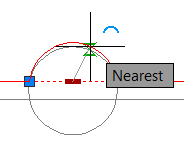 Use Shift + Right-click, then the Nearest option and click on the circle to complete the process!
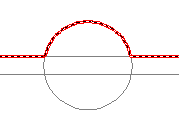
The result is an arc segment within your polyline.
See all the articles published in April 2012
See this article in the April 2012 Corner
Donate to CADTutor
If you found this article useful, you might like to consider making a donation. All content on this site is provided free of charge and we hope to keep it that way. However, running a site like CADTutor does cost money and you can help to improve the service and to guarantee its future by donating a small amount. We guess that you probably wouldn't miss $5.00 but it would make all the difference to us.
Note from Michael: I want to thank all of my customers for continuing to retain my training services (some for over three decades!) and let you know your donations do not go to me personally, but to the ongoing maintenance of the CADTutor ship as a whole and to support the yeoman efforts of my friend and CADTutor captain, David Watson, to whom I am grateful for this monthly opportunity to share a few AutoCAD insights.


