

 From: AutoCAD Productivity Articles #119
Originally published: November 2012
Polar Tooltip & Vector
 When you rotate or move selected objects, you can do so without any restriction, or you can turn on Ortho… or Polar. If you use Polar and you don't see the tooltip displaying the angle and/or the dotted vector, you may possibly think it's 'broken' and not use it. So let's fix that.
How to Set the Display of the Polar Tracking Vector
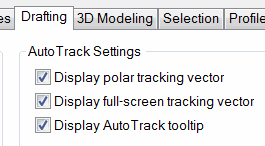 Right-click anywhere in the Command line, then click Options to open the Options dialog box.
On the Display tab, check all the boxes at the top under Auto Track Settings, then click OK to save your settings and close the Options dialog box.
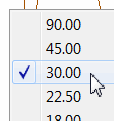
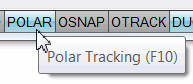
On the Status bar, right-click on Polar Tracking, then click 30.00 in the list.
Note: Setting the angle doesn't turn the feature on, so make the Polar icon/word is blue. You can also toggle it On/Off with [F10]
Launch the Rotate command, select an object, press [Enter], then specify a base point.
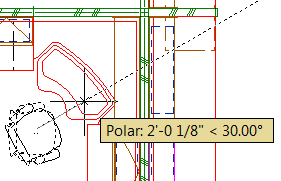 When prompted to specify the rotation angle, move your cursor around to see the tooltip with the distance and angle, as well as the dotted vector!
Hopefully that clarifies any confusion you may have had regarding the settings, and enables you to display the information you want when using this often-overlooked feature.
See all the articles published in November 2012
See this article in the November 2012 Corner
Donate to CADTutor
If you found this article useful, you might like to consider making a donation. All content on this site is provided free of charge and we hope to keep it that way. However, running a site like CADTutor does cost money and you can help to improve the service and to guarantee its future by donating a small amount. We guess that you probably wouldn't miss $5.00 but it would make all the difference to us.
Note from Michael: I want to thank all of my customers for continuing to retain my training services (some for over three decades!) and let you know your donations do not go to me personally, but to the ongoing maintenance of the CADTutor ship as a whole and to support the yeoman efforts of my friend and CADTutor captain, David Watson, to whom I am grateful for this monthly opportunity to share a few AutoCAD insights.


