

 Michael’s Corner #23
November 2004
Power Edits, Points and Palettes
Last month I covered some fun editing features and I found a couple other ones that I wanted to pass along. As I was reviewing the last 22 months of tips (yes, I am coming up on the two year anniversary of writing this column for this terrific website), I discovered that I needed to pass along the updated features of Palettes in AutoCAD 2005. Now that may take a couple issues. In the meantime, carry on and pass along your questions and insights anytime.
On a personal note, it looks like I will be traveling to the continent of Africa to present training in Egypt and Zimbabwe early next year. There are a number of you in the UK/EU who have visited my website, too, so if you are interested in hosting or attending my AutoCAD Toolbelt Workshop, please contact me soon as planning this trip will take a bit of time.
If you would like to contact me directly, you can do that also.
Blessings to one and all,
Michael
Rotate to Parallel
![]() The Object Snap setting of Parallel enables you to rotate selected objects to be parallel with another object. In the following exercise, the Rotate command is implemented with the Reference option and you take the skewed objects and make them parallel to a specified vector.
The Object Snap setting of Parallel enables you to rotate selected objects to be parallel with another object. In the following exercise, the Rotate command is implemented with the Reference option and you take the skewed objects and make them parallel to a specified vector.
 Instructions
- Right-click on the Osnap button on the Status bar and click Settings.
- Turn on Endpoint, Parallel, and Object Snap On, then click OK.
- Launch the Rotate command, select the objects to rotate, and specify a Basepoint, shown with a red dot…
- At the prompt for a rotation angle or Reference, enter R.
- Pick two points (Ex: the red and blue dots) that graphically specify the reference angle.
- Now position your cursor over a vector to acquire its angle for the parallel snap.

- Move your cursor back to a position parallel to the acquired angle.
- When you see the tooltip, click to complete the parallel rotation.

Tip: You can acquire more than one vector as the parallel object.
Power Tool
Tool Palette Updates for A2005
 In my March 2004 column I did a review of the Tool Palettes in… AutoCAD 2004. There were a number of changes to tool palettes in AutoCAD 2005 which I wanted to bring to your attention. Especially since I frequently teach from this column when students have questions and don’t want to take copious notes.
BLOCK Updates
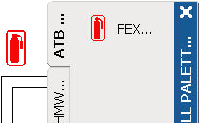
 You can drag blocks from the drawing directly onto a tool palette. [In A2004 you could only get blocks onto the palette from the Block node in DesignCenter.]
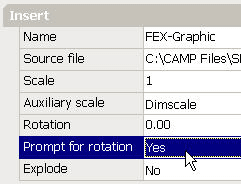
The Tool Properties dialog box for a block has two new options since A2004:
Auxiliary Scale: Choose to scale the block by the Dimscale or the Plotscale. This would be a good idea if you had created a "unit block", one which is scaled based upon the current drawing's Dimension or Plot Scale.
Prompt for Rotation: Set this to Yes if you would like to be prompted for a rotation after specifying a basepoint. [In A2004 you needed to type R prior to specifying a basepoint to place the block].
HATCH Updates
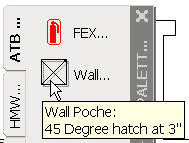
You can drag a hatch from the drawing directly onto the a tool palette. The icon displayed on the tool palette also reflects the hatch parameters, such as angle of the hatch and if it is double-hatched.
 |
 |
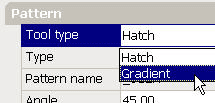
Tool Type: You can edit the hatch tool type and change the hatch from a standard hatch pattern to a Gradient pattern type.
INTERFACE Updates
- You can drag commands from the Commands tab of the Customize dialog box directly onto a tool palette.

Tip: If you drag an object from the drawing to the palette, the command used to create that object is added to the palette.
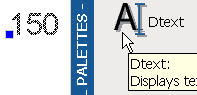
- You can drag a User-Defined Button from the Commands tab of the Customize dialog box directly onto a tool palette.
-
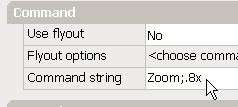
- To add a macro to a User-Defined Button, right-click on the new button and click Properties.
- In the Command String area, enter the desired command string. For example, ZOOM;.8X will reduce your display to 80% of the current view; essentially zooming out.
Tip: To add an image to your User-Defined tool, right-click in the Image area and select Specify Image. File types include BMP, JPG, PNG, TIF or GIF.

The Odd Spot
Under the Option Radar
Since Autodesk rarely takes anything out of their flagship product, I wanted to remind you of a few features you may find "missing". One of those buried treasures is the Vmax option of Zoom. It zooms out as far as possible without incurring a Regen. That could be real helpful for some of those monster drawings you have. Another entire string of options can be found under the New option of the UCS command. You’ll find:
ZAxis/3point/OBject/Face/View/X/Y/Z
Curiously, if you know which option you would like to use, you need not go through the New option, just enter the one you want to use. For example, if you want to select an OBject to align the UCS, simply launch the UCS command, then enter OB at the first string of options… or enter E for Entity since they didn't take that one out either!
The Basics
Why a Closed Polyline?
 When creating a closed polyline, it is best to enter C for the Close option rather than using Endpoint snap and picking the final point for the polyline closure. Here’s a few reasons why:
- When using the Polyline option of the Fillet command, when you select a closed polyline, the fillet radius will be applied to all the corners. (Yes, I thought that might explain a few things.)
Tip: To close an open polyline after the Pline command has been completed, use Pedit, select the open polyline, then enter C for the Close option.


- Only closed polylines can be converted into irregular viewports in a Layout when using the Convert Object to Viewport option on the Viewports toolbar.
- Only closed polylines can be converted into a wipeout object (Express Tools or Draw
 Wipeout in A2004/A2005).
Donate to CADTutor
If you found this article useful, you might like to consider making a donation. All content on this site is provided free of charge and we hope to keep it that way. However, running a site like CADTutor does cost money and you can help to improve the service and to guarantee its future by donating a small amount. We guess that you probably wouldn't miss $5.00 but it would make all the difference to us.
Note from Michael: I want to thank all of my customers for continuing to retain my training services (some for over three decades!) and let you know your donations do not go to me personally, but to the ongoing maintenance of the CADTutor ship as a whole and to support the yeoman efforts of my friend and CADTutor captain, David Watson, to whom I am grateful for this monthly opportunity to share a few AutoCAD insights.
Share this page:


The Basics
- Dual Dimensions in a Dim…
- UCSICON Options
- "Best of" Basics: Irreg…
- Tool Palette Basics
- Original Dimension Value
- Possible Solutions to th…
- Avoid Using 'Standard' i…
- Shorten the Plot Scales…
- Update the Source File B…
- User Increment Angles fo…
- Drawing Information
- 'Sign Language'
- Rotate with the Copy Opt…
- Use the INSERT Osnap on…
- To or From the Current L…


