

 Michael’s Corner #51
March 2007
Annotation Objects & more 3D from AutoCAD 2007
This month I decided to investigate a couple things that I had been wanting to learn more about, so I'm passing my findings along to you. That DUCS button that first showed up on the AutoCAD 2007 Status bar got my curiosity up, and now I'm a true devotee! Then, I will admit to not fully understanding why a Linear dimension is referred to as a "Rotated" dimension in the Properties window. Take a look at the Basics section to see what I found out.
The Power Tool this month is a great little feature from the Express Tools collection that enables you to align text along an arc and has quite a powerful array of features. This came up when a reader from Fullerton College emailed me about how to "bend" text. Then I think I was on the AUGI website (www.augi.com) when I read about the Convtosolid command that lets you take a closed polyline with thickness… and basically fill it with concrete! (It creates a solid).
This month (as with just about every other one) was quite enjoyable to write… mostly at 35,000′ traveling across the country.
If you would like to contact me directly, you can do that also.
Blessings to one and all,
Michael
The Dynamic UCS
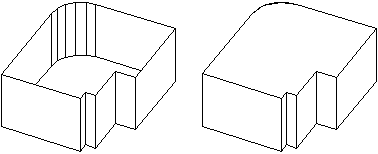
In the December 2006 lead article, I covered the Presspull command. The result of this command is a 3D solid; cool! A couple years prior to that (time flies!), in August 2004, I covered the Real-Time UCS that was a part of the Express Tool collection (and still is, actually). Starting in A2007, you noticed that DUCS button on the Status bar and may be more than a bit curious about what it does.
To illustrate this feature, I have created a couple walls (using Presspull, of course) on which I'll add a rectangle using the DUCS. Then we'll see how the Presspull command will create the opening in the walls.
Instructions to Add a Door to the Walls
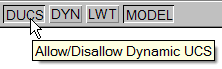
- On the status bar, click DUCS to turn on the Dynamic UCS feature.
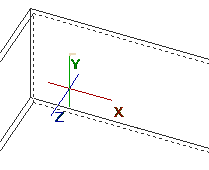
- Begin the Rectangle command, then move your cursor onto the surface of the wall and you will see the Dynamic UCS switch over so the XY plane is aligned with the wall surface.
- When prompted for the first corner of the rectangle, use the Snap From feature with Endpoint snap and click the lower left corner of the wall.
- When prompted for <Offset>, enter 6′,0 to place the first corner 6′ to the right from the corner.
NOTE: Your cursor must remain within the area of the wall when specifying the offset.
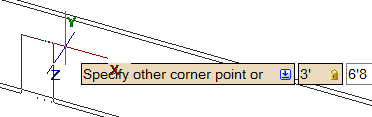
- For the second corner of the rectangle, turn on the DYN button (F12), then type 3′,6′8 and press Enter.
- Now use Presspull, click within the door opening and move your cursor "back" to effectively push the rectangle into the wall and click anywhere.
AutoCAD automatically subtracts the door rectangle from the wall!
- At this point, you may move or erase the originating objects displayed in the door threshold area.
Power Tool
Arc-Aligned Text

Given the alternative to "bending" text yourself, the Express Arc-Aligned Text command is pretty powerful. There are several elements to the ArcAligned Text Workshop dialog box (seriously; that's the name). I'll take a look at some of the key features just to get you going.
Setup: This is easy; you have to have an arc. Not a polyline arc, a good old fashioned arc. Hence the name.
Easily Overlooked Settings: Text Height & Offset From Arc. The default values are very small, so be sure to set them appropriately for your drawing.
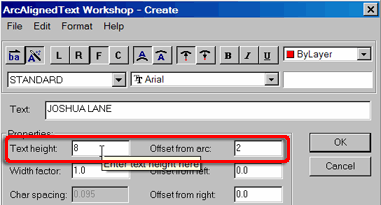
Buttons: Thankfully, the tool tips on the buttons give you all the insight you need. There are a couple that are the key players in specifying how the text is placed along the arc.
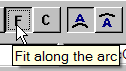
Fit Along The Arc. If you use this, the "Char Spacing" item under Properties is grayed out, leaving AutoCAD to make the necessary adjustments.
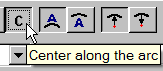
Center Along The Arc. When you use this setting, you make the necessary adjustments to the "Char Spacing". The default value is usually pretty small, so you will probably need to finesse this setting a wee bit, too; I would start with 1 and gently go up or down from there.
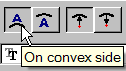
The group of four buttons in the middle, Convex/Concave and Outward/Inward, pretty much speak for themselves. The nice thing is, after entering the desired text string and clicking OK, you can re-launch the command, select the text, then click one of these buttons to see the result.
TIP: Double-click the Arc-Aligned text and you can edit it in the Properties window.
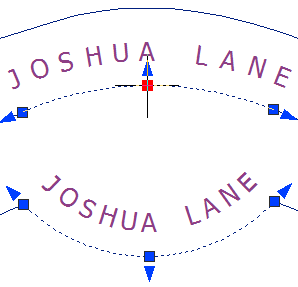
Editing the Arc-Aligned Text: Click the arc along which the text is aligned to display the grips. Use either the normal object grips or the placement (arrow shaped) grips to modify the arc. With each edit, the arc-aligned text adjusts to accommodate.
After playing with this awhile (I am confident that some of you out there probably have no useful application for it, you'll just play with it), you will get the hang of where to make the appropriate edits and tweaks to make the result work for your drawing. Truly a fun, albeit powerful, tool.
The Odd Spot
CONVTOSOLID
If you have a closed polyline, you can change the Thickness (in the Properties window) and you get, essentially, a shaped tube. To get a Solid, you can use the Extrude command and assign an extrusion height (with a Taper Angle, if necessary).
Beginning in A2007, you can still do those things, but if you already have a closed polyline with Thickness, use the command CONVTOSOLID to convert it… into a Solid!
The Basics
Aligned and Rotated Dimensions
When the Properties window is open and you select a dimension, you may have seen the dimension identified as an "Aligned Dimension". Then another time, you'll click on a dimension that looks virtually identical, but it's identified as a "Rotated Dimension". What's the difference?
Aligned Dimension

The dimension line of the Aligned Dimension is always parallel to the points identified to be dimensioned (Definition Points or Defpoints).
If you click on the dimension, then click in one of the definition point grips and reposition the grip, the dimension line rotates to accommodate the new position. It continues to be "aligned" with the definition points.
Rotated Dimension (created with the Linear dimension tool)

When you point two points that are not orthogonally-oriented, if you position your cursor to the left or right you will get a vertical dimension. If you position your cursor above or below the points specified, the result will be a horizontal dimension. In other words, the dimension line is automatically rotated to maintain a horizontal or vertical dimension.
Mystery solved!

Final (cautionary) note: Another reason why a linear dimension is referred to as a Rotated dimension in the Properties window is because, after specifying the points for the dimension, you have a Rotated option. This enables you to specify a rotation angle for the resulting dimension… and the dimension will be the distance between the two points PARALLEL TO the resulting dimension line; the angle of rotation. For this reason, I would suggest that you use the Aligned dimension to accurately dimension angled geometry.
Left Field
"Hand" me the reins - You may already know that a horse's height is measured in hands. But did you know that each hand equals four inches. If you say a horse is 16.2 hands high, the 2 stands for 2 fingers. And a 16.2 horse is a pretty good sized horse!
Donate to CADTutor
If you found this article useful, you might like to consider making a donation. All content on this site is provided free of charge and we hope to keep it that way. However, running a site like CADTutor does cost money and you can help to improve the service and to guarantee its future by donating a small amount. We guess that you probably wouldn't miss $5.00 but it would make all the difference to us.
Note from Michael: I want to thank all of my customers for continuing to retain my training services (some for over three decades!) and let you know your donations do not go to me personally, but to the ongoing maintenance of the CADTutor ship as a whole and to support the yeoman efforts of my friend and CADTutor captain, David Watson, to whom I am grateful for this monthly opportunity to share a few AutoCAD insights.
Share this page:


The Basics
- Dual Dimensions in a Dim…
- UCSICON Options
- "Best of" Basics: Irreg…
- Tool Palette Basics
- Original Dimension Value
- Possible Solutions to th…
- Avoid Using 'Standard' i…
- Shorten the Plot Scales…
- Update the Source File B…
- User Increment Angles fo…
- Drawing Information
- 'Sign Language'
- Rotate with the Copy Opt…
- Use the INSERT Osnap on…
- To or From the Current L…


