 Michael’s Corner #33
September 2005
Oldies and Goodies
Every now and then I'm really glad Autodesk doesn't take stuff out of AutoCAD. OK, maybe they've taken out one or two things (like the plain old Text command; replaced with Dtext), but I think the Boundary command is a nice little routine that can assist in calculating square footages. Then I got an email from somewhere praising the merits of the Dline command, especially the ability to cut door openings in parallel lines. Little things like that are great to have at your disposal, and both of these features are available in LT!
And in yet another case of discovering applications while I'm "on the job", I was teaching some folks in Cincinnati and found a great application for graphically defining points when making a rectangle. Then finally, I wanted to remind the folks that are following my DesignCenter coverage about a great little feature called "Home". Oldies and Goodies: Gotta love 'em.
If you would like to contact me directly, you can do that also.
Blessings to one and all,
Michael
Boundary Creation
 When it comes time to calculate the square footage of a space for fiscal purposes, just let AutoCAD calculate the area. And when you do so, it's best to have a polyline on a separate layer bounding the area to be calculated.
Instructions to Create a Boundary
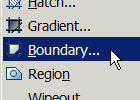
- Set the desired layer to current, then zoom into the area to be calculated (but still see the entire area) and launch the Boundary command [].
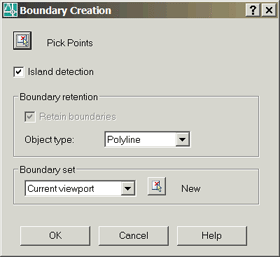
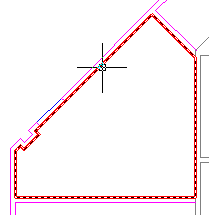
- Click the Pick Points button and click inside the area for the boundary, much like you would do for a hatch. A polyline (the default object type) is automatically 'sprayed' around the perimeter of the area.
Those of you with AutoCAD 2006 can hover over the polyline to display the object.
Gold Star Tip: Clear the Island Detection check box if you have other objects in the area, such as furniture. Then, when you pick the point, click near the wall. AutoCAD will seek out the nearest object, then track the perimeter of the wall, not the furniture "islands".
Power Tool
Graphic Rectangle Fit
Beginning in A2004, the Rectangle command provided an option for Dimension. Cool. What if you want to pick two points to identify one (or both) of the values. In a recent training in Cincinnati I had the opportunity to "explore" that feature. The situation was the need to put an 18" deep bookcase between a fireplace and a wall.
Similar to many other commands in AutoCAD, you can usually graphically specify the points required for a size. Here's the sequence:
- Launch the Rectangle command.
- Specify the first corner of the rectangle (red dot).
- Enter D for the Dimensions option.
- In this example, when prompted to specify points for the Length, I picked two points (red dot / blue dot) to graphically specify the length.
- For the Width, I entered 18.
- Now click a point to specify the quadrant (based upon the first corner picked) where you want to place the rectangle.

Note for A2006 users: The Rotation option of the Rectangle command (displayed after specifying the first point) should be used before using the Dimension option. If you use the Dimension option first, then use the Rotation option to rotate your rectangle, you will need to re-enter your Dimension values. Curious.
The Odd Spot
Door Opening with Dline
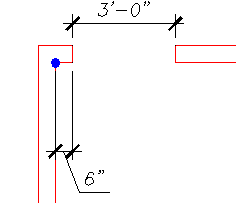 If you don't have Architectural Desktop, this is a great trick you can use to create a door opening with a width of your choice. Back in August 2003 I did coverage on the Dline command. Once you have created the parallel lines, however, how do you cut a door opening?
Dline settings to create the 3' 0" opening shown
Width - 36
Dragline - L
Offset From - Endpoint snap at the blue dot
Offset Toward - Eastward (with Ortho On)
Offset Distance - 6
Instructions to create the 36" Door Opening with Dline
- Launch the Dline command by typing DL at the Command prompt, and set the Width and Dragline values as suggested above.
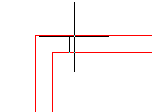
- Enter O for the Offset option and follow the prompts with the responses listed above.
- When prompted to pick the <next point>, click on the top horizontal line directly above the starting point of the dline.
Note: Turn off your Osnaps when using this trick. When picking the 'Offset From' point, just use Snap from Endpoint from the Object Snap toolbar or Shift + Right click.
The Basics
DesignCenter - Part IV
In the June 2005 coverage of DesignCenter I mentioned the benefits of having a 'Master' drawing in which you have your most commonly used named objects. In the August 2005 coverage, I went over how to create a layout and the benefits of using DesignCenter to access to your layouts with the title blocks on a drawing containing your "Plot Sheets".
 What I failed to mention in each of those reviews, is the most efficient method of getting to those important drawings: the Home button.
Instructions to Set a Home for DesignCenter
- Open DesignCenter (Ctrl + 2) and navigate to the drawing containing your layouts and/or your commonly used named objects. These could be the same drawing since this drawing is essentially an external "go-to" drawing.
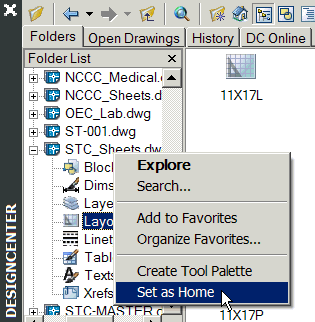
- Right-click on the .dwg file, then click Set as Home in the shortcut menu.
- To test the setting, in the left pane of DesignCenter, navigate to some other location such as C:\Program Files\AutoCAD 2xxx\Sample. Now click the Home button across the top of DesignCenter to see it "go home".
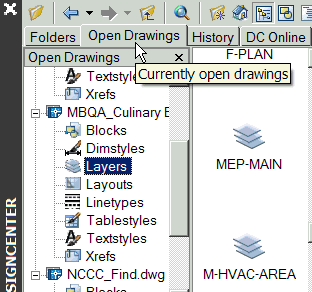
Gold Star Tip: To transfer named objects from one open drawing to another, click the Open Drawings tab, make the necessary selections, and drag them into the current drawing.
Next month I'll wrap up the DesignCenter review!
Left Field
That explains it! The reason pigeons walk so funny is because their eyes can't focus as they move. The bird actually has to bring its head to a complete stop between steps in order to refocus.
Donate to CADTutor
If you found this article useful, you might like to consider making a donation. All content on this site is provided free of charge and we hope to keep it that way. However, running a site like CADTutor does cost money and you can help to improve the service and to guarantee its future by donating a small amount. We guess that you probably wouldn't miss $5.00 but it would make all the difference to us.
Note from Michael: I want to thank all of my customers for continuing to retain my training services (some for over three decades!) and let you know your donations do not go to me personally, but to the ongoing maintenance of the CADTutor ship as a whole and to support the yeoman efforts of my friend and CADTutor captain, David Watson, to whom I am grateful for this monthly opportunity to share a few AutoCAD insights.
The Basics
- Dual Dimensions in a Dim…
- UCSICON Options
- "Best of" Basics: Irreg…
- Tool Palette Basics
- Original Dimension Value
- Possible Solutions to th…
- Avoid Using 'Standard' i…
- Shorten the Plot Scales…
- Update the Source File B…
- User Increment Angles fo…
- Drawing Information
- 'Sign Language'
- Rotate with the Copy Opt…
- Use the INSERT Osnap on…
- To or From the Current L…


