 Michael’s Corner #148
October/November 2016
One-derful!!!
It's a God-thing.
I had no idea that 14 years ago I would be given the opportunity to make an impact on the professional lives of so many. Only God knew what was ahead, and hopefully, the contributions I have made through Michael's Corner have equipped many of you to be more productive and a bit more savvy using AutoCAD. And apart from all the AutoCAD bashing that is going on, I'm sure it has a long life ahead.
So, in an effort to keep the AutoCAD fires burning, here's what I have for my final installment…
…A reminder on how to customize your hot keys
…Three Power Tools — one for Zoom, one for editing, and one for Layers
…Two Odd Spots — one for Layers and one for Hatching
…Buried text treasure
…And how to Search 14 years of the Archives
As for what's ahead for me, I will continue to present a variety of AutoCAD sessions — Fundamentals, Intermediate, Customizing, Updates, and 2D & 3D. I will also keep training CAP Designer, 20-20 Worksheet, Visual Impression (those three from 20-20 Technologies, Inc.), and some Revit Fundamentals. Next year I'm looking forward to being very involved in training CET (from Configura, Inc.) when Herman Miller joins the growing number of manufacturers embracing this software that is being touted as the ‘Future of Space Planning’. Personally, I'm looking forward to spending a bit more time with Donna, my lovely bride of 30 years. When this posts, we'll probably be within days of going on our 30th Anniversary vacation to the Tanque Verde Ranch in Tucson; Ee-Hah! We had such a good time when we went for our 20th, we figured we'd do it again!
Ah, and I'm hoping to have The AutoCAD Workbench, Final Edition out before snow flies.
And with that, Mike drop! …so to speak.
The LORD bless you and keep you;
The LORD make His face shine upon you,
And be gracious to you;
The LORD lift up His countenance upon you,
And give you peace. Numbers 6:24-26
If you would like to contact me directly, you can do that also.
Blessings to one and all,
Michael
Change F1 to ESC
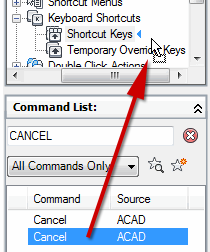 Kinda frustrating to miss ESC, hit F1, and get Help right? This technique will serve you well when investigating additional keyboard customization.
How to Assign ESC to F1
Open the CUI. Expand Partial Customization Files, expand CUSTOM, then expand Keyboard Shortcuts.
Under the Command List, drag the Cancel command (the one with ^C^C in the Macro) up into the Customizations pane and release it next to Shortcut Keys to add it to the listing.
In the upper right quadrant, under Shortcuts, you should see Cancel alphabetically listed with a bar to the left of it, as shown here.

Important: If the recently added command does not initially appear in the Shortcuts pane, click OK to save your changes and close the CUI, then re-open it.
In the Shortcuts pane next to the Cancel command, click in the Keys column to display the edit box.
Make sure Caps Lock is Off, then hit F1 and press [Enter]. You should now see a green checkmark in the column preceding the Cancel command name.
Click OK to save your edits and close the CUI, then begin any command, then hit F1 to Cancel… rather than opening the Help window!
Power Tool
Smoother Zoom
Some wheel mice feel like they have what I refer to as a ‘notch’ as you roll the wheel to zoom in or out. The magnification/reduction can be adjusted with the variable ZOOMFACTOR, but if you want more control over the zoom.
Solution: The <real time> option of the ZOOM command.
Launch Zoom and you see the following options:
[All/Center/Dynamic/Extents/Previous/Scale/Window/Object] <real time>:Press [Enter] to accept the default <real time> option.
Now, click and drag your cursor north and south to zoom In and Out.
Power Tool
Stretch with Extension
 Polar and Otrack are great, but when you have situations with non-Polar or non-Orthogonal angles, the Extension feature can really help.
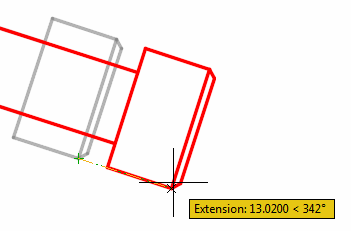
On the Status bar, click Osnap and turn on Extension.
Launch Stretch, select the objects using a Crossing window, then press [Enter].
When prompted for the basepoint, hover (don't click) on the endpoint/intersection of a line parallel to the direction of the edit, and a small + appears. That indicates that AutoCAD has acquired the angle of that geometry.
Move your cursor in that direction and you see a dashed line coming from that basepoint. Now just enter the distance for the Stretch.
Power Tool
Lock Layers with a Crossing Window
Curiously, you can only select the objects on the layers to be locked one at a time, by default; there's no option to use a Window or Crossing window.
But what if we use the command line version of the Layer command? If you want to see the option string of the Layer command, put a hyphen first: -LA (this is an AutoCAD convention for many commands which formerly had no dialog box, only an option string on the command line).
How to Lock Layers with a Crossing Window
At the command line, enter -LA to display the options, one of which is [./LOck/.]
Enter LO to launch the LOck option, and you get the following prompt:
Enter name list of layer(s) to lock or <select objects>:Press [Enter] to select objects… and you can now select objects with a regular or a Crossing Window!
The Odd Spot
Layer Columns & Hatch Background Color
Freeze the Layer Name Column
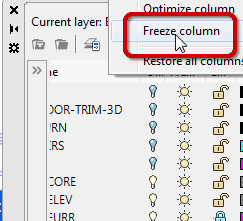 In the Layer Properties Manager you sometimes have to scroll to the right to see additional columns.
If the layer name disappears when you scroll over, right-click on one of the column headers — Name, On, etc. — then click Freeze Column.
Hatch Background Color
The Background Color of a hatch is frequently overlooked, but can be used in combination with a pattern.
How to Include a Background Color with a Hatch Pattern
Set the desired layer, then launch Hatch.

On the Properties panel, choose a Background Color.
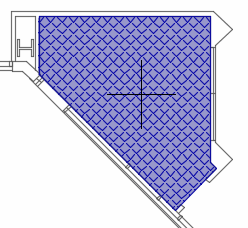
For my floorplan, I chose the ANGLE pattern and set the Angle to 45 and a Scale of 30.

Using the Pick Point method, hover in the area where you want the hatch, and you'll see your background color with your pattern!
The Basics
Text Frame on Mtext
Yes, you can Enclose Text in Objects from Express Tools — See Michael's Corner, June 2004 — but when using the Text Frame property on Mtext, the frame adjusts when you size the Mtext or change the text content!
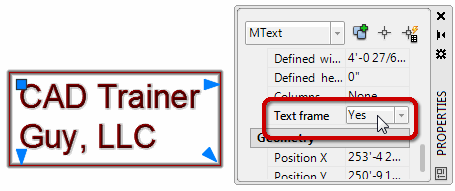
Just select your Mtext, open Properties [Ctrl 1], then set Text Frame to <Yes>.
To test it, change the size of your Mtext or edit the content and the frame automatically adjusts!
…and Finally, How to Search the Archives of Michael's Corner
 As many of you know, there's an Archive button on Michael's Corner. When you go to the Archive, to search across the 14 years (!) of Michael's Corner content, use your Browser's Find command.
When you hit [Ctrl + F]…
…in Chrome, it's at the top right.![]()
…in Firefox it's at the bottom left.![]()
…in Internet Explorer, it's at the top left.![]()
Left Field
 Horses have 17 Distinct Facial Expressions… You knew, of course, that I had to finish off the left field with something equine-related. When we still had my quarter horse Paint, Brave Little Man, I was standing by the fence and he started yawning and I started snapping pictures.
Then on my latest road trip, I was flipping through Southwest magazine, and came across these interesting factoids…
“After carefully examining hours of video, researchers at the University of Sussex found that equines are nearly as animated as we are. (Humans, by comparison, can make 27 discreet movements). While horses' mobile ears set them apart from people, the findings suggest that, like us, horses use their varied visages to communicate with friends and foals.”
Clearly, our Brave Little Man was enjoying using some of those facial expressions that morning.
This is Michael's final article for CADTutor and I would like to thank him from the bottom of my heart for all the work he has put in over the last 14 years to make this column as great as it is.
I know the Corner has helped many, many people improve their work with AutoCAD over the years and Michael's excellent content will remain online as part of CADTutor for as long as people find a use for it.
David
Donate to CADTutor
If you found this article useful, you might like to consider making a donation. All content on this site is provided free of charge and we hope to keep it that way. However, running a site like CADTutor does cost money and you can help to improve the service and to guarantee its future by donating a small amount. We guess that you probably wouldn't miss $5.00 but it would make all the difference to us.
Note from Michael: I want to thank all of my customers for continuing to retain my training services (some for over three decades!) and let you know your donations do not go to me personally, but to the ongoing maintenance of the CADTutor ship as a whole and to support the yeoman efforts of my friend and CADTutor captain, David Watson, to whom I am grateful for this monthly opportunity to share a few AutoCAD insights.
The Basics
- Dual Dimensions in a Dim…
- UCSICON Options
- "Best of" Basics: Irreg…
- Tool Palette Basics
- Original Dimension Value
- Possible Solutions to th…
- Avoid Using 'Standard' i…
- Shorten the Plot Scales…
- Update the Source File B…
- User Increment Angles fo…
- Drawing Information
- 'Sign Language'
- Rotate with the Copy Opt…
- Use the INSERT Osnap on…
- To or From the Current L…


