

 Michael’s Corner #45
September 2006
A Couple Hidden Xref Items, Hatches, & Keeping Order
External references can be confounding sometimes (OK, most of the time), so I'm thankful when a customer reminds me of where they can be tamed. The Xclip feature has been around for a long time, and then I remembered the Express tool that enables you to convert a block to an Xref. Hopefully, you will find them to be useful tools in your toolbelt.
When bringing you these AutoCAD insights over the last several years, I try to present them in the form of an application that you can relate to; or at least make the mental leap and discern how it could be used in your industry. Recently one of you sent a suggestion of using a hatch pattern to accomplish the placement of blocks within an area, so I thought I'd pass that along; it was pretty clever. In the Basics section, I thought I'd address that Draw Order toolbar that, for some reason, Autodesk insists upon having as a default toolbar.
Sorry to see Summer fade out, but Fall is a wonderful time of year. But that's just if you're up here on this side of the planet. I'm sure those of you down under are glad to see Spring.
If you would like to contact me directly, you can do that also.
Blessings to one and all,
Michael
Clipping an XREF
 Many of my customers will Xref the base architectural plan, then add the furniture; wonderful idea. One of my customers in San Diego reminded me of the Xclip feature and showed me how they were using it, so I thought I'd pass it along. The following procedure requires that you have an Xref (Attached or Overlaid, it doesn't matter), and some other objects that are not part of the Xref. In the example, I am using the drawing from the A2005 Sample folder, 8th Floor Furniture.DWG, if you want to follow along.
Instructions to Use XCLIP
- First, I would recommend using the Copy command and copy the Xref and objects you will be including in the selection.
- Type XCLIP or, from the Reference toolbar, click Clip Xref.
- When prompted to select objects, use a crossing window and select the area with the Xref and the objects to be included in the procedure, then press Enter.
- Press Enter for the default option for <New>, then use either the Polygonal or the default of <Rectangular>.

- Draw the rectangle (or polygonal shape if you used that option) around the area containing the objects and the Xref that you want to KEEP. The area of the Xref you do not include will be "clipped" and essentially disappear
- After creating the rectangle (or pressing Enter if you're using Polygonal), the Xref not included in the clipping procedure is no longer visible!
Of course the Xref is still there, but AutoCAD has used the concept of clipping planes (usually encountered in 3D applications; see Michael's Corner March 2006 to accomplish the desired result.
Other Stuff You Should Know
- Set the variable XCLIPFRAMES to <1> to see the edge of the clipping frame. It is NOT editable; I tried.
- To turn Off the clipping frame and see the Xref in its entirety, launch the XCLIP command again, select the objects, then use the OFF option. This retains the integrity of the clipping frame so you can turn it ON again.
- Use the Delete option of the XCLIP command to get rid of the clipping frame and start again.
- If you select the previously selected/clipped area and use the <New> option again, you will be prompted to delete the old clipping boundary.
- You can copy the result of the Xclip procedure, too (as shown in the two Concept plans)!
Power Tool
Convert Block To Xref
Back in June of this year when I had the AutoCAD Yard Sale [Michael's Corner June 2006], you may recall that I covered the Wblock command. In that coverage I mentioned it is a great command you can use to convert a floorplan, for example, into a DWG that you can then Xref back into a host drawing.
But here's something better. Under the Express Tools (even in the AutoCAD 2004 collection) in the Blocks category, you have Convert Block To Xref. This is essentially a method by which you swap out an internal block for an external DWG.
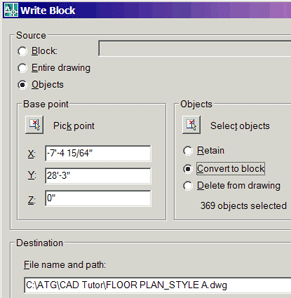
Prerequisites: The .DWG file that is to be the replacement for the block in the drawing. This is easily accomplished using Wblock (Write Block) to make the DWG file. Check it out…
Instructions to use the Convert Block To Xref tool
- Launch the Wblock command by typing W at the command line, then specify the Filename and Path, select the objects, give it a Basepoint and make sure you check the box for Convert To Block before you click OK.
Those objects are now a DWG as well as a block in the drawing. - Click Express
 BlocksConvert Block To Xref. In the BLOCKTOXREF dialog box (which looks remarkably similar to the dialog box for ExpressBlocksReplace Block), select the name of the block you just created or use the Pick button to click it.
 - After identifying the internal block, the Select An Xref File dialog box opens from which you can choose the DWG file made in Step 1, then click Open.
- AutoCAD runs through some checks on referenced items, then comes back with:
Purge unreferenced items when finished? <Y>:
Press Enter if you want to Purge the now-unreferenced block (since it will now be an Xref) and your block is converted to an Xref!
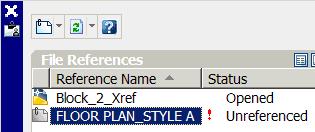
- One last thing: Open the External Reference dialog box/window by typing XR and notice that the Xref is currently Unreferenced. If you have A2007, click the filename, then right click and select Reload. For all other versions, click the filename then click the Reload button.
Job done.
The Odd Spot
Snapping to hatch patterns
There are several applications for this, but Tim Z., one of my readers in New Zealand, was the first to mention this particular approach so I thought I would pass it along.
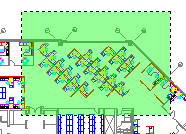
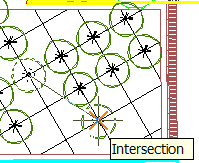
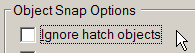 Along about AutoCAD 2004, there appeared a setting on the Drafting tab of Options for Ignore Hatch Objects and by default it's turned On. This setting would need to be turned off if you want to snap to the intersection of a hatch. For example, one application would be for 2' x 4' light fixtures in a ceiling grid. Another one is seen here as a method to add shrubs to a planting bed. If you don't have a drawing with an area about 60' x 30', draw a rectangle and check it out (this works in every version from A2004 and on; even LT!).
Instructions to Snap Blocks to a Hatch Pattern
- On the Drafting tab of Options, turn off the setting for Ignore Hatch Objects.
- Set the desired layer to current, then launch the Hatch command.
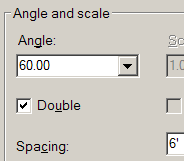
- Set the Type to User-Defined, then set the angle to something like 60, put a check in the box for Double, then set the spacing to 6'.
- Click the Add:/Pick Points button then click inside the area to add the hatch.
- Insert a block for the desired plant (or just draw a circle if you don’t have a block).
- Set the Object Snap to Intersection, then use the Copy command and copy the block to the intersections! Neat, huh?
The Basics
Draw Order
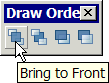 Over the last few versions of AutoCAD, the Draw Order toolbar has been one of the defaults along with Draw and Modify and the ones across the top. So what's it for?
You may have overlooked one of the applications for this tool. In the Odd Spot of Michael's Corner February 2006, I showed you the use of a Wipeout object and how you could use the Draw Order feature of Bring To Front to bring a wipeout object above an Xref.
Another application (and I'm sure the readership of this column could come up with others) is to bring a text object in front of a Raster image. Let's say you have inserted a raster image of a product or an image you have taken at a job site and you need to put text across the top of it. [For more about raster images, see Michael's Corner of January, February, & March 2003.]
- If the text appears below the raster image, click the Bring To Front button on the Draw Order toolbar, then click the text and press <Enter>.
- When using the Bring Above Objects or Send Under Objects, you can select "reference objects" you want to bring them above or under.
- To turn off or on the image frame (0 or 1) so it can be selected, use ModifyObjectImageFrame or set the IMAGEFRAME variable as necessary.
- From the Command List, drag the desired command onto the tool palette.
- Click OK to apply the changes and close the CUI. That's all there is to it!
 |
 |
| Before Draw Order | After Draw Order |
Left Field
Glass lightning bolts: The root-like, glassy tubes that lightning sometimes makes when it hits dry sand are called "fulgurites", informally called solidified or petrified lightning bolts. The longest on record: 17 ft. (That's 5.18m to the rest of us!  Ed.)
Ed.)
Donate to CADTutor
If you found this article useful, you might like to consider making a donation. All content on this site is provided free of charge and we hope to keep it that way. However, running a site like CADTutor does cost money and you can help to improve the service and to guarantee its future by donating a small amount. We guess that you probably wouldn't miss $5.00 but it would make all the difference to us.
Note from Michael: I want to thank all of my customers for continuing to retain my training services (some for over three decades!) and let you know your donations do not go to me personally, but to the ongoing maintenance of the CADTutor ship as a whole and to support the yeoman efforts of my friend and CADTutor captain, David Watson, to whom I am grateful for this monthly opportunity to share a few AutoCAD insights.
Share this page:


The Basics
- Dual Dimensions in a Dim…
- UCSICON Options
- "Best of" Basics: Irreg…
- Tool Palette Basics
- Original Dimension Value
- Possible Solutions to th…
- Avoid Using 'Standard' i…
- Shorten the Plot Scales…
- Update the Source File B…
- User Increment Angles fo…
- Drawing Information
- 'Sign Language'
- Rotate with the Copy Opt…
- Use the INSERT Osnap on…
- To or From the Current L…


