

 Michael’s Corner #117
September 2012
Be Quicker
There's always something you can do to tweak some speed out of your system. Whether you're an Olympic athlete, a weekend mechanic, or just like to tinker with AutoCAD, there's always a way to get a wee bit more speed. This month we'll lift the hood of the Quick Access Toolbar, and we'll also identify a problem or two you may have encountered. Here's what's on tap:
…Accessing your Layout tab title blocks from the Quick Access Toolbar
…Adding a button to the QAT to automatically set a frequently-accessed layer to current
…Discover another setting for the INPUTHISTORYMODE that may come in handy
…Taming the Command line in AutoCAD 2013
It's been pretty toasty in the US, but the tomato harvest was pretty spectacular… and our friends and neighbors agreed! Nonetheless, I'm looking forward to cooler Fall temperatures, and I hope you find this month's collection of articles useful so you can get out and enjoy a bit more of the season!
If you would like to contact me directly, you can do that also.
Blessings to one and all,
Michael
Quick Access to your Layout Tabs
 Back in March 2010, I covered how to make a button on the Tool Palette to automatically launch the dialog box containing your favorite layout tabs.
Now I'm on a crusade to see how many cool things we can put on the Quick Access Toolbar [QAT]. Admittedly, you won't want everything up there, but your favorite Layout Tabs — A-Portrait, A-Landscape, etc. — would be nice to have.
Prerequisite: A drawing (.DWG or .DWT) with the layouts configured for the desired sheet sizes with their associated title blocks.
Need-To-Know: The path and filename of this drawing (needed for step 8, below).
How to Configure the QAT to Access Your Layout Tabs
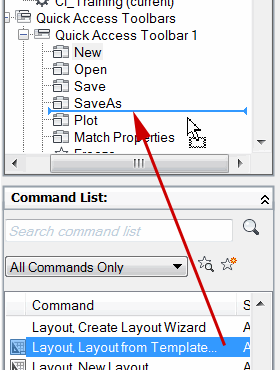
Launch the CUI, then expand Quick Access Toolbars, then Quick Access Toolbars 1 to display the current content of the QAT.
Under the Command List, navigate to Layout, Layout From Template, then drag it up and release it in the list of QAT commands.
Now click on the command in the list to display the Properties in the lower right area of the CUI.
In the Macro, click at the end of the existing string, and use Backspace to eliminate the space that follows the word ‘template’.
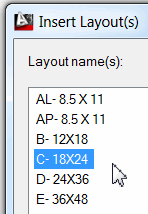 After the word ‘template’, add a semi-colon, this equates to ‘press [Enter]’. Then in quotes, add the name of the .DWG or .DWT containing your layout tabs.
What you add should look similar to the text in red where your filename (with the proper extension) is in quotes:
^C^C^R_layout _template;"MY TITLEBLOCKS.DWG"Click OK, to save your edits and close the CUI.
Now, right-click in the Command line, then click Options to open the Options dialog box.
On the Files tab, expand the node for Support File Search Path.
 If the path to the location of your .DWG or .DWT containing the layout tabs is not on the list, click Add, then Browse to add it [per the Prerequisite and Need-To-Know, above]. Click OK to close Options.
Ready? Go!
Power Tool
A Quick Access Button to Set a Layer
Keeping track of the layer you need to be on is a daily struggle. Over the years we've seen how to set that up on the Tool Palette to automate the layer the Text or Dimension is going onto. But what if you just want to set your default layer to current, such as the Shell layer, or, in the case of many of my customers, A-FURN.
We'll add this to the Quick Access Toolbar, too, but first we have to break down the command we'll be adding.
Layers From the Command Line
The button we add can't launch the Layer Properties Manager; it has to launch the Command line version of that feature: -LA
To launch the old-timey version of many AutoCAD commands, you precede their alias with a hyphen. For the Layer command you get the following:
Enter an option [?/Make/Set/New/Rename/ON/OFF/Color/Ltype/LWeight/Transparency/
MATerial/Plot/Freeze/Thaw/LOck/Unlock/stAte/Description/rEconcile]:
Of the first three options — Make/Set/New — Make will not only create the layer, but it will also set it to current AND, if the layer already exists, it will simply set that layer to be current. Basically, cake & eat it, too!
How to Configure the QAT to Set a Layer to Current
 Launch the CUI, then expand Quick Access Toolbars, then Quick Access Toolbars 1 to display the current content of the QAT.
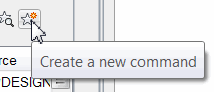
Just above the Command List, click the button for Create a New Command. You will then see ‘Commandx’ in the list.
Drag your new command into the Quick Access Toolbar list of commands.
Now click on the command in the list to display the Properties in the lower right area of the CUI.
Give it a Display ‘Name’, and a ‘Command Name’, then enter the following in the Macro line, where you put the layer name you want to be current:
'-LA;M;A-FURN;;Note: Many times, we will launch a command and only then discover that the layer needs to be changed. The leading apostrophe in the above macro will run the -LA command as a ‘nested’ routine; it won't cancel the current command, just put it on hold. Since the -LA command returns the option string after each requested setting, the final semi-colon completes the command.
-
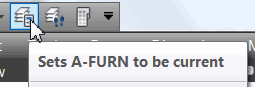 Rather than making a new button top [See Michael's Corner April 2011 for that process], find an icon in the vast collection of existing AutoCAD buttons and click it to assign it to the blank command button.
 You may also want to add a ‘Tooltip Title’ before clicking OK to complete your QAT addition.
The Odd Spot
Input History Mode
I was contacted by a user at EDS Corp. outside Chicago about the curious operation of Up arrow on the keyboard and the Command history. As some of you know, you can hit the Up arrow on your keyboard to display the commands you used; either selected or typed.
Dave's question was, why he couldn't Up arrow to get the previous value entered for a distance? For example, he begins the line command, turns on Ortho, moves the cursor to the right and enters, say, 100.
Now he moves the cursor up, hits the Up arrow, and gets…
Coordinates??

It took me a few minutes, but I tracked it down to the default value for the variable called INPUTHISTORYMODE. Check out Express Tools![]() Tools panel
Tools panel![]() System Variable Editor. I've written about this collection on a number of occasions, and here's another one.
System Variable Editor. I've written about this collection on a number of occasions, and here's another one.
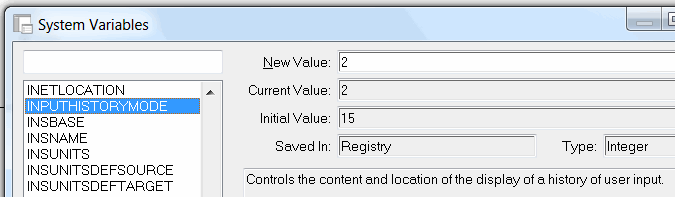
I didn't understand the phrasing of the various settings, but the default of <15> wasn't working for him. As it turned out, an INPUTHISTORYMODE of <2> did the trick.
The Basics
More on the 2013 Command Line
In Michael's Corner April 2012 I covered a few things about the AutoCAD 2013 Command line. In this article, I want to follow up with a few other things I learned/discovered.
Dock your Command Line
 If your AutoCAD 2013 Command line is a single, floating element at the bottom of your screen, you may find it more pleasing to anchor it down at the bottom where you're used to seeing it. To do so, just drag the dot-grouping-grippers down toward the Status bar, and it will ghost into a horizontal window across the bottom; release your mouse.
Disappearing Command Line
I've received emails about a ‘missing’ Command line, but it wasn't until I was training the Facilities Department at Compassion International in Colorado Springs that I had the opportunity to witness and identify the solution.
If you encounter that situation, it is probably because the Command line has slid underneath the Window Taskbar… while you were trying to dock it! I know; crazy. Here's how to get it back:
-
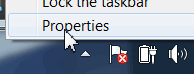 Right-click on an empty area of the Windows Taskbar, then click Properties to open the Taskbar and Start Menu Properties dialog box.
 Check the box for Auto-hide the Taskbar, then click OK.
The Taskbar should gently slide down out of site… revealing your Command line!
-
 After docking your Command line back in the AutoCAD window, move your cursor to the bottom edge of the display and the Taskbar gently slides back up. At this point, you can disable the Auto-hide… or carry on with more space on your screen.
Click Your Option
Then I read on a blog somewhere that you can now click on the option you want! For example, launch the Rectangle command, then click on the option for Fillet. Enter a value, then draw the rectangle… with the fillets on the corners!

Left Field
I ♥ Texas
I love Texas. I'm not from there and didn't go to school there, but I just generally like the state. I've flown into Amarillo when there was 3″ of hard pack snow on the runway, and I've helped friends in Dallas prepare for a garage sale when it was 99 degrees at 10:30 at night. Ah, yes, and the food is incredible. So here are a few fun facts about the often-overlooked neighbor of Dallas in the Metroplex, Fort Worth:
• 60 percent of America's paper money is printed at the U.S. Bureau of Engraving and Printing Western Currency Facility in Fort Worth (Fort Worth Tours are available).
• The Texas Civil War Museum in Fort Worth houses the largest private Civil War collection west of the Mississippi River.
• The Modern Art Museum in Fort Worth is the oldest museum in Texas and is the second-largest museum gallery space for modern art in America, next to MoMA New York.
• Fort Worth is home to the oldest stock show and rodeo in the country — the Southwestern Exposition and Livestock Show.
• Fort Worth hosts the world's only twice-daily cattle drive in the Stockyards National Historic District.
• Bonnie and Clyde hid out from the law in Fort Worth's Stockyards Hotel.
• Fort Worth's Texas Motor Speedway is bigger than eight Texas Stadiums and seats more than 154,000 spectators.
Donate to CADTutor
If you found this article useful, you might like to consider making a donation. All content on this site is provided free of charge and we hope to keep it that way. However, running a site like CADTutor does cost money and you can help to improve the service and to guarantee its future by donating a small amount. We guess that you probably wouldn't miss $5.00 but it would make all the difference to us.
Note from Michael: I want to thank all of my customers for continuing to retain my training services (some for over three decades!) and let you know your donations do not go to me personally, but to the ongoing maintenance of the CADTutor ship as a whole and to support the yeoman efforts of my friend and CADTutor captain, David Watson, to whom I am grateful for this monthly opportunity to share a few AutoCAD insights.
Share this page:


The Basics
- Dual Dimensions in a Dim…
- UCSICON Options
- "Best of" Basics: Irreg…
- Tool Palette Basics
- Original Dimension Value
- Possible Solutions to th…
- Avoid Using 'Standard' i…
- Shorten the Plot Scales…
- Update the Source File B…
- User Increment Angles fo…
- Drawing Information
- 'Sign Language'
- Rotate with the Copy Opt…
- Use the INSERT Osnap on…
- To or From the Current L…


