

 Michael’s Corner #50
February 2007
States, Styles, and Follow-Ups
 When I looked back over the last few month's articles, I realized there were a few loose ends along with some follow-up comments I wanted to pass along to you all. The coverage of Layer States is one that I have been meaning to elaborate upon, especially since it is so easy to make a macro for a tool palette to recall layer states. Then I remembered that many years ago, when I was publishing the AutoCAD Toolbelt newsletter, that I had written about how to lock a palette, so I wanted to pass that along, too. Ironically, in my training at University of Michigan this week, one of their CAD managers was asking how to maintain the integrity of a tool palette.
The Odd Spot this month is dedicated to a few follow-ups that were brought to my attention that I think you will find useful. And finally, I have written about the faithful Text Style dialog box. That's just one of those features that I thoroughly enjoy teaching since it clarifies one of the important fundamentals of using AutoCAD. And that's what it's all about; giving you all the tools you need to get your job done as efficiently as possible.
If you would like to contact me directly, you can do that also.
Blessings to one and all,
Michael
Layer States Manager
 Last December, I referenced the wisdom of using the Layer States Manager, but then realized I didn't give you much insight into how it works. The point of saving a layer state is to "capture" the condition of the layer properties; On, Off, Frozen, Thawed, etc. A layer state can be saved when you're in the Model tab or in a viewport of a Layout. The following procedure is what you would do after you configure the layers of the drawing the way you want them. You know, On/Off/Freeze/Thaw/Lock/Unlock… and Color. Yes, the layer state will retain the color you assign to a layer.
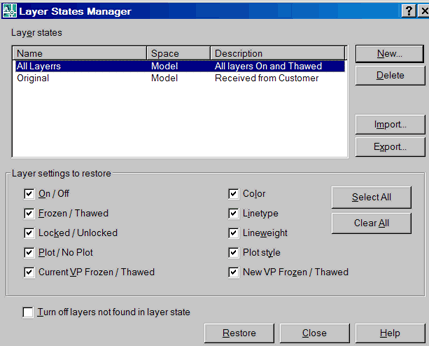
Instructions to Create a New Layer State (Model Tab)
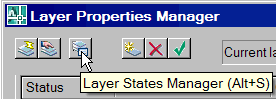
- Open the Layer Properties Manager, then click the Layer States Manager button.
- Click the New button and enter a name for the layer state. You can also enter a description.
- Check the boxes for the layer settings to be saved with that layer state.
- Click Close.
- To test your layer state, turn a few layers off, thaw a few layers, then re-open the Layer States Manager and Restore your named layer state.
Additional Insights
Layer States in Viewports: When saving a layer state for the active viewport, make sure you check the box for Current VP Frozen / Thawed.
Export/Import: Use the Export feature to create a .LAS file that can then be Imported to another drawing.
Color vs Black & White: If you can't get a drawing to plot using a Monochrome plot style, save a layer state in its default color condition, then change all the layers to White (or Black) and save THAT layer state with a name like B-W or something.
Tool Palette Macro: One of the annoying parts of layer states (at this writing), is that it can only be accessed from within the Layer Properties Manager. Solution: Put it in a macro on the tool palette. For more on adding a macro to the tool palette, take a look at the January 2006 article regarding a Blank Button On the A2006 Tool Palette.
Power Tool
Locking a Tool Palette
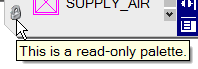 If you share tool palettes with others or you are the CAD Manager, you may be interested to know that you can lock palettes. In other words, the only thing you will be able to do to the items on the palette is change their display settings and/or rearrange them on the palette. This may also be useful if you simply want to retain the integrity of the palette(s) you have made yourself, just so you don't accidentally mess them up.
So here's what you do:
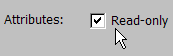
First, navigate to the location where your palette files (.ATC) are located. [Hint: Do NOT change this path; bad career move.] By default these files are located at… C:\Documents and Settings\<yourloginnamehere>\Application Data\Autodesk\AutoCAD 2007\R17.0\enu\Support\ToolPalette\Palettes.
Next, right-click on the name of the palette you want to lock, then click Properties to open the General tab for the Properties of that file.

Now, for the Attributes setting, check the box for "Read-Only", then click OK.
When you go back into AutoCAD and open the palette for which you made the Read-Only assignment, you will see a lock in the lower left corner.
The Odd Spot
Following-Up
This month's Odd Spot is dedicated to follow-up emails I have received regarding previous articles. Curiously, two of the three are compliments of the users at University of Kentucky. Thank you Paul and Larry!
DYN Follow-Up: Let's say you want to create a numerically accurate rectangle, i.e., you know the dimensions of that rectangle. Here's how the DYN feature can make help you in making that rectangle without using the @ sign (which we have grown to know and love), and without using the Distance option of the Rectangle command.
- Pick the start point of the rectangle and you see the dynamic interface information next to your cursor.
- Type the horizontal (X) value for the rectangle, then enter a comma to toggle into the next edit field for the Y value. You will notice that the X value has been locked.

- Type the Y value in the edit field, then press Enter. Done!
DTEXTED Follow-Up: This one actually supports my contention that it may be more to your advantage to have the variable DTEXTED set to <1>. Back in May 2003, I covered the five unique character sets you could use to Overline, Underline text, as well as add the degree, plus/minus, and diameter signs.
![]() With the DTEXTED variable set to <0>, when you double-click on the text, you get a frameless text editor. When you precede the text with %%O or %%U, the effect is immediately applied. If you double-click on the text, you don't see the special character set (%%O or %%U).
With the DTEXTED variable set to <0>, when you double-click on the text, you get a frameless text editor. When you precede the text with %%O or %%U, the effect is immediately applied. If you double-click on the text, you don't see the special character set (%%O or %%U).
Solution: Add the %%O or %%U to the front of the text, to effectively "toggle off" the Underline/Overline setting.
Euro Sign Follow-Up: My friend Tracy Lincoln reminded me about another method of getting the Euro sign in Mtext.
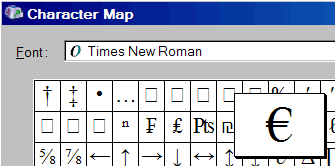
"You can also get to it from the MTEXT Editor. Right-Click in the Editor, then click Symbol![]() Other to open the Windows Character Map. In most of the character sets (fonts), you will find the Euro symbol. Click on the symbol, then click Select, then Copy. Return to your MTEXT Editor, then right-click, Paste."
Other to open the Windows Character Map. In most of the character sets (fonts), you will find the Euro symbol. Click on the symbol, then click Select, then Copy. Return to your MTEXT Editor, then right-click, Paste."
The Basics
Creating Text Styles
 Contrary to how Microsoft Word® works, AutoCAD doesn't have a "Font" command by which to establish the look of your text. To establish the look of your text, you will need to create a Text Style.
Suggestion 1: Don't modify the text style named Standard, make your own.
Suggestion 2: When naming the text style, use your company initials as the prefix to make your style obvious in the list.
Instruction to Create a Text Style
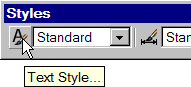
- From the Styles toolbar, click Text Style to open the Text Styles dialog box. You could also click Format
 Text Style from the menus.
 - Click the "New" button, then enter a name for the text style and click OK. In this example, I'll name it ATG_Notes.
- From the Font Name dropdown list, select a font.
Notes
Fonts with the .SHX extensions are native AutoCAD fonts (these are compiled Shape files, thus the SHX). Fonts with the TT logo are Microsoft's TrueType fonts, just like you would use in a Word document. Do NOT use fonts with the @ sign at the beginning; it adversely affects the rotation of text in Mtext objects.
If you are using a TrueType font, you can specify the Font Style of Regular, Italic, or Bold, and for some, Bold Italic.
And now a word about "Big Font" – A Big Font does not generate monstrous sized characters. The term big font, essentially, identifies the size of the "bucket" AutoCAD uses to hold all the characters for that character set. Look at it this way: The English language has a 36 alpha-numeric collection, along with all those characters above the number keys on your keyboard, roughly 50 characters. For our analogy, let's say all 50 characters (and their assorted capitalization, etc.) could fit into a gallon bucket. For those character sets, Autodesk parsed out a normal sized "bucket" to hold the standard collection.
Foreign language versions of AutoCAD, however… specifically the Asian languages… contain a significantly larger collection of characters. They may need a 5 gallon bucket to hold the full spectrum of characters for that language. But there are also companies (as well as individuals making their own character sets) that have added a wider variety of alpha-numeric characters. The font named Special.shx is one of those that some of you may have encountered. Consequently, for specific foreign language (and those customized character sets), Autodesk parsed out larger than normal "bucket" to hold all the characters, and called those character sets "Big Fonts".
(See the Fix-It Table in my June 2006 article for more on working with drawings using big fonts).
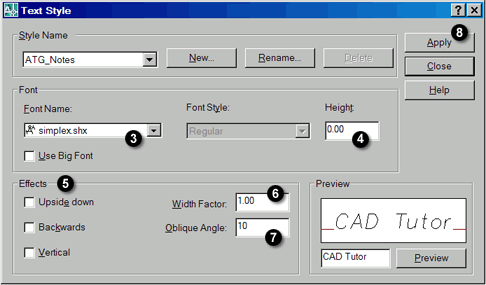
- Set the Height to 0. If this value is 0, when you use the Dtext (Single Line Text) or Mtext commands, you will be prompted to enter a height. This allows for maximum flexibility when adding text to your drawing.
- Set an Effect if desired. Or not.
Effects: Generally speaking, only the SHX fonts support all the effects.
Upside Down – Not sure why folks don't rotate the text 180 degrees rather than using the Upside Down effect, but that's what it will do.
Backwards – This one could actually be useful. When the text is plotted backwards and printed to what we called "sticky-back" paper, then applied to a window, when viewed from the opposite side the text would read properly.
Vertical – This is not text rotated to 90 degrees but character sits above the next. When you check this box, you will see an example in the Preview area to see what I mean.
- The Width factor can be a value between 0.01 and… some number you probably wouldn't use. OK, it's 100.
- The Oblique Angle can be a positive or negative value to slant the characters as necessary.
- After making the desired adjustments to the text style properties, click Apply, then Close. If Apply is grayed out, it simply means you probably pressed Enter when entering a value. Click Close.
That text style is now current and is displayed in the Styles toolbar. Keep in mind, however, that text styles are drawing-specific. I would suggest you add the necessary text style(s) to your template so you will be able to use them on each new drawing you create.
Left Field
Happy Birthday - The song "Happy Birthday to You" was the creation of two sisters from Louisville, Kentucky in 1893.
50th Corner - a note from the editor
Well, this is Michael's 50th Corner, so I'd like to give him a big round of applause. It's amazing what a fantastic body of work Michael has contributed to the CADTutor site over more than 4 years. In nearly 200 articles, he has covered numerous topics that have helped all of us learn to use AutoCAD "smarter and faster".
Thank you Michael, and here's to the next 50!
David
Donate to CADTutor
If you found this article useful, you might like to consider making a donation. All content on this site is provided free of charge and we hope to keep it that way. However, running a site like CADTutor does cost money and you can help to improve the service and to guarantee its future by donating a small amount. We guess that you probably wouldn't miss $5.00 but it would make all the difference to us.
Note from Michael: I want to thank all of my customers for continuing to retain my training services (some for over three decades!) and let you know your donations do not go to me personally, but to the ongoing maintenance of the CADTutor ship as a whole and to support the yeoman efforts of my friend and CADTutor captain, David Watson, to whom I am grateful for this monthly opportunity to share a few AutoCAD insights.
Share this page:


The Basics
- Dual Dimensions in a Dim…
- UCSICON Options
- "Best of" Basics: Irreg…
- Tool Palette Basics
- Original Dimension Value
- Possible Solutions to th…
- Avoid Using 'Standard' i…
- Shorten the Plot Scales…
- Update the Source File B…
- User Increment Angles fo…
- Drawing Information
- 'Sign Language'
- Rotate with the Copy Opt…
- Use the INSERT Osnap on…
- To or From the Current L…


