

 Michael’s Corner #137
December/January 2015
Making it Happen at Autodesk University 2014!
The annual event is always pretty stunning. Thousands of people with the full gamut of skill sets (and then some!) milling about Mandalay Bay in Las Vegas on a mission to, basically, kick it up a notch. As this goes to press, I have practiced my hands-on Lab a few times and have worked out the missteps, made the appropriate notes, and have the timing down pretty well.
This final offering for 2014 includes some customizing, as well as a couple features that have been around for quite some time, but I had never thought about them until they were brought up by a customer… which is what has driven these topics for the last 12 years!
With an eye toward a more productive 2015, we have…
…A tip on automating the repetition of a viewport plot scale with the click of a button.
…Some old fashioned display tricks you may find interesting
…An option worth considering if your drawing ‘disappears’ when you Zoom/Extents
…How to keep track of the time you spend in a drawing
Thank you all for your continued interest in Michael's Corner. It was a good year for me with 21 new customers and another country added to my ‘Trained In’ list bringing the total to eleven! The first quarter of 2015 is shaping up nicely already with my calendar already booked into mid-March.
Wishing you all a relaxing and joyful Christmas season and a promising New Year!
If you would like to contact me directly, you can do that also.
Blessings to one and all,
Michael
Automating the Application of a Viewport Scale
I've had this question more than once, so I'm finally getting around to it.
If you have a specific scale that you need to consistently apply to a viewport, drawing after drawing, let's make a button on the Quick Access Toolbar to apply that scale.
Two Procedures Required
First, we have to get the numeric equivalent of the plot scale. It's pretty straightforward for Engineering scales, but the Architectural scales are less intuitive. Solution: VPSCALE
Once that value has been acquired, we'll use the (very) old fashioned Zoom command with the XP option.
I'm using the drawing Floor Plan Sample.DWG located in AutoCAD 2015's ..\Sample\Database Connectivity folder. If you have an earlier version of AutoCAD, the drawing is in the same folder, but it's called Db_samp.DWG.
How to Acquire & Apply a Consistent Viewport Scale
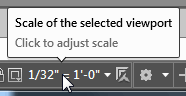 On the Layout1 tab, double-click in the viewport, then set the plot scale to 1/32″ = 1′0 from the Plot Scale list on the Status bar.
 Enter VPSCALE, then hit F2 to flip to the Text Window and you see the following:
Command: VPSCALE

PS:MS == 1:384

Viewport Scale: 1/32″ = 1′-0″
Note: The key ingredient here is the value for PS:MS - 1:384
To test our procedure, zoom into any area in the drawing.
Enter ZOOM, then enter 1/384XP… and notice that the Plot Scale value on the Status bar is 1/32″ = 1′-0″!
To add a button to the Quick Access Toolbar, enter CUI to open the Customize User Interface.
In the Command list, find the command ‘Viewports, Single Viewport’, then right-click on it and click Duplicate. This effectively accomplishes a Copy + Paste in one click.
Under Properties, modify the properties to something similar to what you see here.
For the Macro, enter ZOOM;1/384XP
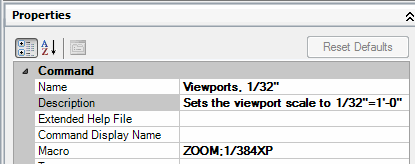
Note: The semi-colon means ‘Press ENTER’
Under Button Image at the top, click Edit, turn on the Grid, then edit the button image.
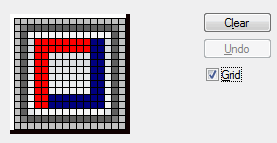
When you're finished with your button-top, click Save and enter a name. Then click Close.
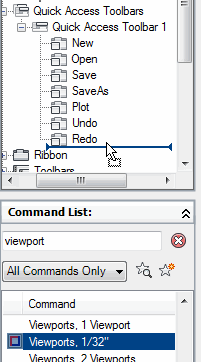 To add this button to the Quick Access Toolbar, in the top left quadrant of the CUI, expand Quick Access Toolbars, then expand Quick Access Toolbar 1 to display the current content of your Quick Access Toolbar.
-
Now drag and drop your new Viewports, 1/32″ command up into the Quick Access Toolbar command list.
Click OK to save your edits and close the CUI.
Now create a new layout tab, double-click in the viewport, then hit your new button to assign that viewport scale!
Bonus Round: You may also notice the ZOOM command has a Center option. Hmmm, I wonder if that can be incorporated into the above macro…
Merry Christmas! - The first person to email me the solution to the Bonus Round will receive a PDF version of my book, The AutoCAD Workbench, 2nd Edition!
Hint: You may need to reference the Power Tool article in November 2007.
Power Tool
Pan and Zoom Antiques
WB Mason invited me to their annual meeting to train some of their Designers, and there were two questions that came up that were only able to be solved by some old fashioned features in Pan and Zoom.
Pan a Specific Distance or To Objects
The wheel mouse dominates many of our pan and zoom needs, but this request was to be able Pan a specific distance. This requires that I be able to pick Point A, then move my cursor and enter the distance.
Solution: -PAN
Put a hyphen in front of the PAN command and you will be prompted for two points. You can use object snaps, as well as Ortho or Polar.
Smoother Zoom
Some wheel mice have what I refer to as a ‘notch’ as you roll the wheel to zoom in or out. The magnification/reduction can be adjusted with the variable ZOOMFACTOR (see December 2005, Stocking Stuffers), but this Designer wanted to have more control over the zoom.
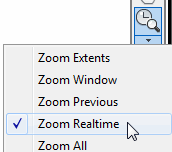 Solution: ZOOM Realtime
The default option of the Zoom command is <realtime>. Launch Zoom, press [Enter], the drag your cursor north and south to zoom In and Out.
Note: I also happen to know that the captain of our CADTutor ship utilizes the tools found on the Navigation bar, one of which contains the assortment of Zoom options… wherein you will also find Zoom Realtime. Hats off to Professor Watson for that revelation from many months ago.
The Odd Spot
Zoom Extents = Air
 The AutoCAD-based furniture specification software used by many of my customers—Aflac, Safeway, and Yum! Brands, to name a few—has Point objects on the corners of the furniture blocks. Then, when placing the furniture, the Designer uses Node snap to accurately place the components.
 And, as has happened to most people reading this article, sometimes you Zoom/Extents and your drawing ‘disappears’.
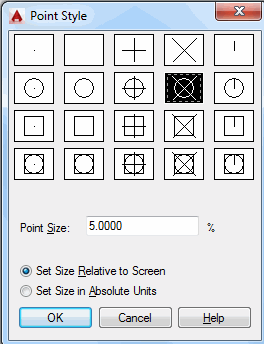
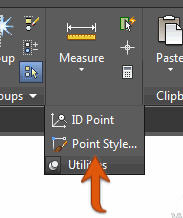
Of course, the first place you check is for layers that have been turned Off, but the solution that helps my furniture folks, is to adjust the Point Style to something more visible. [Home tab![]() Utilities panel
Utilities panel![]() Point Style]
Point Style]
Recommended
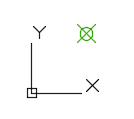 I typically use the style of the Circle with the X as shown in the figure [PDMODE = 35 for those of you who like to know the variables], and then notice that the size is ‘Set Size Relative to Screen’. This will cause any random/misbehaving Point object to be plainly visible.
The Basics
Drawing Information
For billing purposes, it's nice to know how long you have spent working in a drawing. To that end, the Time command may be a helpful resource, especially given the elapsed time feature that can be toggled ON and OFF, and can also be Reset.
Command:  TIME
Current time:             Sunday, November 23, 2014  3:44:54:790 PM
Times for this drawing:
  Created:                Wednesday, November 14, 2007  2:42:44:984 PM
  Last updated:           Sunday, November 23, 2014  9:59:28:105 AM
  Total editing time:     0 days 04:45:06:399
  Elapsed timer (off):    0 days 04:44:32:866
  Next automatic save in: 0 days 00:07:30:395

Enter option [Display/ON/OFF/Reset]:
 To keep track of your time in the drawing, launch the Time command, then begin the elapsed timer with the ON option. When finished, use the OFF option to display the total editing time. The above information indicates that I was editing the drawing for a little more than 30 seconds - 04:44:32 to 04:45:06.
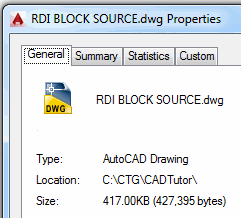
DWGPROPS [Application menu![]() Drawing Utilities
Drawing Utilities![]() Drawing Properties]
Another useful tool for quick information may be the Dwgprops command found in the ‘scarlet letter’. It's nice to have the Location and Size information immediately available, rather than going out to Save As.
Drawing Properties]
Another useful tool for quick information may be the Dwgprops command found in the ‘scarlet letter’. It's nice to have the Location and Size information immediately available, rather than going out to Save As.
Left Field
The Christmas Flower: The Poinsettia is a native plant of Mexico and originated in a rather limited region near present day Taxco. Long before the arrival of Europeans, the Aztecs of central Mexico cultivated the plant and called it Cuetlaxochitl. Because of its brilliant color, the Poinsettia was a symbol of purity to the Indians.
Poinsettias received their name in the United States in honor of Joel Roberts Poinsett, who introduced the plant into the country in 1828. Poinsett was a botanist, physician and the first United States Ambassador to Mexico. He sent cuttings of the plant he had discovered in Southern Mexico to his home in Charleston, South Carolina. The word Poinsettia is traditionally capitalized because it is named after a person.
From the website of the American Phytopathological Society. www.apsnet.org
Donate to CADTutor
If you found this article useful, you might like to consider making a donation. All content on this site is provided free of charge and we hope to keep it that way. However, running a site like CADTutor does cost money and you can help to improve the service and to guarantee its future by donating a small amount. We guess that you probably wouldn't miss $5.00 but it would make all the difference to us.
Note from Michael: I want to thank all of my customers for continuing to retain my training services (some for over three decades!) and let you know your donations do not go to me personally, but to the ongoing maintenance of the CADTutor ship as a whole and to support the yeoman efforts of my friend and CADTutor captain, David Watson, to whom I am grateful for this monthly opportunity to share a few AutoCAD insights.
Share this page:


The Basics
- Dual Dimensions in a Dim…
- UCSICON Options
- "Best of" Basics: Irreg…
- Tool Palette Basics
- Original Dimension Value
- Possible Solutions to th…
- Avoid Using 'Standard' i…
- Shorten the Plot Scales…
- Update the Source File B…
- User Increment Angles fo…
- Drawing Information
- 'Sign Language'
- Rotate with the Copy Opt…
- Use the INSERT Osnap on…
- To or From the Current L…


