

 Michael’s Corner #101
May 2011
Data Links and New Tools
This month I have the great pleasure of standing in for Michael while he takes a well-earned rest after delivering his 100th Corner last month. Never fear, Michael will be back next month, but in the meantime I have a few things you might find interesting.
We all work with data and commonly, we need to integrate this data with our AutoCAD drawings. This month I demonstrate how to make a data link between AutoCAD and Microsoft Excel and how to display your spreadsheets in an AutoCAD table.
In other articles, I'm covering a few things new to AutoCAD 2011 and 2012 that you may have missed but should know about because they are great for productivity.
If you'd like to comment on anything in this month's Corner, please visit our friendly AutoCAD forums or contact me directly.
Thanks for listening!
David
Data Link Excel to AutoCAD
 In the bad old days, linking Excel spreadsheets to your AutoCAD drawings using OLE (Object Linking and Embedding) was, at best, a hit and miss affair. OK, well it kind of worked but it was never very satisfactory and was subject to various limitations.
With the advent of Tables and Data Linking in AutoCAD, the whole process of adding live spreadsheets to drawings became a breeze technically and much more pleasing aesthetically. Although this technique has been available since AutoCAD 2008, many people are not aware of it, so I thought it would be good to demonstrate it using AutoCAD 2012 (although the interface is just the same in 2011).
I'm guessing that most of you at some time have had a parts list or schedule or some other tabula data in Excel that needed to be added to a drawing, so here's how. It's a 2 part process; first you make the data link and next you create the table… yes, that's all there is to it!
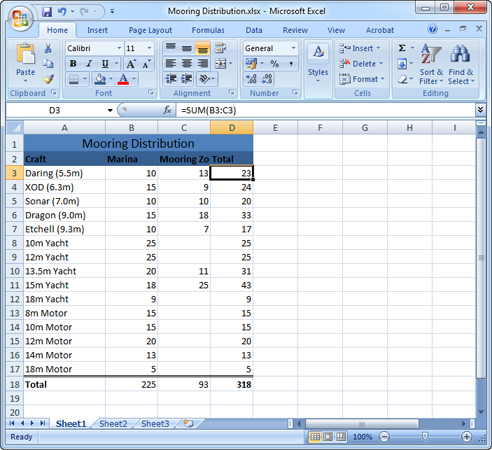
If you'd like to follow this demonstration, download the Excel file and save it to a suitable folder.
How to Link an Excel spreadsheet to an AutoCAD table
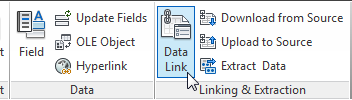 On the AutoCAD Ribbon, click the Insert tab and then the Data Link button on the Linking & Extraction panel.
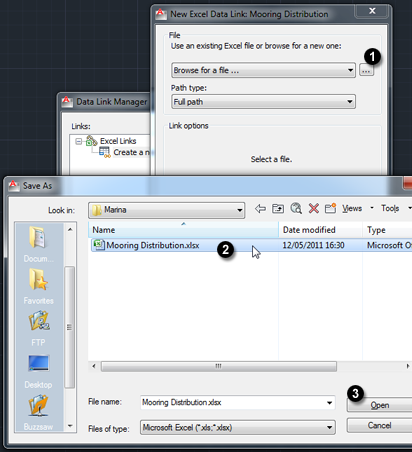
In the Data Link Manager, click the Create a new Excel Data Link option and give the new data link a name (I usually make this the same as the Excel file name to avoid confusion). Click OK

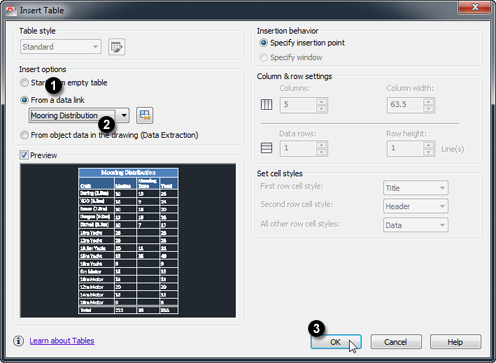
In the New Excel Data Link dialog, click the elipsis button (three dots) and navigate to your Excel file. Select the file and click Open.
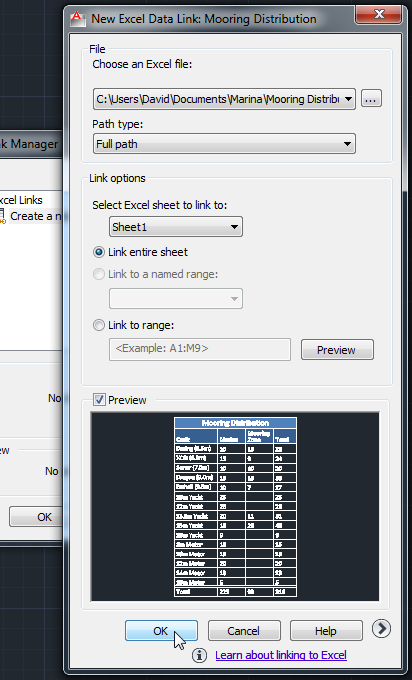
You should now see a preview of exactly what the table will look like in AutoCAD. Click OK. That completes the data link part.
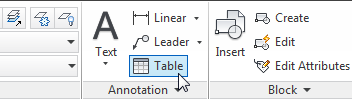 Next, click the Home home tab on the Ribbon and click the Table button in the Annotation panel.
In the Insert options section of the Insert Table dialog, click the From a data link radio button if it is not already checked. Select your data link from the drop-down list (this will be the name you gave it earlier). Check the preview for confirmation and then click OK.
Pick the insert point for the table when prompted and that's it. You should now see your Excel spreadsheet dynamically linked to a matching AutoCAD table. If you need to resize the table, just use the Scale command - this ensures that the text and cells all scale proportionately.
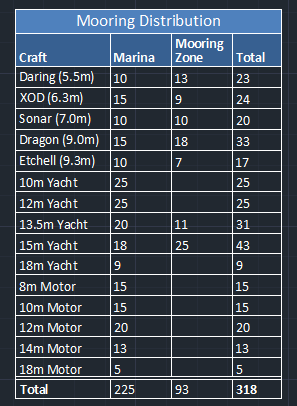
The great thing about this is that any changes to the Excel spreadsheet will be updated in your drawing, just like an Xref. Notice too that all the styling on your spreadsheet such as font weights and cell backround fills is translated into AutoCAD table cell styles for you - neat.
Power Tool
Blend Curves
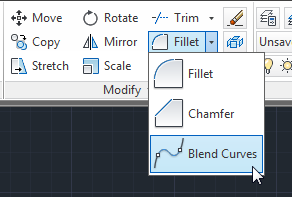 Some of the most useful new features in AutoCAD 2012 are those that didn't make the headlines. Blend Curves is one such tool that slipped under the radar but it solves a problem that is very difficult to resolve manually. Curiously, this little gem is hidden under the Fillet tool on the Modify panel, so even if you're already using AutoCAD 2012, it's possible that you've missed it.
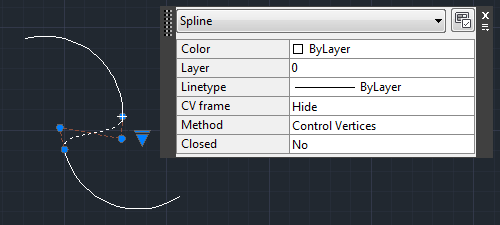
Essentially, Blend Curves creates a spline that is tangential to any 2 existing curves (Arcs, Splines or Polyline arc segments).
How to join 2 arcs with Blend Curves
Draw two arcs similar to the ones shown below.

On the Home tab of the Ribbon, click the Fillet flyout in the Modify panel and select Blend Curves.
Follow the prompt and select the two ends of the arcs that you want to join. The result should be similar to the illustration below.

The default setting for the spline gives a good result but if you need to tweak the form of the spline, just pick it to select it and edit the spline by stretching the vertices until you have it just the way you want it.
Blend Curves is a great productivity tool that you may only use occasionally but it's so efficient at what it does that it's worthy of its place on the Modify panel.
The Odd Spot
The Ribbon AND Toolbars
OK, I admit it, I like the Ribbon (or at least I've grown to like it) and there's no doubt that it is improving with each AutoCAD version. For example, I'm really pleased to see more space given to the Draw and Modify panels in 2012, they always felt rather cramped in 2011 and this is rather odd considering how important they are.
Despite my support for the Ribbon interface, there are occasions where I'd like to use the "classic" style toolbars with the Ribbon. I don't want to go back to using the Classic workspace, I want the best of both. Well, the AutoCAD interface is nothing if not flexible and it's easy to achieve.
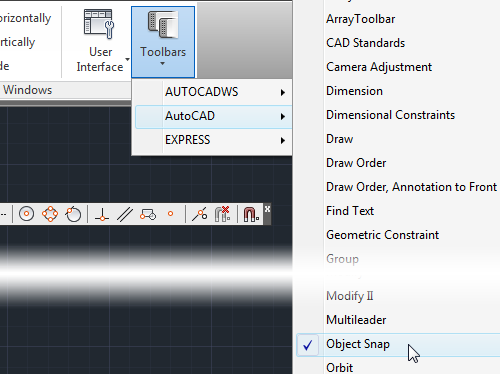
I like having the Object Snap toolbar on screen while I'm working. I know the Osnap overrides are just a right-click and sub-menu away, but why bother doing that when you can have one-click access to those options on a floating toolbar. So, just click the View tab on the Ribbon, then in the Windows panel, click Toolbars and then select AutoCAD from the menu; there are all the toolbars arranged in alphabetical order. Simply select the ones you want.
The Basics
Add Selected and Select Similar
Here's a couple of "under the radar" features that can really speed up your drawing work.
Add Selected
Add Selected made its debut in AutoCAD 2011 but I must admit that I didn't really notice it until quite recently. Essentially, it invokes the command used to create ant selected object. Moreover, it will match the properties (layer etc.) of the selected object. This allows you to (for example) draw a circle on the same layer as the selected circle, even if that layer is not current. It's a great timesaver and the fact that it's on the right-click menu means that it's really efficient to use too.
Select Similar
Select Similar is another recent tool that works by matching properties - it's a kind of quick selection filter that can be used to select any objects that match the selected object or objects.
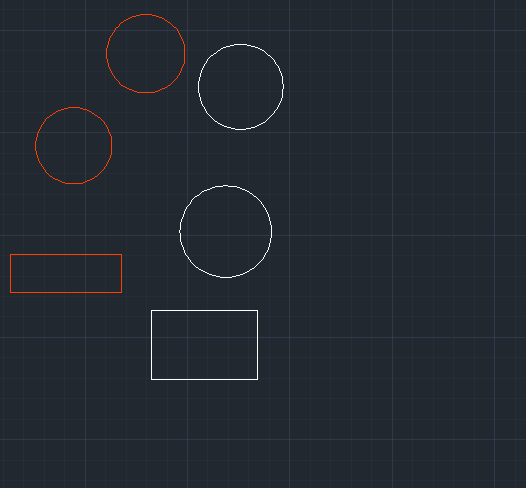
In the example below, I have drawn a bunch of objects (circles and rectangles), some on a layer called "Circle" and some on layer 0. If I want to select all circles on both layers, all I need to do is select one circle on each layer, right-click and select Select Similar from the menu. It's yet another very simple but effective productivity tool.
Left Field
Our "new" planet Ceres: On 24th August 2006, Pluto ceased to be a planet and was removed from the list of planets all schoolchildren must learn. Where did it go? It was reclassified as a Dwarf Planet. In fact, there are a number of objects in the solar system that are similar in size to Pluto and it didn't seem fair not to include them too, so the International Astronomical Union created the new classification for objects that were essentially planet-shaped but too small to be considered planets in their own right. However, if you don't like the idea of losing Pluto, then you must at least add Ceres to your extended list of planets. Ceres is somewhat smaller than Pluto and has an orbit between Mars and Jupiter in the asteriod belt.
Donate to CADTutor
If you found this article useful, you might like to consider making a donation. All content on this site is provided free of charge and we hope to keep it that way. However, running a site like CADTutor does cost money and you can help to improve the service and to guarantee its future by donating a small amount. We guess that you probably wouldn't miss $5.00 but it would make all the difference to us.
Note from Michael: I want to thank all of my customers for continuing to retain my training services (some for over three decades!) and let you know your donations do not go to me personally, but to the ongoing maintenance of the CADTutor ship as a whole and to support the yeoman efforts of my friend and CADTutor captain, David Watson, to whom I am grateful for this monthly opportunity to share a few AutoCAD insights.
Share this page:


The Basics
- Dual Dimensions in a Dim…
- UCSICON Options
- "Best of" Basics: Irreg…
- Tool Palette Basics
- Original Dimension Value
- Possible Solutions to th…
- Avoid Using 'Standard' i…
- Shorten the Plot Scales…
- Update the Source File B…
- User Increment Angles fo…
- Drawing Information
- 'Sign Language'
- Rotate with the Copy Opt…
- Use the INSERT Osnap on…
- To or From the Current L…


