

 Michael’s Corner #107
November 2011
From Autodesk University, to Folsom Prison, to Guam!
My travel schedule gets pretty wacky (not as wacky as Shaan's, of course), but this is probably the most exciting sequence of events and locations I've had in awhile. At Autodesk University, I'll be presenting The AutoCAD Toolbelt lab twice, the following week I have been invited to do some AutoCAD training at Folsom Prison (stay tuned to Michael's Corner for more on how that goes!), then I'll be heading down to Guam again to train customers of the New Horizons Learning Center. Ee-Hah!
This month I'll be covering the following topics of interest expressed by folks in my recent training sessions…
Mapping materials to 3D furniture blocks comprised of 3D faces
Adding a button to the Quick Access Toolbar that will reload all Xrefs at once
Putting the workspace name back on the Workspace Switching icon on the A2012 Status bar
Subtleties of the Join command
Really looking forward to presenting at Autodesk University again, as we learn to Export a customized tab from the Ribbon. After AU, I'll be posting the presentation on my Home page, next to the ones from the previous 2 years.
Ah, and a Happy Thanksgiving to one and all.
If you would like to contact me directly, you can do that also.
Blessings to one and all,
Michael
Mapping Materials to Blocks in A2012 and Tweaking a Visual Style
 There's a lot of powerful 3D stuff in AutoCAD by itself, and one of the really fun features is the ability to easily map materials to a block. A significant percentage of my customer base are designers in the contract furniture industry, and they are quite keen on materials and 3D.
Herman Miller has a vast amount of images that can be saved as .JPG files, which is what I did for this article. Here's the link with their Materials Library.
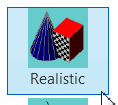
The golden key to mapping materials to a block, is to do so in the Block Editor. Once in the Block Editor, you can set the Visual Style to Realistic so you can see the result immediately.
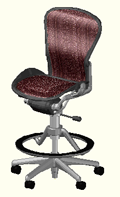
After assigning materials to the block in the following exercise, you will create a new Visual Style and modify a couple of the variables. Click here to download the drawing of the Aeron stool that I will be using in this exercise. I will also have it on my website on the AutoCAD Stuff link. The following procedure is presented in AutoCAD 2012, but A2011 is very similar.
Note: Of course, the following procedures also apply to any 3D geometry that is not a block, so please feel free to bypass the opening of the Block Editor, and simply set an isometric view and begin on Step 3, below.
Prerequisite: Before beginning this exercise, if you want to apply materials from another resource other than AutoCAD's Materials Browser, download the desired .JPG/.GIF/.BMP/.TIF/.PCX, etc. first.
How to Map Materials to a Block
 After opening the drawing containing a block to which you want to map materials, select the block, then right-click
 Block Editor.
In the Block Editor, set an isometric view using the View Cube or 3D Orbit.
On the View tab, set the Visual Style to Realistic.
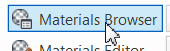 Click Materials Browser found on the Palettes panel of the View tab.
If you are going to use a downloaded image file, at the top of the Materials Browser palette, click Create Material
New Generic Material, which opens the Materials Editor palette.On the Materials Editor palette, under Generic, set the Color to Color By Object, then reduce the Glossiness value to 0.
To load an image file, click in the large, empty Image frame, then navigate to and select the image file. This file will be added to the Materials Browser and will be given the name "Default - Generic".
Note: To edit the values such as Position, Rotation, and Scale of the image, double-click the image swatch in the Materials Editor to open the Texture Editor. I'll save coverage of this feature for a future Corner.
After loading an image file, you will see that file loaded in the Materials Browser and is named Default Generic. You can close the Materials Editor at this point.
Select one face of the objects, then right-click and click Select Similar to select all the faces on that layer.
Now click Default Generic in the Materials Browser to map the material to the selected object(s).
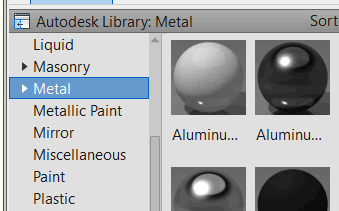
The above steps are the fundamentals of assigning an external image file to an object in AutoCAD. There are several materials from the Autodesk Library in the Materials Browser, as shown in the figure.
Continue assigning materials to the objects in the drawing. When you're finished, click Close Block Editor and Save changes.
You will probably see the lines which define the edges of the 3D surface, so let's create a new visual style with no lines.
How to Tweak an Existing Visual Style
-
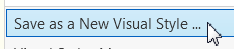 With the Realistic style current, expand the Visual Styles drop-down list, then click Save as a New Visual Style. I called this one Real_NoLines.
 -
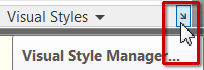 To edit the settings for this new Visual Style, on the Visual Styles panel, click the arrow in the corner to open the Visual Style Manager.
 -
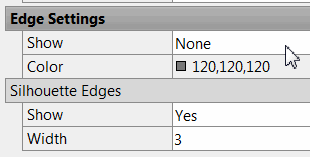
 In the Visual Style Manager, click on your new visual style to make sure it's the one you will be editing.
 Under Edge Settings, change the Show value to None.
-
Under Silhouette Edges, change the Show value to Yes. This punches up the image a bit.
Close the Visual Style Manager, then save your drawing!
When you create a new Visual Style, that style can be used on any other drawing; it's not drawing specific.
Power Tool
Reload All Xrefs from One Button
 Here's another one that came from a customer: Can I make a button to reload all the Xrefs at once?
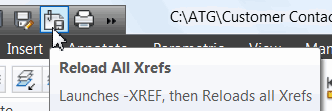
If we're going to put it on a button, we need to know the Command line equivalent of the 'Reload' feature in the External References window. To launch the Xref command without a window opening, enter -XREF, then you see the options. You probably know where we're going from here…
How to Make a Button to Reload All Xrefs
Set the desired Workspace to be current, then open the CUI.
Expand Quick Access Toolbars, then expand Quick Access Toolbar 1.
Rather than making a new button, we'll just duplicate an existing one and change the Macro.
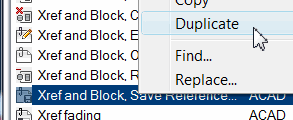 Under the Command List, find Xref and Block, Save Reference Edits, then right-click, Duplicate.
 In the Properties pane one the right, edit the Name and Description as shown in the figure.
Enter the following in the field for Macro:
-XREF;R;*;
The macro means:
-XREF Run the Command line version of the Xref command ; Press [Enter] R The Reload option of the Xref command * When prompted for which Xrefs to reload, select all of them -
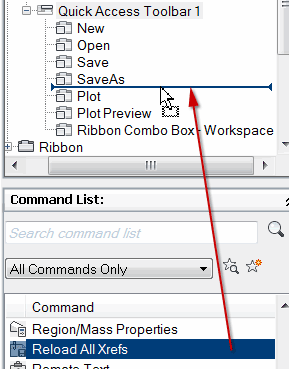 After editing the Properties, drag your new button up into the list of commands under Quick Access Toolbar 1.
Now you can hit one button to update all references at once!
The Odd Spot
Display the Workspace Label in A2012
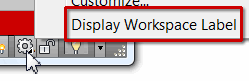
 The Workspaces are definitely important, and you may have more than one that you use. The Quick Access Toolbar has a Workspace item [shown here], but I usually turn that off since I have other things I would prefer up on the QAT, such as that presented in the above article.
That said, if you turn off the Workspace item in the Quick Access Toolbar, how do you know what workspace is current?
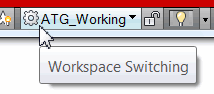
Beginning in AutoCAD 2012, when you click the Workspace Switching item on the Status bar, you have an option to Display Workspace Label. Nice!
The Basics
The JOIN Command
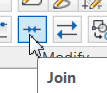 The Join command slid in under the collective radar a couple versions ago, and is really a handy tool to 'heal' walls or other geometry with a gap (or gaps) in the continuity of the linework.
Need-To-Know
The Join command can only be used to join objects of the same type (line to line, polyline to polyline etc.). I know, bummer. However, you can use Pedit to join polylines to other polylines, lines and arcs. See our lovely video tutorial for details.
You can join any Lines that are colinear, even if there's a gap. Unfortunately, this doesn't work with Polylines - they must be touching end-to-end. However, as above, this can be done with Pedit.
If the lines being joined have different properties, the line selected as the Source object wins.
If you have more than 2 co-linear segments, when prompted to select the Source object, you may use any windowing method to select the geometry. Window/Crossing/CPolygon/WPolygon are valid options.
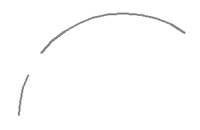 Yes, you can use the Join command to join 2 arcs that lie in the same circular definition (per the figure shown here).
Note: Since arcs are, technically, created counter-clockwise, to heal the gap in the illustration shown, you would pick the larger arc first. After selecting the second arc, since AutoCAD has to go counter-clockwise to 'see' what you selected, it will join the arcs based on its direction of 'travel'. I know, goofy, but that's how it works. If you pick the smaller arc first, it has to go the long way around to join to the long arc.
-
Yes, you can 'heal' a gap in a circle by following these prompts:
Command: JOIN

Select source object or multiple objects to join at once: Select the circle

Select objects to join: Press [Enter]

Select arcs to join to source or [cLose]: L [Enter]

Arc converted to a circle.
And finally…
-
If the lines are not perfectly co-linear - not even a variance of 0.000001 (6 decimals) - Join will pitch a fit and not join the selected lines.
0 objects joined, 2 objects discarded from the operation
If the co-linear condition of the lines is separated by a value of 0.0000001 (7 decimals), the selected geometry will be joined. But other than that, it's a pretty slick little routine.
Left Field
Three Hundred :
The number of individual pieces that make up the Statue of Liberty, which was dedicated in NYC 125 years ago on October 28, 1886. The statue, a gift from France, sat unassembled in crates for more than a year while workers finished its pedestal.
Donate to CADTutor
If you found this article useful, you might like to consider making a donation. All content on this site is provided free of charge and we hope to keep it that way. However, running a site like CADTutor does cost money and you can help to improve the service and to guarantee its future by donating a small amount. We guess that you probably wouldn't miss $5.00 but it would make all the difference to us.
Note from Michael: I want to thank all of my customers for continuing to retain my training services (some for over three decades!) and let you know your donations do not go to me personally, but to the ongoing maintenance of the CADTutor ship as a whole and to support the yeoman efforts of my friend and CADTutor captain, David Watson, to whom I am grateful for this monthly opportunity to share a few AutoCAD insights.
Share this page:


The Basics
- Dual Dimensions in a Dim…
- UCSICON Options
- "Best of" Basics: Irreg…
- Tool Palette Basics
- Original Dimension Value
- Possible Solutions to th…
- Avoid Using 'Standard' i…
- Shorten the Plot Scales…
- Update the Source File B…
- User Increment Angles fo…
- Drawing Information
- 'Sign Language'
- Rotate with the Copy Opt…
- Use the INSERT Osnap on…
- To or From the Current L…


