

 Michael’s Corner #100
April 2011
The 100th Michael's Corner: Thank You!
![]() Who knew, back in 2002 when Professor David Watson invited me to contribute to CADTutor, that there would still be an audience 100 months later. I am humbled and honored to still be considered a valuable resource for improving your AutoCAD productivity.
Who knew, back in 2002 when Professor David Watson invited me to contribute to CADTutor, that there would still be an audience 100 months later. I am humbled and honored to still be considered a valuable resource for improving your AutoCAD productivity.
Although the celebration in London this month would have been wonderful, the timing wasn't quite right (and I'm still not sure when I'm going to use that round-trip ticket I have, so stay tuned).
Nonetheless, here are a few of the things I was preparing for that event.
…How to add button to the Quick Access Toolbar for a unique Viewpoint position
…The Hatch Transparency two-step
…A quicker way to make a New Layer using the QAT
…Adding the Object Hide and Isolation commands to the QAT
…And a few other random insights that I have been gathering
And yes, AutoCAD 2012 is now available, so once I work with it a bit more, I'll get back to you on what I find under the hood (or in the trunk with the spare tire!).
If you would like to contact me directly, you can do that also.
Blessings to one and all,
Michael
Selecting a Viewpoint from the Quick Access Toolbar
 Once you have established a 3D viewpoint - using whatever method you prefer - many of you are aware that you can save that view by name so you can restore it later in other viewports or after you have gone back to the Plan view.
Named views are great, but a named view is only saved in the current drawing. What if you would like to use that particular ‘eyeball position’ on all your drawings?
Before you begin this exercise, you will either need a blank button on your tool palette, or a custom Panel on the Ribbon (see Michael's Corner, August 2009) that you want to add the command to.
How to Capture a non-Standard Viewpoint
Set your view to a position other than one found in the standard collection of NE, NW, etc.
Hint: You can hold down the Shift key, then use you wheel-mouse Pan feature and (slowly) move your cursor to kick your system into 3D Orbit.
After you get the view the way you want it, enter VPOINT and you see the viewpoint stated as VIEWDIR= [X,Y,Z], similar to this:
VIEWDIR= -37′-10 5/8″,-87′-5 5/8″,35′-10 1/4″Jot down the numbers, rounding them to the nearest whole number. In this situation, I'll use -38, -87, 36. You don't have to include the feet since the values define the vector position of your eyeball.
-
If you're adding this to a blank button on your tool palette, enter the following for your Command String macro.
^C^CVPOINT;-37,-87,36;

If you're adding a button to your custom Panel on the Ribbon, use the same string for the value of the Macro as shown in this screen capture.
The next time you have a drawing that you want that very same eyeball position, hit that button!
Hatch Transparency
Setting the Draw Order for a hatch has always been very helpful when you want to send a Solid hatch behind other objects. However, AutoCAD 2011 introduced the Transparency feature for hatching, but it's a two-step dance to implement it.
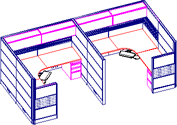
In the following exercise, I already created a Polyline around the interior walls of a room.
How to Assign Hatch Transparency

Launch the Hatch command [Home tab
 Draw panel], set the Pattern to Solid, then click Select Boundary Objects. (See Michael's Corner, February 2011 for coverage on selecting objects to hatch).
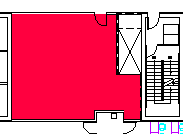 Select the object to be hatched - the hatch will be applied to the object - then press [Enter] to complete the process.
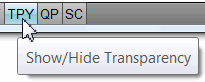 On the Status bar, turn on the button (Show/Hide Transparency). This is the step that frequently gets overlooked; truly an ‘Ah-haaa!’ moment.
Now click on the hatch to highlight it and you see the contextual tab "Hatch Editor".
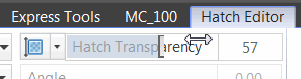 Slide the Hatch Transparency as desired, but to see the result you'll have to press Esc to end the process.
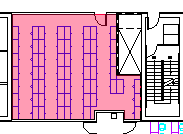 Note: Each hatch object can have its own transparency setting. When you toggle off the button on the Status bar, all hatch transparencies are disabled.
Power Tool
Quick Access Toolbar - Your Best Friend
As you may have noticed, my new Best Friend is the Quick Access Toolbar (QAT). Tool palettes are still immensely powerful, but that QAT is called that for a reason - it's quick and easy.
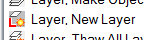
There are two layer-related things I think would be handy to have up there on the QAT, but neither one can be added by right-clicking on the tool (and one doesn't even have a tool equivalent). Specifically, Layer States Manager and New Layer. Curiously, the one without the default tool - Layer States Manager - is the easy one.
The challenge will be putting a button for a New Layer on the QAT since I couldn't find it anywhere in the Command list. [Note: You may recall that I also covered how to add an image to a tool in Michael's Corner, July 2010 when we looked at putting the firecracker back on the Explode tool!]
How to Create a Command with a Button Image for New Layer
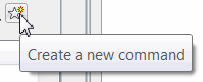 Open the CUI, then click Create a New Command and enter Layer, New Layer as the name.
In the Command List, click on your new button [Layer, New Layer], then size the Button Image pane in the upper right quadrant of the CUI to display all the available buttons.
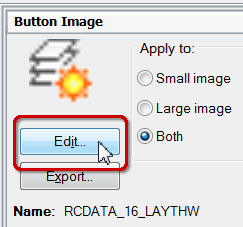 In the collection of images, I used Layer Thaw, halfway down in the button images.
Click Edit to open the Button Editor, then check the box for Grid.
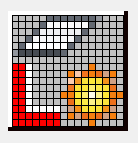 I first used the Eraser feature to erase pixels for the two lower ‘layers’, then used the pencil tool to add the letter ‘L’.
Click Save and enter an image name; I used New_Layer.
The problem I have with that step, is that I have no idea where it's going (I do, but it's generally an uneditable location), so…
I would highly recommend that you now click Export, then navigate and save it to a location where you have been saving your custom files. Basically, a location that won't be deleted when you get a new version of AutoCAD or need to reinstall your current version.
 After saving and exporting your work of art, click Close and you will see your button image along with the saved name as a .BMP. You will also notice, under the Command List, that your image is now assigned to Layer, New Layer!
The last step is to edit the macro.
This macro will launch the command line version of the Layer command [-LA], then run the Make option - which will create and set to current - the layer name you enter. The macro will also prompt you for a Color and assign it to the layer you're making. Here's what you want to enter in the field for the Macro:
^C^C-LA;M;\C;\;;Other characters:
Backslash: Pause for user entry (The first one is for the layer name, the second for the color)
Semicolon: Press [Enter] Note: When entering a color for the layer, you can enter the first letter of any of the standard color names - Red, Yellow, Blue, Cyan, Magenta, Green, White (which is also Black on a white background). You can also enter a color number, if you just happen to have one that's your favorite. Also, to change the color of a layer, you can actually change it from the Layer dropdown list by clicking on the color swatch for that layer which opens the Select Color dialog box opens. Introduced in A2011.
At this point, your command creation for Layer, New Layer is complete. The next exercise takes you through the process of putting a command on the QAT.
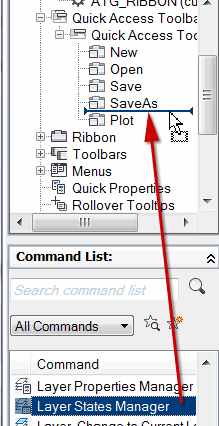
How to Add Commands to the QAT in the CUI
Open the CUI, then expand Quick Access Toolbars, then expand Quick Access Toolbar 1.
Under the Command list, navigate to the command created in the previous exercise - Layer, New Layer - then drag it up and drop it in the list of commands in the Quick Access Toolbar, as shown in the illustration.
While you're in there, add these to the Quick Access Toolbar, too:
Layer States Manager
Hide Objects
Isolate Objects
End Object Isolation Note: You can add a separator between commands on the QAT. Right-click on the command you want the separator to go AFTER, then click Insert Separator. Yes, this is contrary to how most other 'insert' procedures operate.
The Odd Spot
Object Isolation Feature [A2011]
In the above exercise, you added the Isolate Objects features to the QAT. Back in Michael's Corner, May 2010 I covered these features, but failed to mention one… little… detail.
| <0> | The isolation/hide condition of the objects is temporary. Close the drawing, open it again, they're all back. |
| <1> | The isolation/hide conditions of the selected objects is retained as the drawing is opened and closed, until such time as you end the object isolation. This mode is called the ‘Persist’ mode. |
Thankfully, the default is <0>.
User-Defined Field Format
There are several formats for Date fields [Insert tab![]() Data panel
Data panel![]() Field]. The cool thing is, you can make your own!
Field]. The cool thing is, you can make your own!
How to Create a Custom Date Field
Launch the Field command, then select Create Date in the list of field names.
On the right side of the Field dialog box are several ‘Hints’ for formatting the field. Click in the Date Format edit box, then consider the following:
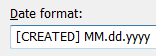 [Created] MM.dd.yyyy
dd MMM, ADyyyy

After entering the desired format for the field, click OK, then place the field text as necessary. If you need to change the height, enter H for the Height option.
 Note: By default, a field has a background to distinguish it from the other four text objects in AutoCAD [single line text, multiline text, dimension text, and attribute text]. To turn off the background for field text, go to ToolsOptionsUser Preferences tab, and toggle off the check box for Display Background of Fields (lower left on that tab).
To store your custom field so you can reuse it on other drawings, take a look at my coverage of fields in Michael's Corner, May 2008, where you learn how to create a block from the field, then add it to a tool palette.
Hot Key to Toggle Between Viewports
Although it's not a common condition, you may want to have a viewport within a viewport. If you do that, it makes it a bit difficult to enable the smaller viewport, since it's already within the larger one. (That's why this is called the Odd Spot; it's very odd to have that situation).
Use Ctrl + R to toggle between viewports. Give it a try on any layout tab with more than one viewport.
The Basics
Color Scheme: Light or Dark
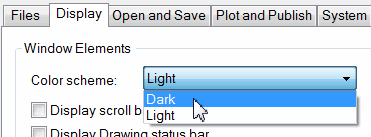 Bottom line, AutoCAD users are getting older - aging, shall we say, like a fine wine. I have recently found that a suggestion from one of my users is actually very nice; specifically, the Dark color scheme.
Go to Tools![]() Options
Options![]() Display tab, and check it out. The higher contrast found in the Dark scheme is more appealing for your AutoCAD Trainer Guy.
Display tab, and check it out. The higher contrast found in the Dark scheme is more appealing for your AutoCAD Trainer Guy.

ViewCube toggle in Options
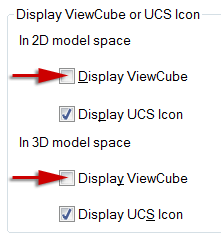
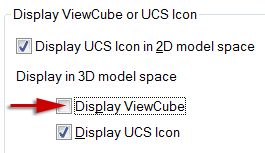
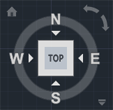 While you're in the Options dialog box, if you have found that the ViewCube in the upper right corner is something you would rather not have displayed, go to the 3D Modeling tab and toggle off the check boxes to Display ViewCube. Curiously, A2010, A2011, and A2012 have different arrangements for this feature, so here they are in the order stated:

Hatch: Match Properties (formerly Inherit Properties)
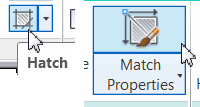 If you have a hatch in a drawing and you want to apply that same hatch to another area, use the Match Properties feature of the Hatch command.
How to Reuse an Existing Hatch
Zoom to an area in the drawing containing the desired hatch.
Launch the Hatch command, then click Match Properties (you have two origin options; for this exercise, either one is OK).
 When prompted, click on the hatch whose properties you want to apply in the target location.
Now click in the desired target area(s) to place the hatch.
Locked Layer Fading
 Last month I presented a cool way to lock more than one layer using a Crossing Window… but failed to comment on how to fade the locked layers. With the introduction of the Ribbon, the fade slider is much easier to access.
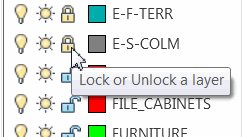
Note: Locked layers - if you haven't worked with them before - are visible, but not selectable. You can snap to the geometry using object snaps, too, but you can't edit them. This is very helpful when working in floorplans where, for example, you want to move the furniture along the wall, but you don't want to accidently select and move the wall lines when you select the furniture.
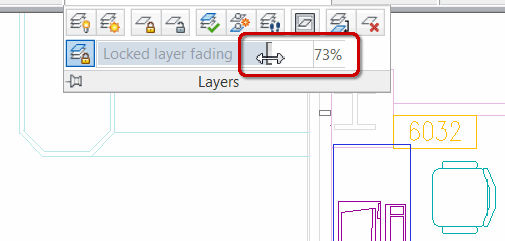
How to Fade Locked Layers
Lock a few layers of your drawing.
On the Home tab, expand the Layers panel by clicking on the panel name.
Slide the Locked Layer Fading slider to the desired fade percentage.
Easy!
Left Field
Still Incredible: 78.5 billion eggs were produced for eating in the US in 2010. Here's where they ended up:
2.5B were exported
6.3B went to food service use
24.8B were processed into liquid, dried, and frozen products
44.9B went to retail
[Apparently my neighbor's chickens aren't hurting egg sales any]
300,000 eggs to go Peg's Glorified Ham N Eggs on South Sierra Street in Reno, NV every year, where they are transformed into heaping breakfast platters piled with hash browns and homemade salsa. Their top seller: Huevos rancheros, served in a sizzling 13″ frying pan alongside pinto beans and vinegary red cabbage slaw.
Additional egg-citing egg facts can be found at the Spirit Magazine website, Southwest Airline's in-flight magazine.
http://spiritmag.com/features/article/still_incredible/
Donate to CADTutor
If you found this article useful, you might like to consider making a donation. All content on this site is provided free of charge and we hope to keep it that way. However, running a site like CADTutor does cost money and you can help to improve the service and to guarantee its future by donating a small amount. We guess that you probably wouldn't miss $5.00 but it would make all the difference to us.
Note from Michael: I want to thank all of my customers for continuing to retain my training services (some for over three decades!) and let you know your donations do not go to me personally, but to the ongoing maintenance of the CADTutor ship as a whole and to support the yeoman efforts of my friend and CADTutor captain, David Watson, to whom I am grateful for this monthly opportunity to share a few AutoCAD insights.
Share this page:


The Basics
- Dual Dimensions in a Dim…
- UCSICON Options
- "Best of" Basics: Irreg…
- Tool Palette Basics
- Original Dimension Value
- Possible Solutions to th…
- Avoid Using 'Standard' i…
- Shorten the Plot Scales…
- Update the Source File B…
- User Increment Angles fo…
- Drawing Information
- 'Sign Language'
- Rotate with the Copy Opt…
- Use the INSERT Osnap on…
- To or From the Current L…


