

 Michael’s Corner #110
February 2012
Gotta Love Shortcuts
It's February, and love is in the air. You may love Winter (no comment), love horses, love skiing, love your significant other, love to read, love to fly Southwest Airlines, etc., but I think we can all agree: We all love AutoCAD shortcuts.
This month I reached back into the Corner vault to solve a couple issues that happened over the last 48 hours in my training seminars, and created some shortcut solutions using Lisp routines. My Lisp knowledge is extremely limited, but the little bit that I know – and that I'm passing along to you - can be extremely powerful. So here's what's in store for February 2012…
…Creating and automating several one-line Lisp routines
…Toggling the Selection Preview setting when you rollover an object in the drawing
…A possible solution for the disappearing cursor
…The Command line version of the Purge command
Give these a shot and I think you'll LOVE leaving the office just a wee bit earlier!
If you would like to contact me directly, you can do that also.
Blessings to one and all,
Michael
Quick Lisps
Say that three times fast!
This month's Power Tool and Odd Sport articles each address circumstances where you need a temporary solution. Each solution could be automated by putting them on the Quick Access Toolbar or on your Tool Palette, but I wanted to change it up a bit and revisit how to create a one-line Lisp routine so you can just type the solution, not pick it.
The fundamentals of the following overview was originally posted 9 years ago(!) in Michael's Corner, February 2003, and can also be found in my book, The AutoCAD Workbench, beginning on page 203.
The example used here will incorporate the coverage of switching Visual Styles found in this month's Odd Spot article.
How to Write and Save a One-Line Lisp
Open Windows Notepad (not Word, it puts hidden characters in the header and footer).
First, it's always a good idea to identify what your routine is doing by adding a comment line at the beginning. Comment lines have a semi-colon as the first character on the line. Add something similar to the following as the first three lines in your notepad file.
; CADTUTOR February 2012 Lisp routines.
;
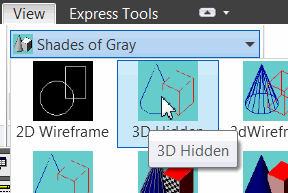
; Change Visual Styles. 2D Wireframe, 3D Hidden, & RealisticAdd the following text as the fourth line. It's not case-sensitive and there is no preceding semi-colon:
(DEFUN C:V2()(COMMAND "-VISUALSTYLES" "C" "2")(PRINC))Here's how all that stuff breaks down:
(AutoCAD takes off if you hit the spacebar, so the first open parenthesis puts AutoCAD on 'hold'. DEFUNDEfine FUNction. You're telling the Lisp routine what you're setting up. C:The Command: line. The text that comes after C: is what you type to 'run' the Lisp. ()(The 'clutch'. Push it in ( change the gear ) let it out ( No options. Don't need to know. COMMANDFor all one line Lisps, you need to let AutoCAD know you are using Commands. "whattodo"All commands and options go in quotes. Yes, you can put a space between them. Many AutoCAD commands invoke dialog boxes or a drop-down panel, as found in Visual Styles. You will also find that many of those commands have a Command-line equivalent (which is necessary if you're going to key in the desired responses as we need to do in a Lisp routine). Commands launched with a leading hyphen display the options on the Command line. The equivalent for the Visual Style drop-down box is -VISUALSTYLES and you see the following option string:
Enter an option [set Current/Saveas/Rename/Delete/?]: C
Enter an option [2dwireframe/Wireframe/Hidden/Realistic /Conceptual/Shaded/shaded with Edges/shades of Gray/SKetchy/X-ray/Other]: 2
"C"The option for 'set Current', as shown above. "2"The option for '2dwireframe', as shown above. (PRINC)Locking the door on the way out. Suppresses that 'nil' you see in some routines. )Resolve all the open parentheses. Here's what I put in my Notepad after the initial comment lines…
;
(DEFUN C:V2()(COMMAND "-VISUALSTYLES" "C" "2")(PRINC))
;
(DEFUN C:V3()(COMMAND "-VISUALSTYLES" "C" "3")(PRINC))
;
(DEFUN C:VR()(COMMAND "-VISUALSTYLES" "C" "R")(PRINC))When you're finished adding your one-liners (you can have as many as you want, I would recommend comment lines between them, though), click File
 Save, then navigate to AutoCAD's ..\Support folder.
IMPORTANT: You must enter the file extension of .LSP after the filename, not Notepad's .TXT. I'll name this one CTFeb12.LSP.
As I mentioned, your .LSP file can contain as many one-liners as you want. I simply recommend you put comment lines in between each routine so you can reference it later and so it doesn't look so cryptic when you review it later.
How to Quickly Run a One-Line Lisp
To test the routine created in the above exercise, open any AutoCAD and draw any non-orthogonal line, then draw a circle on one side of it.
Open 'My Computer' (also called Windows Explorer) with Windows key + E.
Navigate to where you saved your .LSP, then drag and drop it into the AutoCAD drawing window. You will see something like the following response on the command line:
LOAD "C:/Program Files(x86)/Autodesk/ AutoCAD 2012-English/Support/CTFeb12.LSP")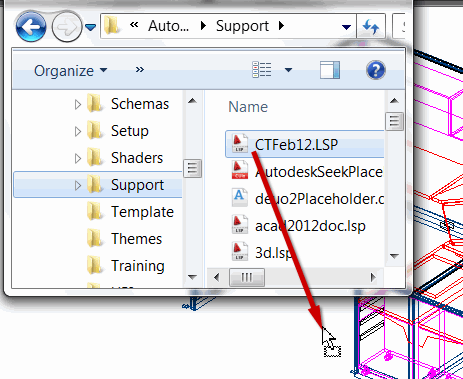
To run your routine, enter VR (the text after DEFUN C: in your lisp file) and you should see your screen background change. If you have a 3D drawing open, you will see the drawing in the Realistic visual style. That's all there is to it!
Bonus Points
This month's Power Tool article addresses the toggling of the Selection Preview feature. The variable for that feature – as you will read, below – is SELECTIONPREVIEW. After reading the article, you should be able to add the necessary lines to your .LSP file to toggle on or off the Selection Preview feature at your leisure. I'll leave it to you to specify what follows the DEFUN C: to launch your options.
Launching Your LSP from the Startup Suite
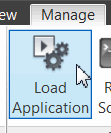 If you have a .LSP file containing routines that you want to have available whenever you open AutoCAD, add that file to the Startup Suite. On the Manage tab
![]() Applications panel you will find Load Application. In the Load/Unload Application dialog box, you will find the golden key: The Startup Suite.
Applications panel you will find Load Application. In the Load/Unload Application dialog box, you will find the golden key: The Startup Suite.
The following instructions are also found on the 'AutoCAD Stuff' link on my website.
How to Add Your .LSP to the Startup Suite
 Click Load Application [Manage tabApplications panel] to open the Load/Unload Application dialog box.
Click the Startup Suite suitcase at the bottom (or Contents) to open the Startup Suite dialog box.
At the bottom of the Startup Suite dialog box, click Add, then navigate to the .LSP files in the ..\Support folder (or wherever you saved that file).
Select your .LSP file(s), then click Open to return to the Startup Suite dialog where you will see the file(s) listed.

Click Close, then Close out of the Load Application dialog box.
To make them work, you will need to close and re-launch AutoCAD.
Note: There are several Lisp routines on my website on the 'AutoCAD Stuff' page. The Lisp files on that page are zipped for ease of distribution and the instructions are there, too.
Power Tool
Rollover Toggle
 I really like the feature that causes objects to 'light up' when you roll your cursor over them, however…
If you have a 3D drawing with intensely meshed 3D objects or blocks, your system may get really s-l-o-w. If that's the case, consider turning off the Selection Preview feature.
Insights
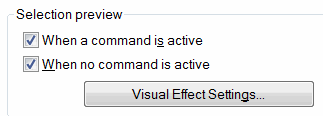
Options![]() Selection tab – This is where you have the two check boxes to toggle off the feature, shown in the figure.
Selection tab – This is where you have the two check boxes to toggle off the feature, shown in the figure.
Express Tools >System Variable Editor – This is where you will find the variable related to this feature – SELECTIONPREVIEW – along with an explanation of the possible settings, which reads:
Controls the display of selection previewing.
Objects are highlighted when the pickbox cursor rolls over them. This selection previewing indicates that the object would be selected if you clicked. The setting is stored as a bitcode using the sum of the following values:
0 Off 1 On when no commands are active 2 On when a command prompts for object selection
Bottom Line: If you want to toggle off the Selection Preview feature, set the SELECTIONPREVIEW variable to <0>… or create a Lisp routine as shown in this month's opening article so you can toggle it On and Off without typing the whole variable name!
The Odd Spot
Disappearing Cursor Solution
 Have you ever had the cursor disappear in the drawing area, but you can see it on the toolbars/Ribbon?? I had this happen in training on a customer's computer yesterday, and I think I found the solution: Change the Visual Style.
Application of the Logic
If you have selected one of the Visual Styles to view your 3D drawing, you know that, by default, the background color changes.
The visibility of the cursor has something to do with the graphics; it was fine a moment ago, and now it's gone.
Therefore, if you change the visual style from what you were using – probably 2D Wireframe – to another style, then back again, it will effectively 'reboot' your cursor graphics.
This worked for Jesse's system, so I'm hoping if you ever encounter this frustrating anomaly, you try this tidbit and see if it works for you.
The Basics
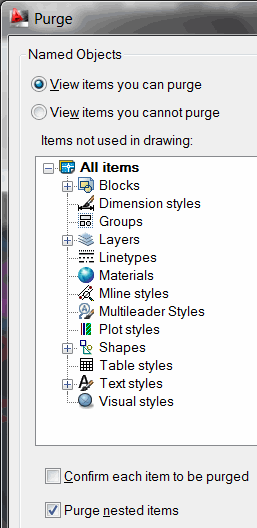
More Powerful Purge Command
 It was great to see my friends from Autodesk at AU last December. I was particularly pleased to be able to chat with Lee Ambrosius, a guy who I have immense respect for, primarily because his customizing skills are so far above and beyond my own.
As many of you know, the PURGE command gives you the opportunity to 'clean out' any unreferenced Blocks, Layers, Dimension Styles, etc. from your drawing. The potential is that it will make your file size smaller; always a good thing.
Not sure how the conversation came around to this, but Lee was saying that there's also a Command line version of the Purge command. When you type -PURGE (keeping in mind the hyphen is the golden key here), you see the following list of options:
Enter type of unused objects to purge[Blocks/Dimstyles/ Groups/LAyers/LTypes/MAterials/MUltileaderstyles/Plotstyles/SHapes/textSTyles/Mlinestyles/Tablestyles/ Visualstyles/Regapps/Zero-length geometry/Empty text objects/All]:
Of particular importance is the option for Regapps (Registered Applications). For a more complete review of the implication of registered applications, see this review regarding performance issues with excess unreferenced regapp IDs from the Autodesk Services & Support site.
Bottom Line: If your system is running slower than normal, try this:
Command: -PURGE

Enter type of unused objects to purge[Blocks… ] R

Enter name(s) to purge <*>: [Enter]

Verify each name to be purged? [Yes/No] <Y>: N
No guarantee, but that may just help your drawing move along a bit quicker.
Thanks, Lee!
Left Field
Petoskey Stones: State Stone of Michigan
 As a kid, our family would go to Michigan for vacation, specifically to Bay View, outside Petoskey on Little Traverse Bay. Over the years, we spent hours scouring the shoreline for Petoskey stones and I have gathered more than I can lift. So here's a little information about this fascinating find.
The Petoskey Stone is a coral that lived during the Devonian age when the northern part of Michigan was covered with a sea of warm water. The scientific name is Hexagonaria percarinata (Hexagonaria meaning having six sides).
The soft living tissue of the corallite was called polyp. At the center of the polyp was the food intake opening or mouth. This dark spot, or the eye of the corallite, has been filled with silt or mud that petrified after falling into the openings. Surrounding the opening were tentacles that were used for gathering food and drawing the food into the mouth. This living corallite thrived on plankton which lived in the warm sea.
Calcite, silica and other minerals have replaced the original elements in each cell. Each chamber or corallite at one time was a living marine animal that grew in colonies. The Petoskey stone is also known as a colony coral.
Credit for this information goes to the Petoskey Area Visitor's Bureau.
Donate to CADTutor
If you found this article useful, you might like to consider making a donation. All content on this site is provided free of charge and we hope to keep it that way. However, running a site like CADTutor does cost money and you can help to improve the service and to guarantee its future by donating a small amount. We guess that you probably wouldn't miss $5.00 but it would make all the difference to us.
Note from Michael: I want to thank all of my customers for continuing to retain my training services (some for over three decades!) and let you know your donations do not go to me personally, but to the ongoing maintenance of the CADTutor ship as a whole and to support the yeoman efforts of my friend and CADTutor captain, David Watson, to whom I am grateful for this monthly opportunity to share a few AutoCAD insights.
Share this page:


The Basics
- Dual Dimensions in a Dim…
- UCSICON Options
- "Best of" Basics: Irreg…
- Tool Palette Basics
- Original Dimension Value
- Possible Solutions to th…
- Avoid Using 'Standard' i…
- Shorten the Plot Scales…
- Update the Source File B…
- User Increment Angles fo…
- Drawing Information
- 'Sign Language'
- Rotate with the Copy Opt…
- Use the INSERT Osnap on…
- To or From the Current L…


