

 Michael’s Corner #72
December 2008
Merry Christmas 2008!
As the Christmas season approaches, I want to let you all know I'm very thankful for each one of you and your interest in the tidbits I post in this monthly column. I'm honored to have been a part of the CADTutor team now for 6 years. I have a couple ideas for the New Year, and will keep you in the loop as those ideas develop.
This month, with the exception of the lead article on customizing a flyout button on a toolbar, all of the topics are AutoCAD 2009-specific. There was no real reason for that, but sooner or later, you're all probably going to be able to benefit from these insights.
Wishing you all a safe and blessed Christmas season and a fabulous New Year!!
If you would like to contact me directly, you can do that also.
Blessings to one and all,
Michael
Creating a Custom Flyout Button on a Toolbar
 One of my customers in Nashville asked about creating a flyout button, and although I am still a proponent of customizing a tool palette, I thought I'd take a look-see. I was pleasantly surprised that the process is actually quite simple.
The following instructions take you through the process, but you may want to also review my coverage from January 2006 on making custom toolbars using the Customize User Interface.
Instructions to Create a Flyout on a Toolbar
- Enter CUI, then press Enter to open the Customize User Interface dialog box.
- Under Customizations In All CUI Files, expand Partial CUI Files, then expand CUSTOM. This will display the collection of customizable interface elements, including Toolbars.
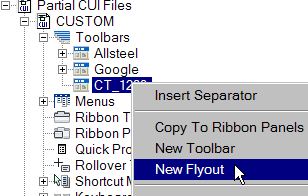
- Right-click on the Toolbar node, then click New Toolbar.
- Enter a name for the toolbar - CT_1208 in my example - then press [Enter].
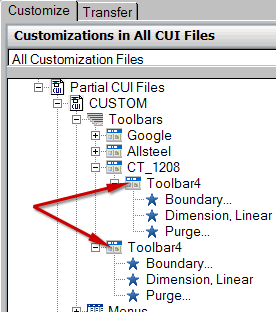
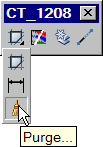
- Right-click on the new toolbar name, then click New Flyout. This creates and offsets a new toolbar node, Toolbarx, where the number indicates it's position in the list.
Note: You will also see a duplicate of the Toolbar at the same indent position as your other custom toolbars.
- At this point, you can populate the flyout toolbar with commands (as well as the new "host" toolbar) as you would normally by dragging commands from the command list and releasing them on the desired toolbar/flyout.
Power Tool
Customizing the A2009 Quick Access Toolbar
 The Quick Access toolbar in A2009 (the tray of icons beside the big red A) seems redundant if you use the AutoCAD Classic workspace, but for those of you/us trying to self-indoctrinate ourselves into using the Ribbon, it's pretty cool and quite useful from a productivity standpoint.
I can't divulge what the "future" holds, but there are changes afoot that are not far away regarding the aforementioned interface, but in this exercise, I wanted to pass along the very simple process of adding commands to that toolbar. Specifically, the Save As command and any others you may want to add while the door's open.
Instructions to Add Commands to the Quick Access Toolbar
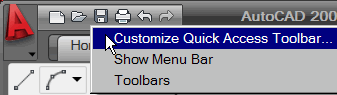
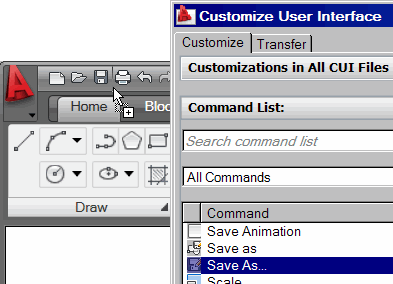
- Right-click on the Quick Access Toolbar, then click Customize Quick Access Toolbar to open a collapsed view of the CUI which displays, primarily, just the Command List.
- Scroll down in the Command List to (there are - strangely - two commands in the list that say ‘Save As', but only one has the three dots after it implying that a dialog box will open). You will also see the command string of ^C^C_saveas when you hover over the command in that list.
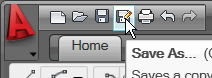
- Drag the command onto the Quick Access toolbar and release it in the desired position.
- Add as many other commands to that toolbar, then click OK to close the CUI and save your edits.
After you have added those commands to that Quick Access Toolbar, what do you do to modify their position? It's actually not very intuitive, and could be more complicated… but I'm not sure how.
 Since the Quick Access Toolbar is Workspace-dependent, you will need to know what Workspace is current.
Instructions to Manage Commands on the Quick Access Toolbar
- Identify your current workspace by clicking on the Workspace Switching button in the bottom right corner of the status bar. In the list displaying existing workspaces, your current workspace will have a check beside it.
- Type CUI at the Command line, then press [Enter].
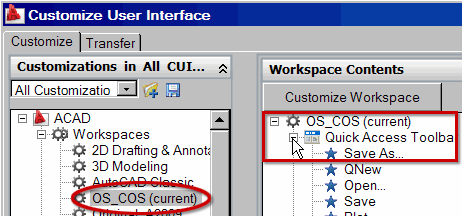
- Under the listing of Workspaces, click on the workspace that is (current) to display the Workspace Contents area on the opposite side of the CUI.
- Expand the Quick Access Toolbar node to display the commands on that toolbar.
- Move the commands to the desired location, then click OK to apply and save the changes.
The Odd Spot
Locked Layers Fade Value
 I wrote about the variable LAYLOCKFADECTL in July 2007 which is the variable that adjusts the fade value for locked layers. Very clunky to say the least. In A2009, however, we now have a slider for that adjustment.
Instructions to Adjust the Layer Lock Fading in A2009
- Open a drawing, then open the Layer Properties Manager.
- In the upper right corner, click on the wrench icon which will open the Layer Settings dialog box.
- Under Isolate Layer Settings, click the radio button for Lock And Fade, the you can adjust the slider.
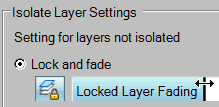
…but then, by the time you have done that, you could have typed LAYLOCKFADECTL and entered an integer between -90 and 90. Which then begs the question, "what happens if the number is less than 0?"
Per AutoCAD's Help: When the value is negative, locked layers are not faded, but the value is saved for switching to that value by changing the sign.
Reason enough to file this under "Odd Spot".
The Basics
A2009 File Preview Images
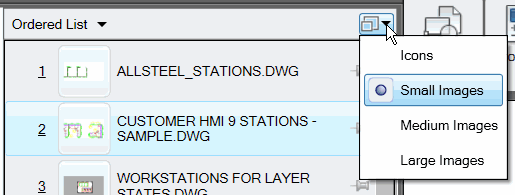
![]() While we're talking about A2009 - and particularly the big red "A" (officially named the "Menu Browser") there is an inconspicuous feature that is available when you view Recent Documents that you may not have been aware of.
While we're talking about A2009 - and particularly the big red "A" (officially named the "Menu Browser") there is an inconspicuous feature that is available when you view Recent Documents that you may not have been aware of.
First, click Menu Browser (the big red A).
Next, click Recent Documents (down at the bottom) to display a list of the last 10 drawings you opened.
Now, click the (unnamed) button in the upper right corner of that drawing list to see the file display options - Icons, Small Images, Medium Images, or Large Images.
Sweet!
To give credit where credit is due, I think I found this tidbit of information in something Heidi Hewett had on her blog. Heidi is an employee of Autodesk and is the person responsible for the AutoCAD Preview Guides. If you have not visited Heidi's blog site, check it out, especially if you didn't have the opportunity to visit Autodesk University this year. http://heidihewett.blogs.com
Left Field
Why was there no room at the inn? - Bethlehem is only about 5 miles from Jerusalem, and all the men of Israel had come to attend the festival of Tabernacles as required by the law of Moses. Every room for miles around Jerusalem would have been already taken by pilgrims, so all that Mary and Joseph could find for shelter was a stable. (You'll find the complete Christmas story in Luke 2:1-14.)
6 Years of top-class content!
I would like to thank Michael on behalf of all his readers for yet another excellent year (his 6th) of articles. How he manages to keep this up month after month I'll never know but we are very glad that he does.
Thank you Michael and here's to a successful 7th year in 2009.
David Watson
Donate to CADTutor
If you found this article useful, you might like to consider making a donation. All content on this site is provided free of charge and we hope to keep it that way. However, running a site like CADTutor does cost money and you can help to improve the service and to guarantee its future by donating a small amount. We guess that you probably wouldn't miss $5.00 but it would make all the difference to us.
Note from Michael: I want to thank all of my customers for continuing to retain my training services (some for over three decades!) and let you know your donations do not go to me personally, but to the ongoing maintenance of the CADTutor ship as a whole and to support the yeoman efforts of my friend and CADTutor captain, David Watson, to whom I am grateful for this monthly opportunity to share a few AutoCAD insights.
Share this page:


The Basics
- Dual Dimensions in a Dim…
- UCSICON Options
- "Best of" Basics: Irreg…
- Tool Palette Basics
- Original Dimension Value
- Possible Solutions to th…
- Avoid Using 'Standard' i…
- Shorten the Plot Scales…
- Update the Source File B…
- User Increment Angles fo…
- Drawing Information
- 'Sign Language'
- Rotate with the Copy Opt…
- Use the INSERT Osnap on…
- To or From the Current L…


